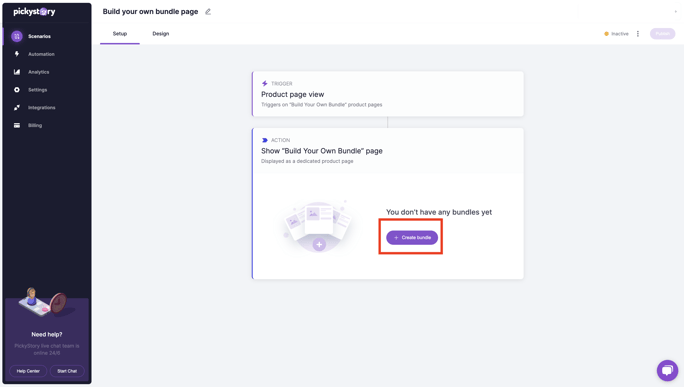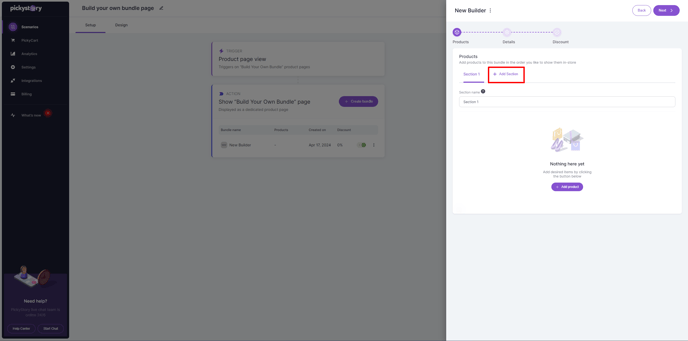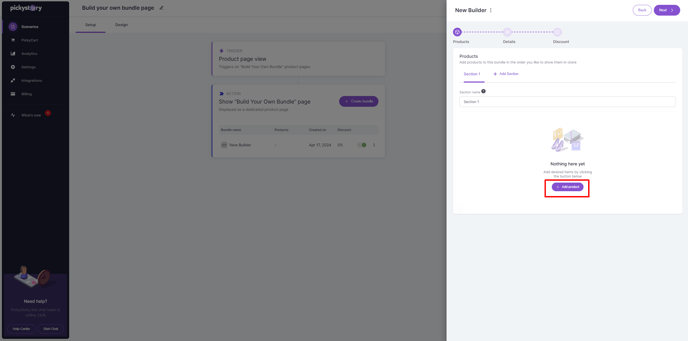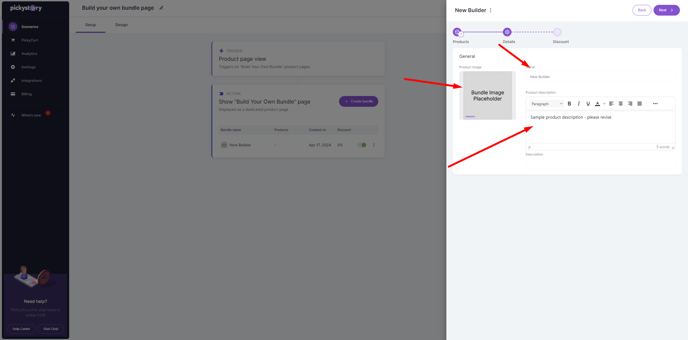
# Select a product

<table data-view="cards" data-full-width="false"><thead><tr><th></th><th></th><th data-hidden data-card-target data-type="content-ref"></th><th data-hidden data-card-cover data-type="files"></th><th data-hidden></th></tr></thead><tbody><tr><td><strong>Bundles &#x26; Upsell</strong></td><td>Product bundles and upsell strategies that drive customers to buy more.</td><td><a href="https://support.heyamplify.com/bundles-and-upsell">https://support.heyamplify.com/bundles-and-upsell</a></td><td><a href="/files/7oLpMOWWUXWKgqi1Du4J">/files/7oLpMOWWUXWKgqi1Du4J</a></td><td></td></tr><tr><td><strong>Cart &#x26; Checkout</strong></td><td>Intelligent cart and post-purchase strategies to maximize your orders</td><td><a href="/spaces/wr3WKkdPthY5q7z19yUd/pages/cip7qovYul25Wbf0BiAA">/spaces/wr3WKkdPthY5q7z19yUd/pages/cip7qovYul25Wbf0BiAA</a></td><td><a href="/files/IGwwuiYDJVpbXokx5hCQ">/files/IGwwuiYDJVpbXokx5hCQ</a></td><td></td></tr><tr><td><strong>Subscriptions</strong></td><td>Subscriptions designed to retain customers cycle after cycle</td><td><a href="https://support.heyamplify.com/subscriptions">https://support.heyamplify.com/subscriptions</a></td><td><a href="/files/Jlaa0lopIpfzp28p1WdK">/files/Jlaa0lopIpfzp28p1WdK</a></td><td></td></tr></tbody></table>

## Frequently Asked Questions

<details>

<summary>Does Amplify offer free trial?</summary>

Yes, Amplify offers a 30-day free trial on all applications that allows you to explore all features and generate revenue without any initial costs. During this period, you can test the app’s capabilities and decide if it’s the right fit for your store.​

</details>

<details>

<summary>Does Amplify track product inventory?</summary>

Amplify was designed to automatically track the inventory of all the products that are part of a deal on a variant/SKU basis. This means that every time your customer picks a deal, Amplify will track the inventory of the deal's individual products to make sure your stock is up to date.

</details>

<details>

<summary>Does Amplify offer customizations for widgets?</summary>

Yes, Amplify allows you to customize widgets extensively, including colors, fonts, and styles, to align with your store’s branding. You can also tailor the functionality and behavior of the widgets to fit your specific needs.​

</details>

<details>

<summary>Does Amplify require coding skills?</summary>

No. Amplify was built to work without any further development or coding skills. Merchants can easily create bundles and add bundles to multiple locations in their stores.

</details>

<details>

<summary>Does Amplify work with my Shopify theme?</summary>

Yes. Amplify is designed to work with any Shopify theme so you don't need to worry about compatibility issues. You can also reposition your bundles with just a few clicks.

</details>


# Bundles & Upsell

<table data-view="cards"><thead><tr><th></th><th></th><th></th></tr></thead><tbody><tr><td></td><td></td><td></td></tr><tr><td></td><td></td><td></td></tr><tr><td></td><td></td><td></td></tr><tr><td></td><td></td><td></td></tr><tr><td></td><td></td><td></td></tr><tr><td></td><td></td><td></td></tr></tbody></table>


# Bundle as product


# How to create a Bundle as product scenario

Create bundles sold as products and add them to collections

{% hint style="info" %}
This feature is available to customers who installed the app **after November 14th, 2023**
{% endhint %}

Bundles as products are aggregated into one single product pack. This Shopify product pack is treated as one product in your store (and has its own product page) rather than being an addition to existing products in your store.\
\
Steps to create:\
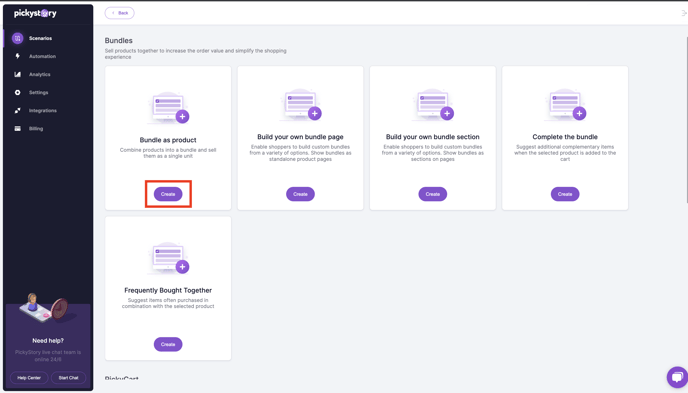
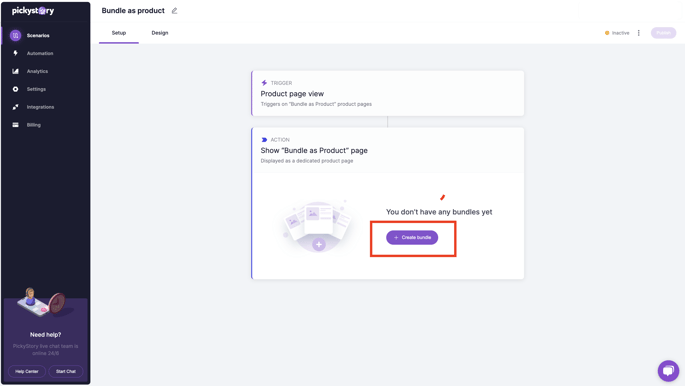
1\. Go to Scenarios, and click on create-&#x20;

<img src="https://25037085.fs1.hubspotusercontent-eu1.net/hub/25037085/hubfs/image-png-Nov-20-2023-07-30-05-1928-AM.png?width=688&#x26;height=394&#x26;name=image-png-Nov-20-2023-07-30-05-1928-AM.png" alt="" height="394" width="688">

\
2\. Create a new bundle- <br>

<figure><img src="https://25037085.fs1.hubspotusercontent-eu1.net/hub/25037085/hubfs/image-png-Nov-20-2023-07-31-13-4065-AM.png?width=685&#x26;height=1613&#x26;name=image-png-Nov-20-2023-07-31-13-4065-AM.png" alt=""><figcaption></figcaption></figure>

3\. GIve the bundle a name and add an image and description (image and description will be updated on the Shopify end as well)&#x20;

![](https://25037085.fs1.hubspotusercontent-eu1.net/hub/25037085/hubfs/image-png-Nov-20-2023-07-33-38-9909-AM.png?width=685\&height=1601\&name=image-png-Nov-20-2023-07-33-38-9909-AM.png)

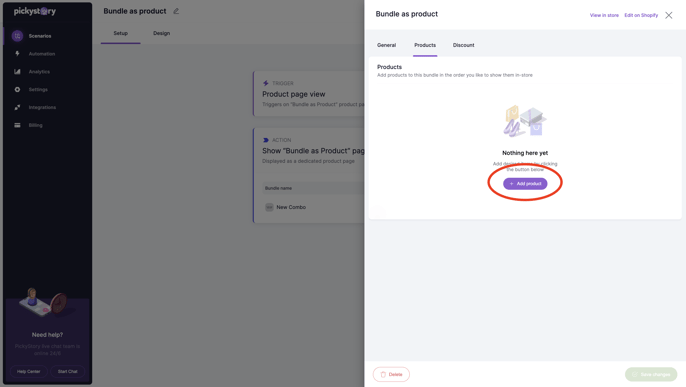
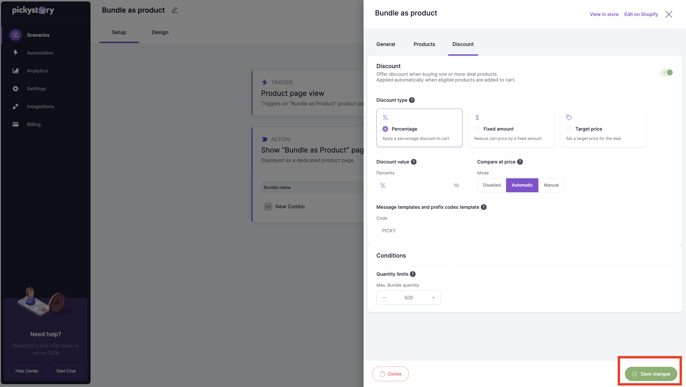
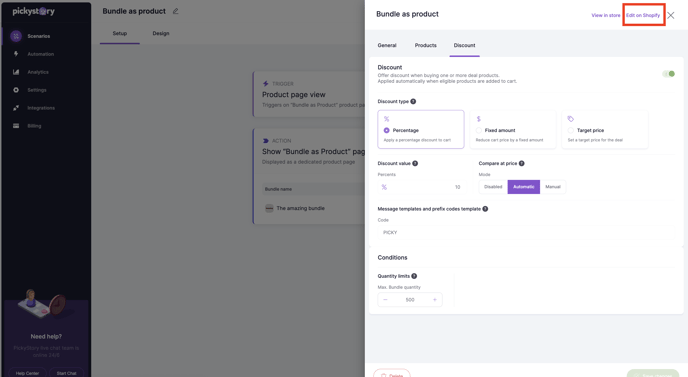
4\. Add the products, set the discount and save the new changes-&#x20;

<figure><img src="https://25037085.fs1.hubspotusercontent-eu1.net/hub/25037085/hubfs/image-png-Nov-20-2023-07-34-48-8140-AM.png?width=686&#x26;height=1621&#x26;name=image-png-Nov-20-2023-07-34-48-8140-AM.png" alt=""><figcaption></figcaption></figure>

<figure><img src="https://25037085.fs1.hubspotusercontent-eu1.net/hub/25037085/hubfs/image-png-Nov-20-2023-07-36-28-8400-AM.png?width=686&#x26;height=1619&#x26;name=image-png-Nov-20-2023-07-36-28-8400-AM.png" alt=""><figcaption></figcaption></figure>

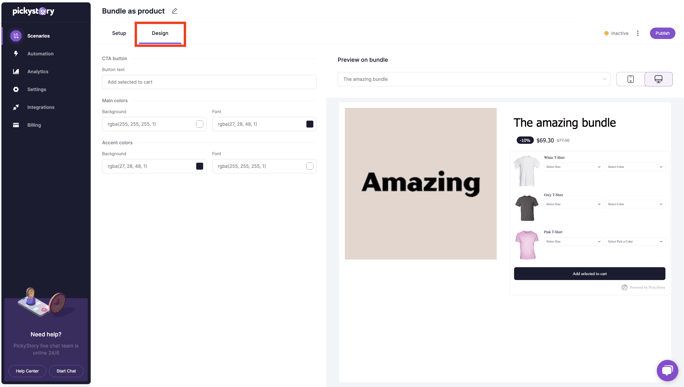
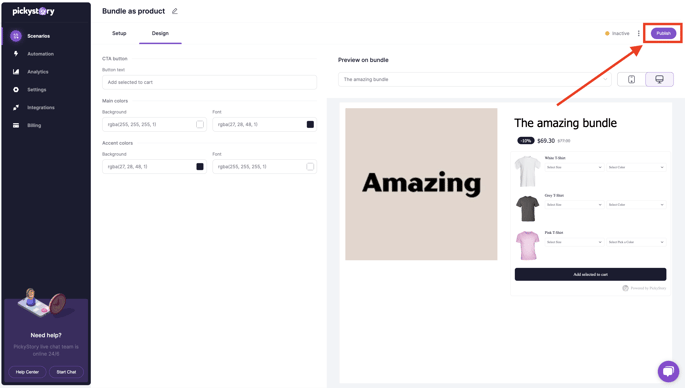
4\. Go to the Design tab and customize the scenario-

<figure><img src="https://25037085.fs1.hubspotusercontent-eu1.net/hub/25037085/hubfs/image-png-Nov-20-2023-07-38-45-7013-AM.png?width=684&#x26;height=1619&#x26;name=image-png-Nov-20-2023-07-38-45-7013-AM.png" alt=""><figcaption></figcaption></figure>

5\. Publish the scenario-

<figure><img src="https://25037085.fs1.hubspotusercontent-eu1.net/hub/25037085/hubfs/image-png-Nov-20-2023-07-39-16-8290-AM.png?width=685&#x26;height=1621&#x26;name=image-png-Nov-20-2023-07-39-16-8290-AM.png" alt=""><figcaption></figcaption></figure>

**The Bundle is now live in your store! 🎉**

&#x20;

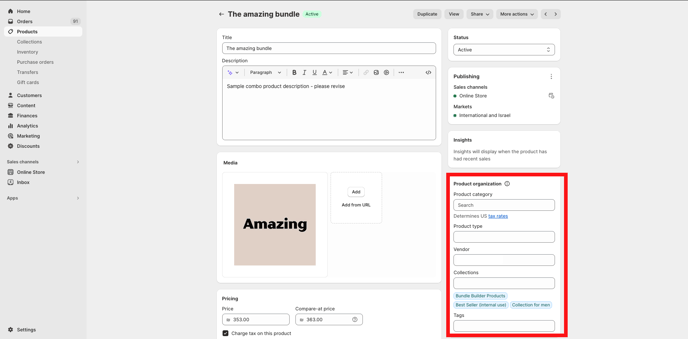
\*If you want to add the bundle to a specific collection, add tags or product category-

1\. Click on Edit on Shopify-

<figure><img src="https://25037085.fs1.hubspotusercontent-eu1.net/hub/25037085/hubfs/image-png-Nov-20-2023-07-42-28-0317-AM.png?width=688&#x26;height=1576&#x26;name=image-png-Nov-20-2023-07-42-28-0317-AM.png" alt=""><figcaption></figcaption></figure>

2\. Add all the information in Product organization-

<figure><img src="https://25037085.fs1.hubspotusercontent-eu1.net/hub/25037085/hubfs/image-png-Nov-20-2023-07-44-37-9345-AM.png?width=688&#x26;height=936&#x26;name=image-png-Nov-20-2023-07-44-37-9345-AM.png" alt=""><figcaption></figcaption></figure>


# Build your own bundle page


# How to create a Build your own bundle page scenario

Let customers create custom bundles with "Build your own bundle" and show it as a product in your store

{% hint style="info" %}
This feature is available to customers who installed the app **after November 14th, 2023**
{% endhint %}

Steps to create:\
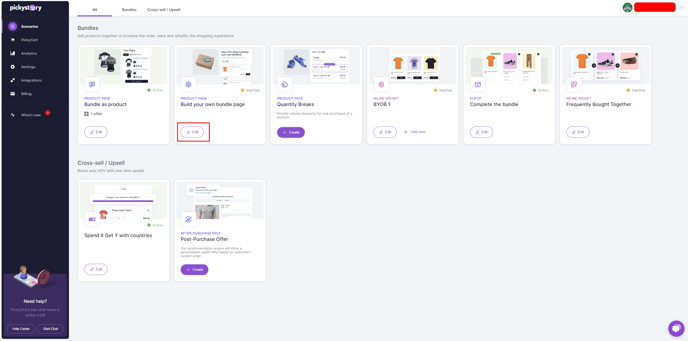
1\. Go to Scenarios, and click on Create/Edit-&#x20;

<figure><img src="https://25037085.fs1.hubspotusercontent-eu1.net/hub/25037085/hubfs/image-png-Apr-17-2024-04-16-48-3331-PM.png?width=688&#x26;height=341&#x26;name=image-png-Apr-17-2024-04-16-48-3331-PM.png" alt=""><figcaption></figcaption></figure>

2\. Create a new bundle- <br>

<figure><img src="https://25037085.fs1.hubspotusercontent-eu1.net/hub/25037085/hubfs/image-png-Nov-20-2023-08-00-18-0088-AM.png?width=684&#x26;height=1621&#x26;name=image-png-Nov-20-2023-08-00-18-0088-AM.png" alt=""><figcaption></figcaption></figure>

3\. In Products, you can create one section or multiple sections &#x20;

<figure><img src="https://25037085.fs1.hubspotusercontent-eu1.net/hub/25037085/hubfs/image-png-Apr-17-2024-04-18-56-9392-PM.png?width=688&#x26;height=342&#x26;name=image-png-Apr-17-2024-04-18-56-9392-PM.png" alt=""><figcaption></figcaption></figure>

4\. Add the products-

<figure><img src="https://25037085.fs1.hubspotusercontent-eu1.net/hub/25037085/hubfs/image-png-Apr-17-2024-04-19-17-2282-PM.png?width=688&#x26;height=341&#x26;name=image-png-Apr-17-2024-04-19-17-2282-PM.png" alt=""><figcaption></figcaption></figure>

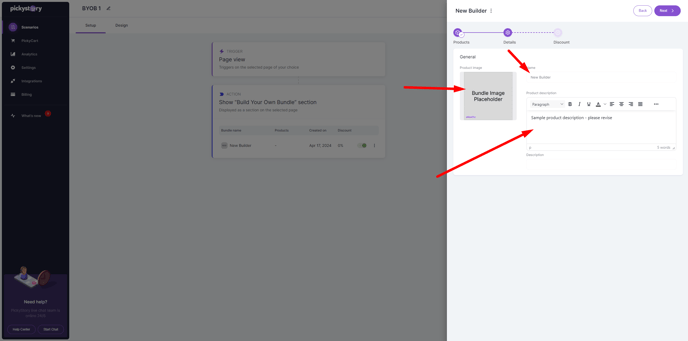
5\. In Details, give the builder a name and add an image and description (the image and description will be updated on Shopify's end as well)&#x20;

<img src="https://25037085.fs1.hubspotusercontent-eu1.net/hub/25037085/hubfs/image-png-Apr-17-2024-04-18-04-6984-PM.png?width=688&#x26;height=340&#x26;name=image-png-Apr-17-2024-04-18-04-6984-PM.png" alt="" height="340" width="688">

6\. Set the discount and save the new changes-
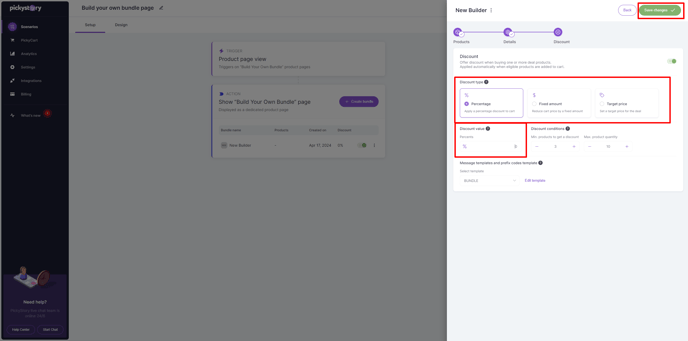
<img src="https://25037085.fs1.hubspotusercontent-eu1.net/hub/25037085/hubfs/image-png-Apr-17-2024-04-20-08-8481-PM.png?width=688&#x26;height=341&#x26;name=image-png-Apr-17-2024-04-20-08-8481-PM.png" alt="" height="341" width="688">

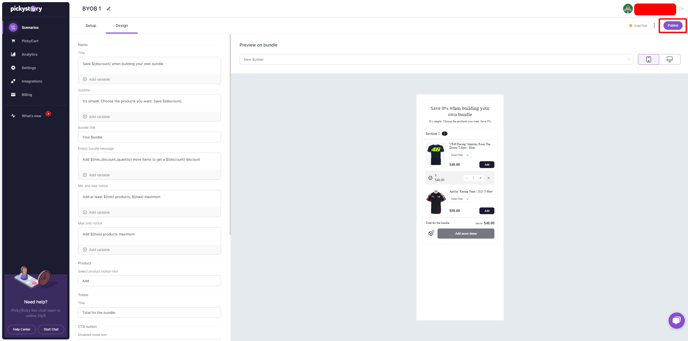
7\. Go to the Design tab to customize the Scenario-
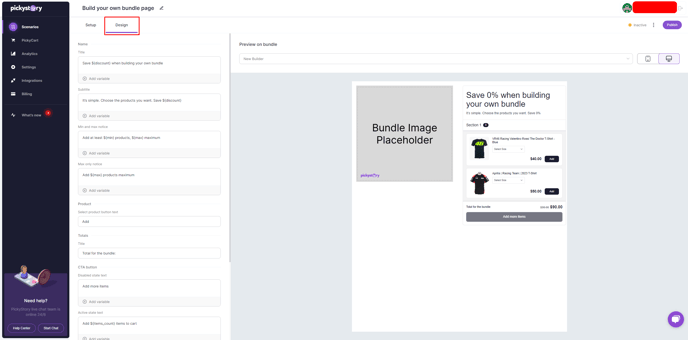
<img src="https://25037085.fs1.hubspotusercontent-eu1.net/hub/25037085/hubfs/image-png-Apr-17-2024-04-21-33-8231-PM.png?width=688&#x26;height=341&#x26;name=image-png-Apr-17-2024-04-21-33-8231-PM.png" alt="" height="341" width="688">

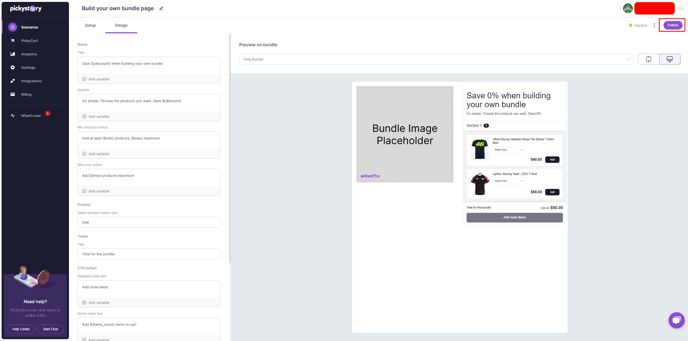
8\. Publish the scenario-

&#x20;

<figure><img src="https://25037085.fs1.hubspotusercontent-eu1.net/hub/25037085/hubfs/image-png-Apr-17-2024-04-22-00-9521-PM.png?width=688&#x26;height=342&#x26;name=image-png-Apr-17-2024-04-22-00-9521-PM.png" alt=""><figcaption></figcaption></figure>

**The Builder is now live in your store! 🎉**

&#x20;

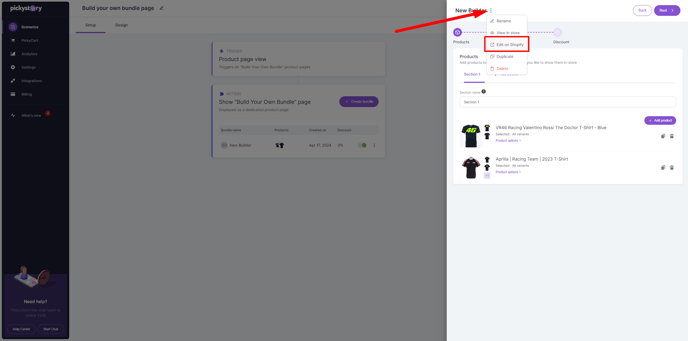
\*If you want to add the bundle to a specific collection, add tags or product category-1. Click on Edit on Shopify-

&#x20;\
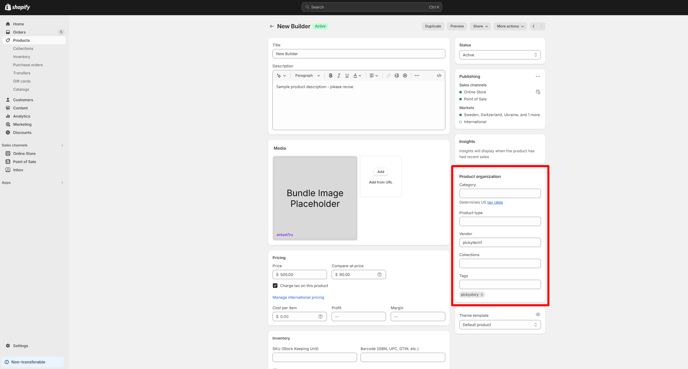
2\. Add all the information in Product organization-

<figure><img src="https://25037085.fs1.hubspotusercontent-eu1.net/hub/25037085/hubfs/image-png-Apr-17-2024-04-22-29-5577-PM.png?width=688&#x26;height=341&#x26;name=image-png-Apr-17-2024-04-22-29-5577-PM.png" alt=""><figcaption></figcaption></figure>

&#x20;

<figure><img src="https://25037085.fs1.hubspotusercontent-eu1.net/hub/25037085/hubfs/image-png-Apr-17-2024-04-22-57-8859-PM.png?width=688&#x26;height=370&#x26;name=image-png-Apr-17-2024-04-22-57-8859-PM.png" alt=""><figcaption></figcaption></figure>

<br>


# Quantity Breaks


# How to create a Quantity Breaks scenario?

Quantity Breaks allows you to offer volume discount for products in their own product pages

Steps to create:

1\. Go to Scenarios and click on Create/Edit-

![](https://25037085.fs1.hubspotusercontent-eu1.net/hub/25037085/hubfs/image-png-Apr-17-2024-07-43-24-7200-PM.png?width=2557\&height=1265\&name=image-png-Apr-17-2024-07-43-24-7200-PM.png)

2\. Click on Create QB-

![](https://25037085.fs1.hubspotusercontent-eu1.net/hub/25037085/hubfs/image-png-Apr-17-2024-07-44-06-3495-PM.png?width=2553\&height=1266\&name=image-png-Apr-17-2024-07-44-06-3495-PM.png)

3\. Add products. If you want to offer volume discount on multiple products, just add more-

![](https://25037085.fs1.hubspotusercontent-eu1.net/hub/25037085/hubfs/image-png-Apr-17-2024-07-44-57-5575-PM.png?width=2551\&height=1264\&name=image-png-Apr-17-2024-07-44-57-5575-PM.png)

4\. On Discount Rules, add new tiers, name each tier, set the number for the discount and set the discount. Then click on Save Changes-

![](https://25037085.fs1.hubspotusercontent-eu1.net/hub/25037085/hubfs/image-png-Apr-17-2024-07-46-09-9336-PM.png?width=2552\&height=1268\&name=image-png-Apr-17-2024-07-46-09-9336-PM.png)

5\. Go to the Design tab to customize the Scenario-

![](https://25037085.fs1.hubspotusercontent-eu1.net/hub/25037085/hubfs/image-png-Apr-17-2024-07-47-51-6617-PM.png?width=2553\&height=1264\&name=image-png-Apr-17-2024-07-47-51-6617-PM.png)

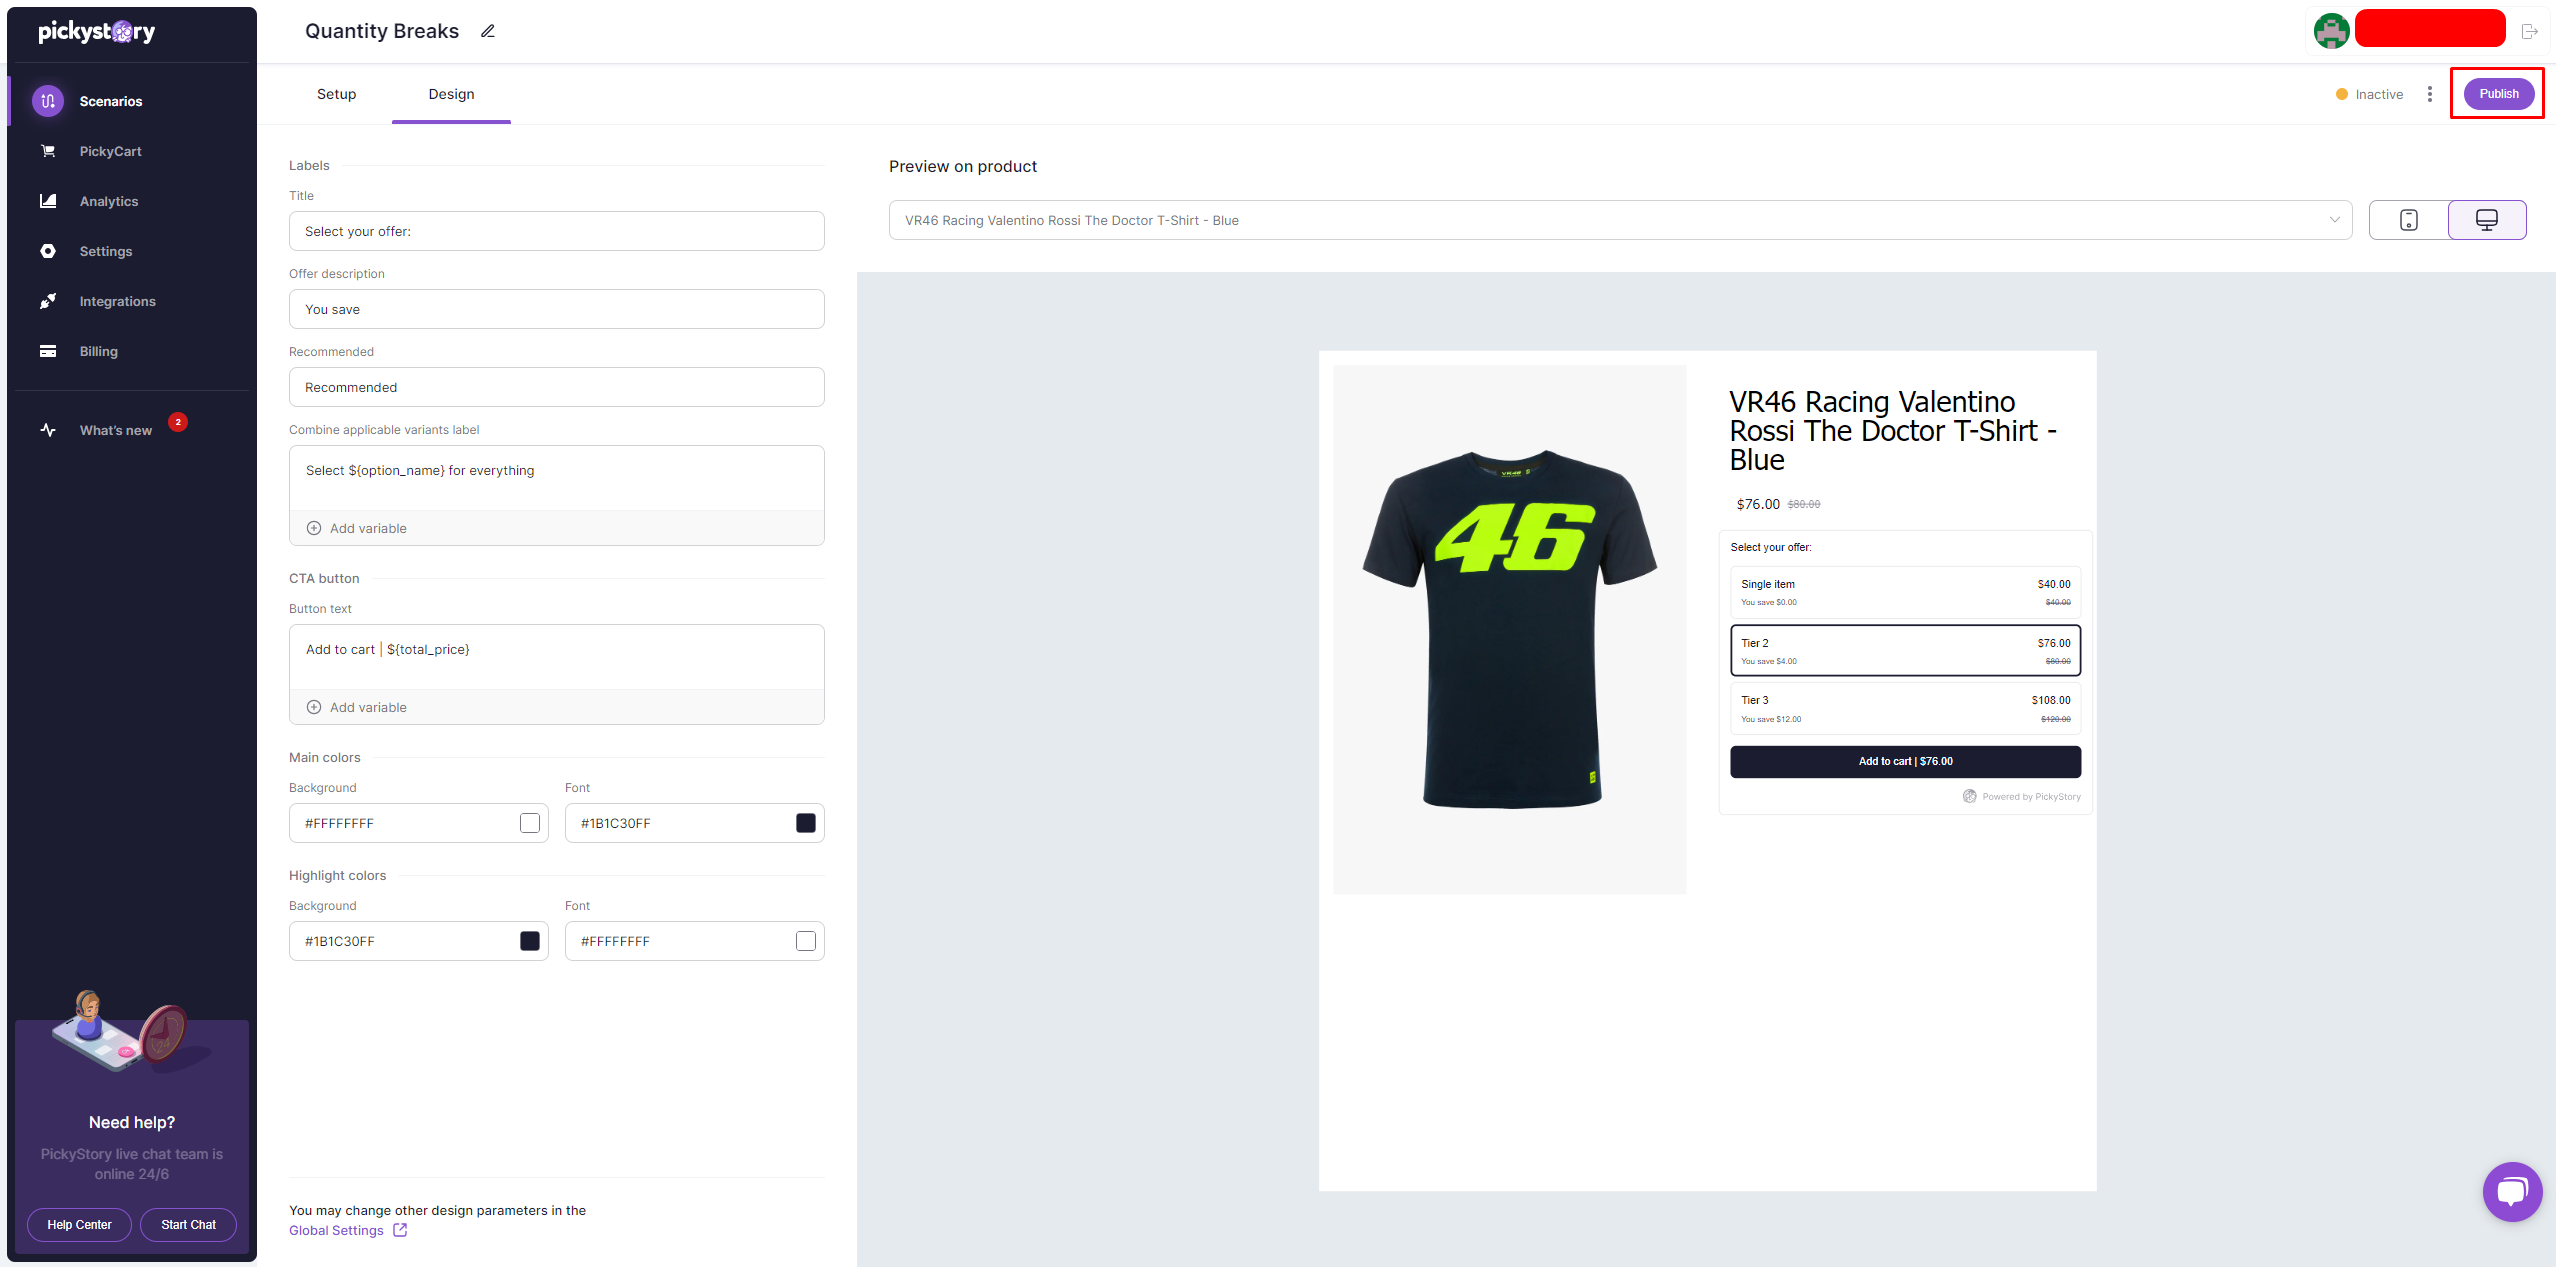
6\. Publish the scenario-

<div align="left"><img src="https://25037085.fs1.hubspotusercontent-eu1.net/hub/25037085/hubfs/image-png-Apr-17-2024-07-48-34-7807-PM.png?width=2556&#x26;height=1267&#x26;name=image-png-Apr-17-2024-07-48-34-7807-PM.png" alt=""></div>

**The Quantity Breaks Scenario is now live in your store! 🎉**<br>


# Build your own bundle section


# How to create a Build Your Own Bundle section scenario

Let customers create custom bundles with "Build your own bundle"

{% hint style="info" %}
This feature is available to customers who installed the app **after November 14th, 2023**
{% endhint %}

Steps to create:\
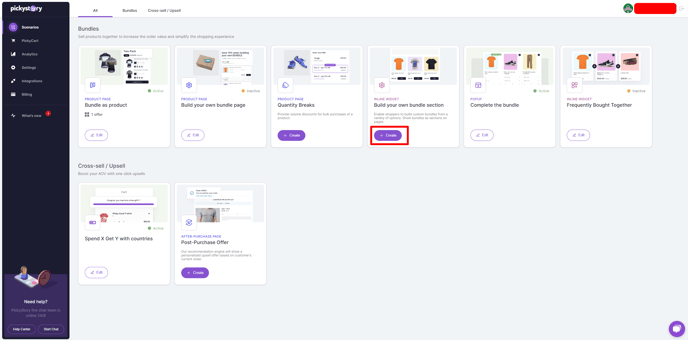
1\. Go to Scenarios, and click on Create/Edit-

<img src="https://25037085.fs1.hubspotusercontent-eu1.net/hub/25037085/hubfs/image-png-Apr-17-2024-04-40-04-6781-PM.png?width=688&#x26;height=341&#x26;name=image-png-Apr-17-2024-04-40-04-6781-PM.png" alt="" height="341" width="688">

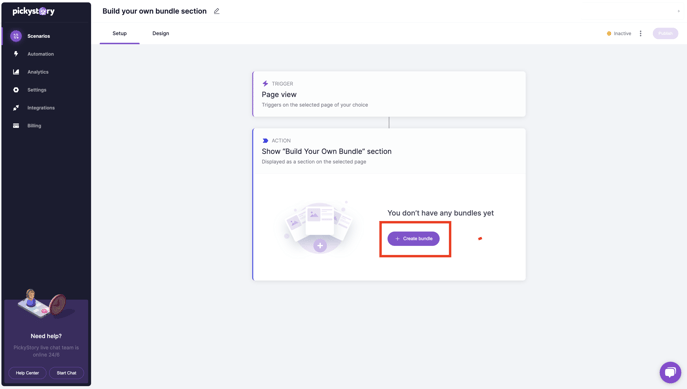
2\. Create a new bundle-<br>

<figure><img src="https://25037085.fs1.hubspotusercontent-eu1.net/hub/25037085/hubfs/Screenshot%202023-11-20%20at%2013-18-40-png.png?width=687&#x26;height=1626&#x26;name=Screenshot%202023-11-20%20at%2013-18-40-png.png" alt=""><figcaption></figcaption></figure>

2.1 You can also switch between different "Build your Bundle section" bundles -

![](https://25037085.fs1.hubspotusercontent-eu1.net/hub/25037085/hubfs/image-png-Apr-17-2024-07-23-03-3160-PM.png?width=2552\&height=1263\&name=image-png-Apr-17-2024-07-23-03-3160-PM.png)

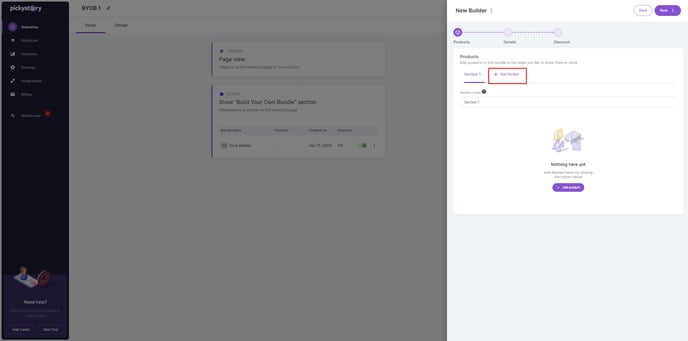
3\. You can create one section or multiple sections-

<figure><img src="https://25037085.fs1.hubspotusercontent-eu1.net/hub/25037085/hubfs/image-png-Apr-17-2024-04-33-52-3968-PM.png?width=688&#x26;height=341&#x26;name=image-png-Apr-17-2024-04-33-52-3968-PM.png" alt=""><figcaption></figcaption></figure>

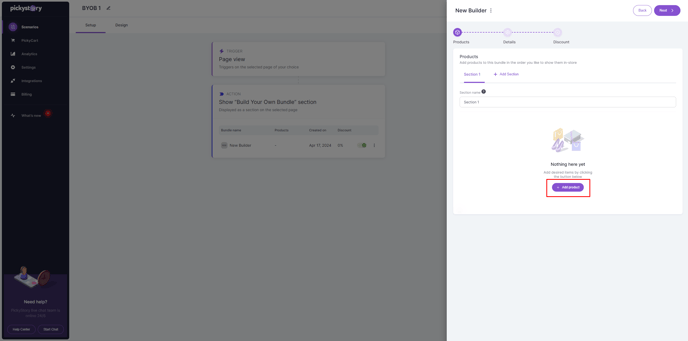
4\. Add the products-&#x20;

<figure><img src="https://25037085.fs1.hubspotusercontent-eu1.net/hub/25037085/hubfs/image-png-Apr-17-2024-04-34-10-4130-PM.png?width=688&#x26;height=341&#x26;name=image-png-Apr-17-2024-04-34-10-4130-PM.png" alt=""><figcaption></figcaption></figure>

5\. Give the builder a name and add an image and description-

<img src="https://25037085.fs1.hubspotusercontent-eu1.net/hub/25037085/hubfs/image-png-Apr-17-2024-04-33-28-6697-PM.png?width=688&#x26;height=342&#x26;name=image-png-Apr-17-2024-04-33-28-6697-PM.png" alt="" height="342" width="688">

6\. Set the discount and save the new changes-
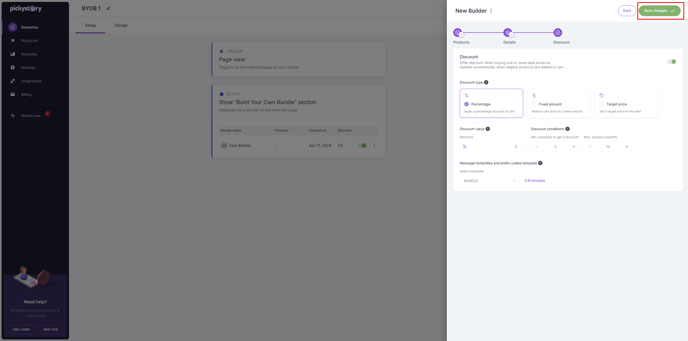
<img src="https://25037085.fs1.hubspotusercontent-eu1.net/hub/25037085/hubfs/image-png-Apr-17-2024-04-34-42-9068-PM.png?width=688&#x26;height=342&#x26;name=image-png-Apr-17-2024-04-34-42-9068-PM.png" alt="" height="342" width="688">

7\. Go to the Design tab and customize the scenario-
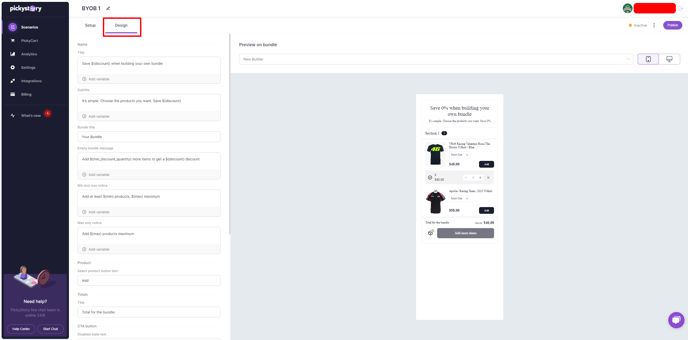
<img src="https://25037085.fs1.hubspotusercontent-eu1.net/hub/25037085/hubfs/image-png-Apr-17-2024-04-36-28-4993-PM.png?width=688&#x26;height=341&#x26;name=image-png-Apr-17-2024-04-36-28-4993-PM.png" alt="" height="341" width="688">

8\. Publish the scenario-

&#x20;

<figure><img src="https://25037085.fs1.hubspotusercontent-eu1.net/hub/25037085/hubfs/image-png-Apr-17-2024-04-36-57-2467-PM.png?width=688&#x26;height=342&#x26;name=image-png-Apr-17-2024-04-36-57-2467-PM.png" alt=""><figcaption></figcaption></figure>

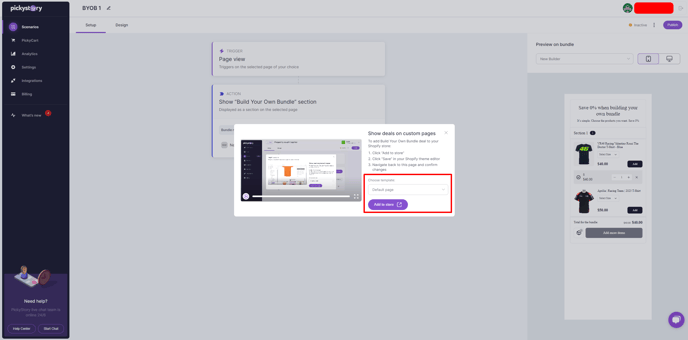
9\. Choose the template and click on "Add to store", you will be redirected to Shopify's editor-

<img src="https://25037085.fs1.hubspotusercontent-eu1.net/hub/25037085/hubfs/image-png-Apr-17-2024-04-37-30-2658-PM.png?width=688&#x26;height=341&#x26;name=image-png-Apr-17-2024-04-37-30-2658-PM.png" alt="" height="341" width="688">

10\. PickyStory app block will appear on the page-
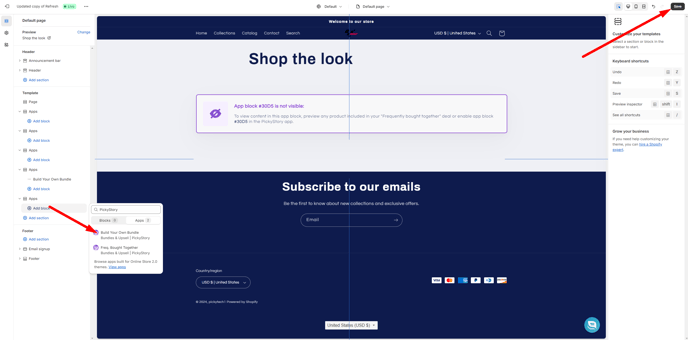
<img src="https://25037085.fs1.hubspotusercontent-eu1.net/hub/25037085/hubfs/image-png-Apr-17-2024-04-38-34-7392-PM.png?width=688&#x26;height=340&#x26;name=image-png-Apr-17-2024-04-38-34-7392-PM.png" alt="" height="340" width="688">

\*\*In case it is not showing, click on "add block" under "apps" and add "build your own bundle" by PickyStory.

Then save changes.&#x20;

11\. Once the offer is live on the page, you will see a confirmation in the app-
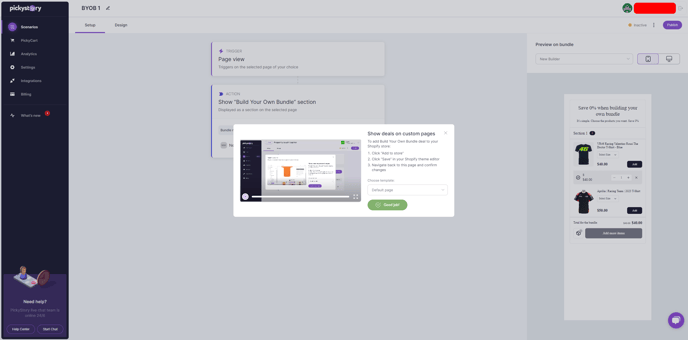
<img src="https://25037085.fs1.hubspotusercontent-eu1.net/hub/25037085/hubfs/image-png-Apr-17-2024-04-39-08-3077-PM.png?width=688&#x26;height=340&#x26;name=image-png-Apr-17-2024-04-39-08-3077-PM.png" alt="" height="340" width="688">

**The Builder is now live in your store! 🎉**
<br>


# Complete the bundle


# How to create a Complete the Bundle scenario

Creating a Complete the Bundle Scenario

{% hint style="info" %}
This feature is available to customers who installed the app **after October 19th, 2023**
{% endhint %}

Complete the Bundle is great for promoting popular product combinations to increase AOV. You can choose between custom or automated product combinations. You can also mix both.\
\
When displayed on product pages, by default, frequently Complete the Bundle will be shown on all product pages that are part of the bundle.\
\
If automated bundles are enabled, they will be shown on pages where custom bundles couldn't be found.\
\
Steps to create:\
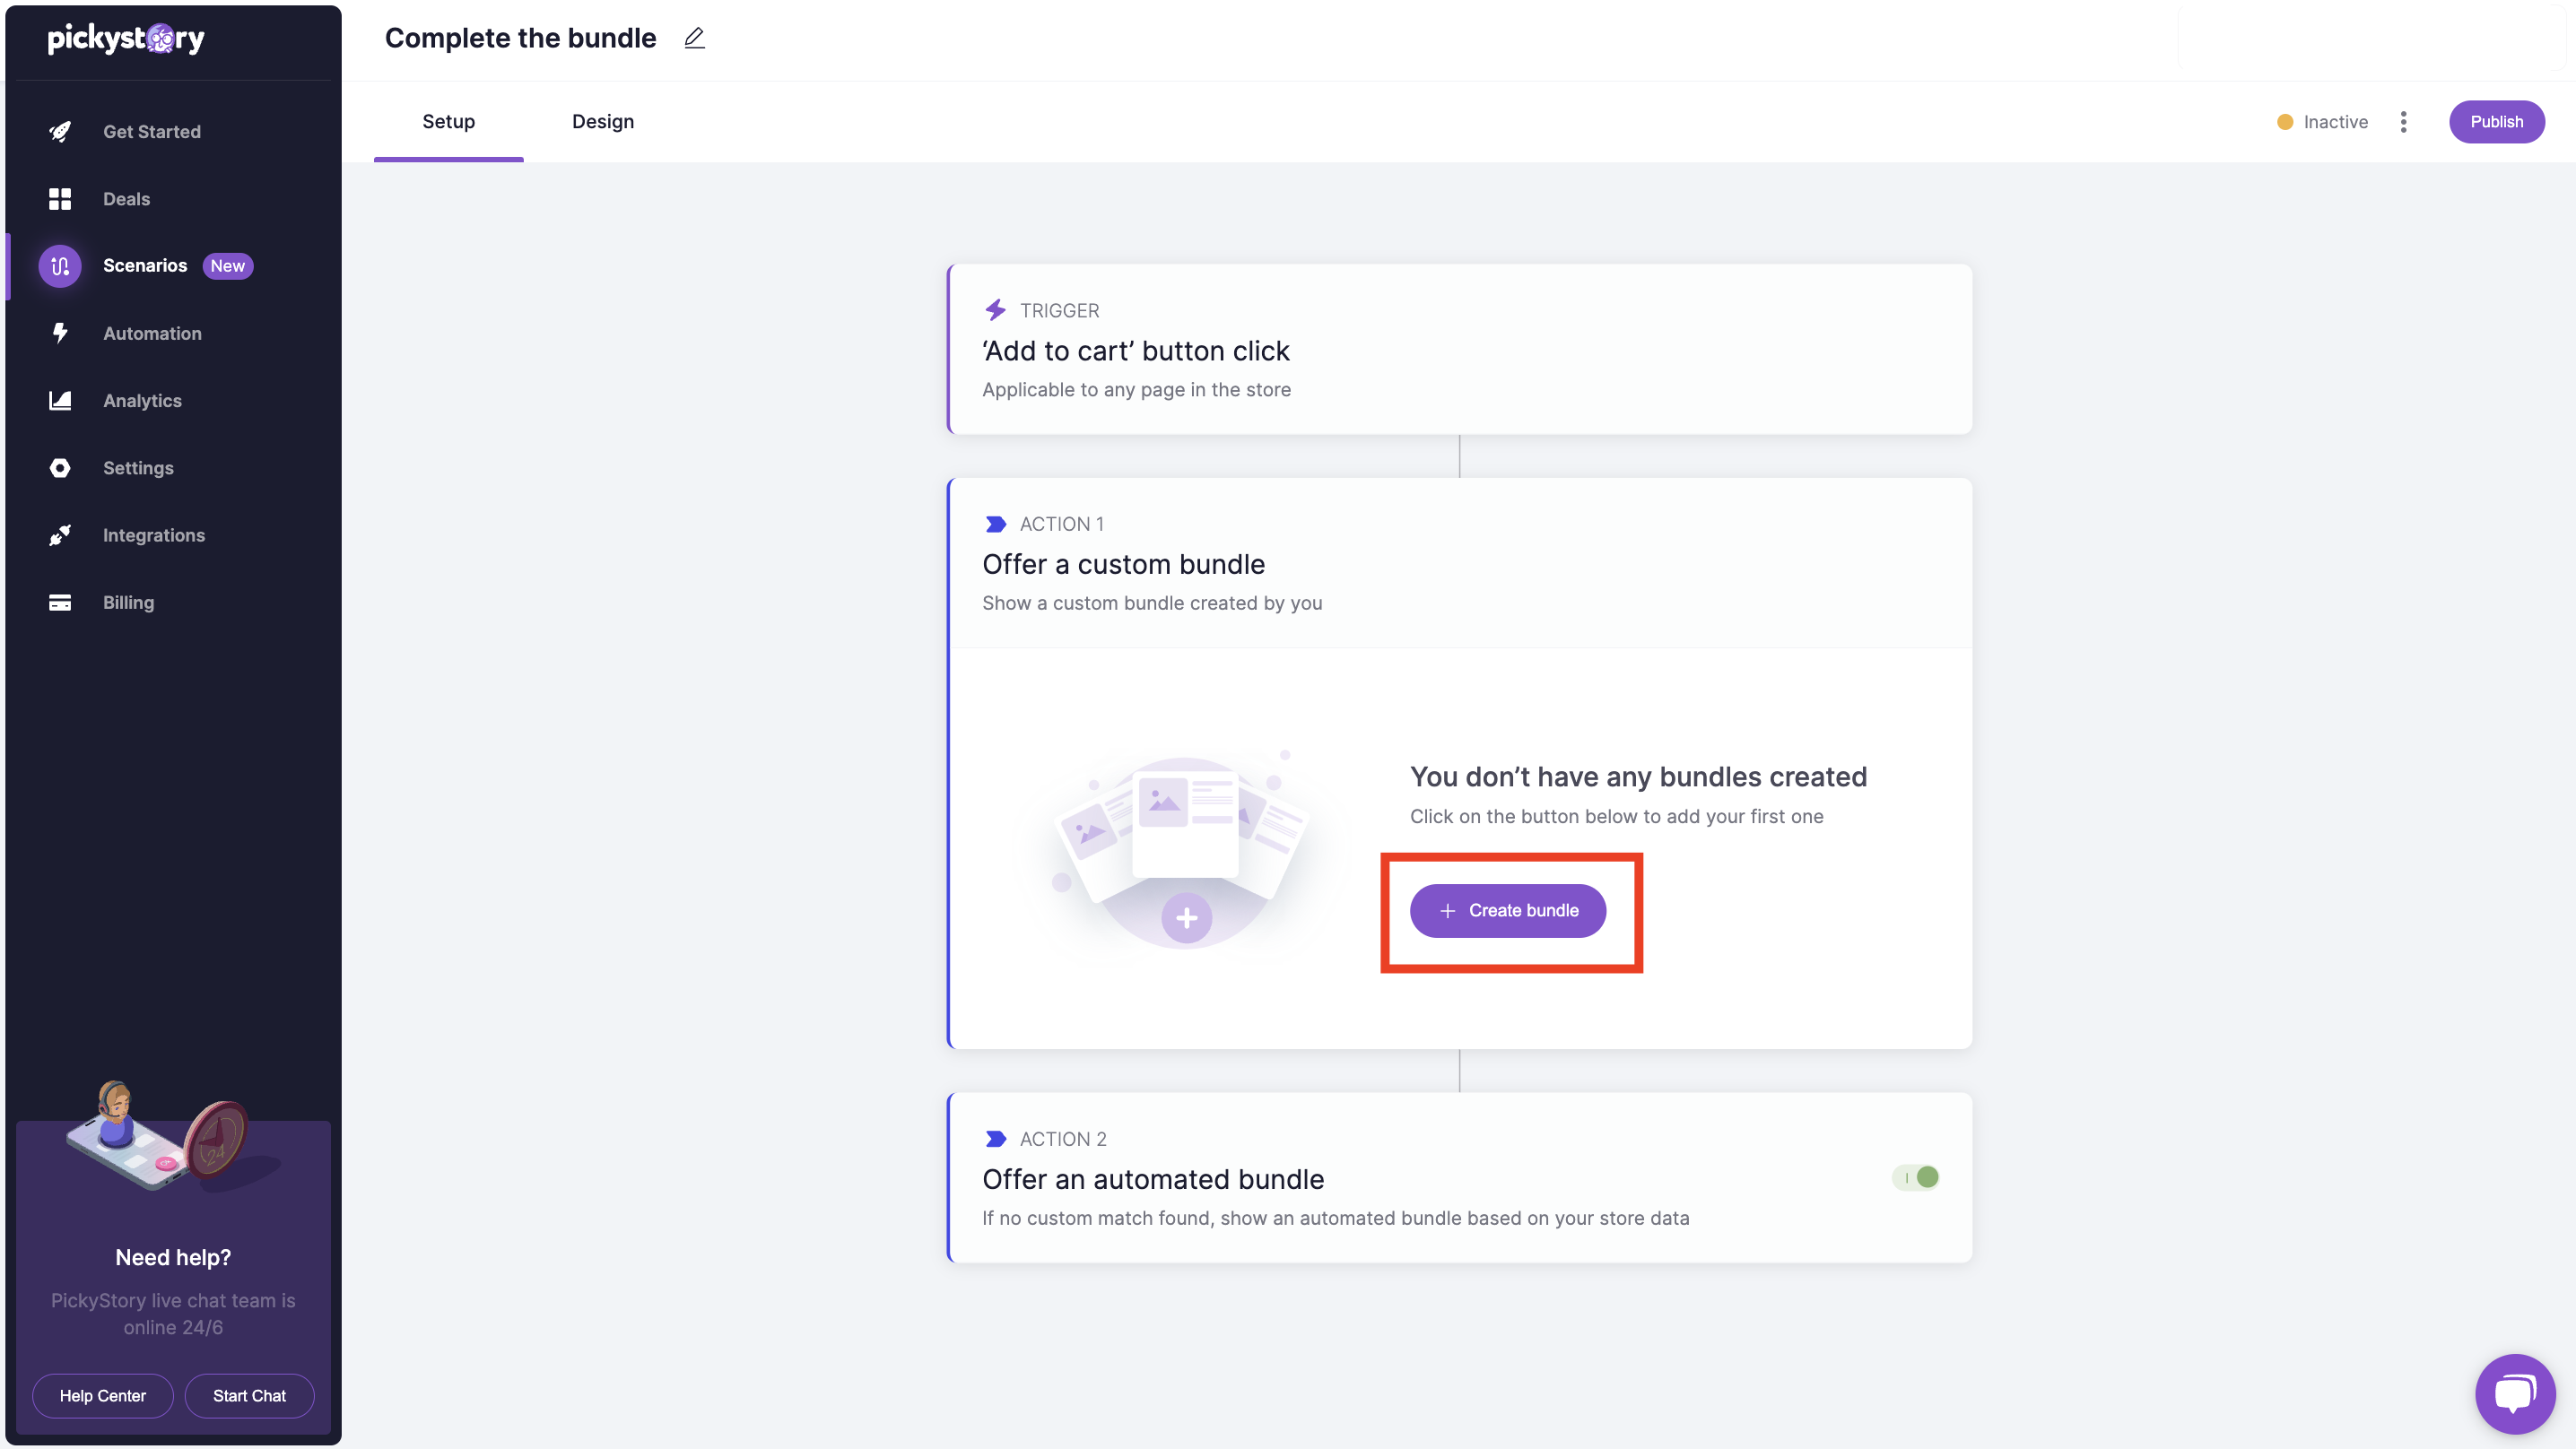
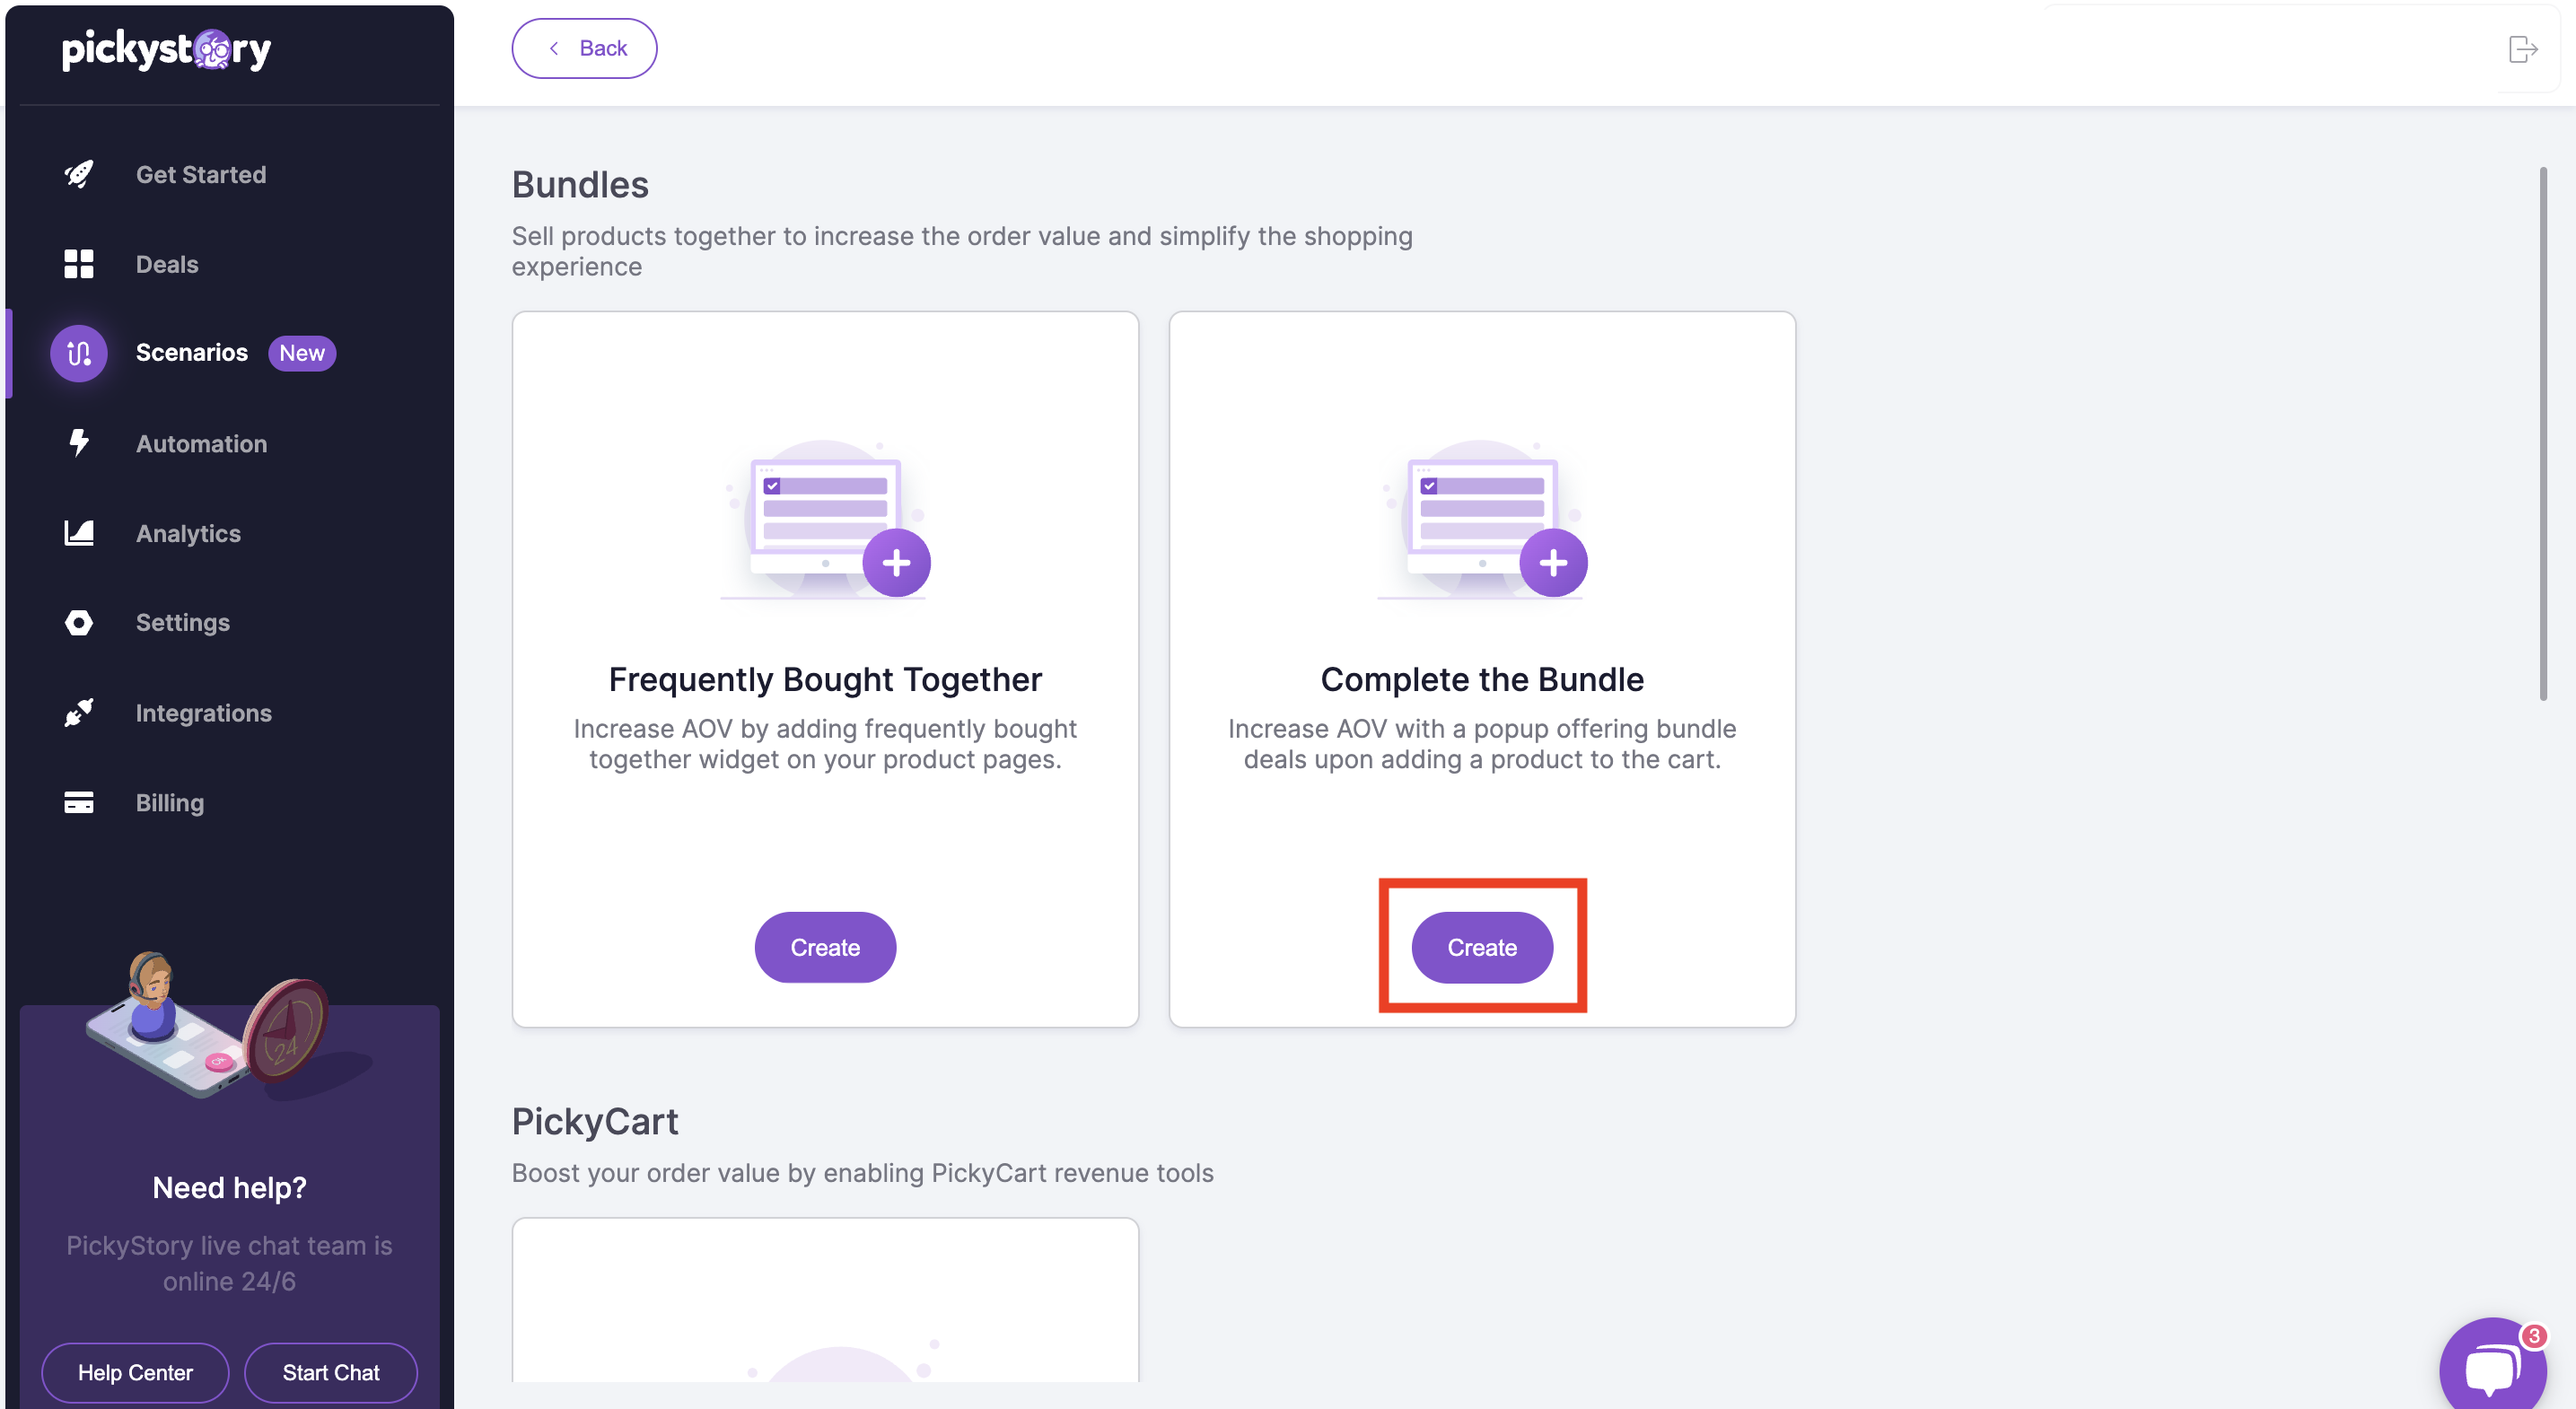
1\. Go to Scenarios, and click on create-

&#x20;

<figure><img src="https://25037085.fs1.hubspotusercontent-eu1.net/hubfs/25037085/image-png-Oct-22-2023-11-12-48-7350-AM.png" alt=""><figcaption></figcaption></figure>

If you'd like to create **a manual bundle** follow the next steps (for automated option scroll down)\
\
2\. Create a new bundle- <br>

<figure><img src="https://25037085.fs1.hubspotusercontent-eu1.net/hubfs/25037085/image-png-Oct-22-2023-11-15-34-8791-AM.png" alt=""><figcaption></figcaption></figure>

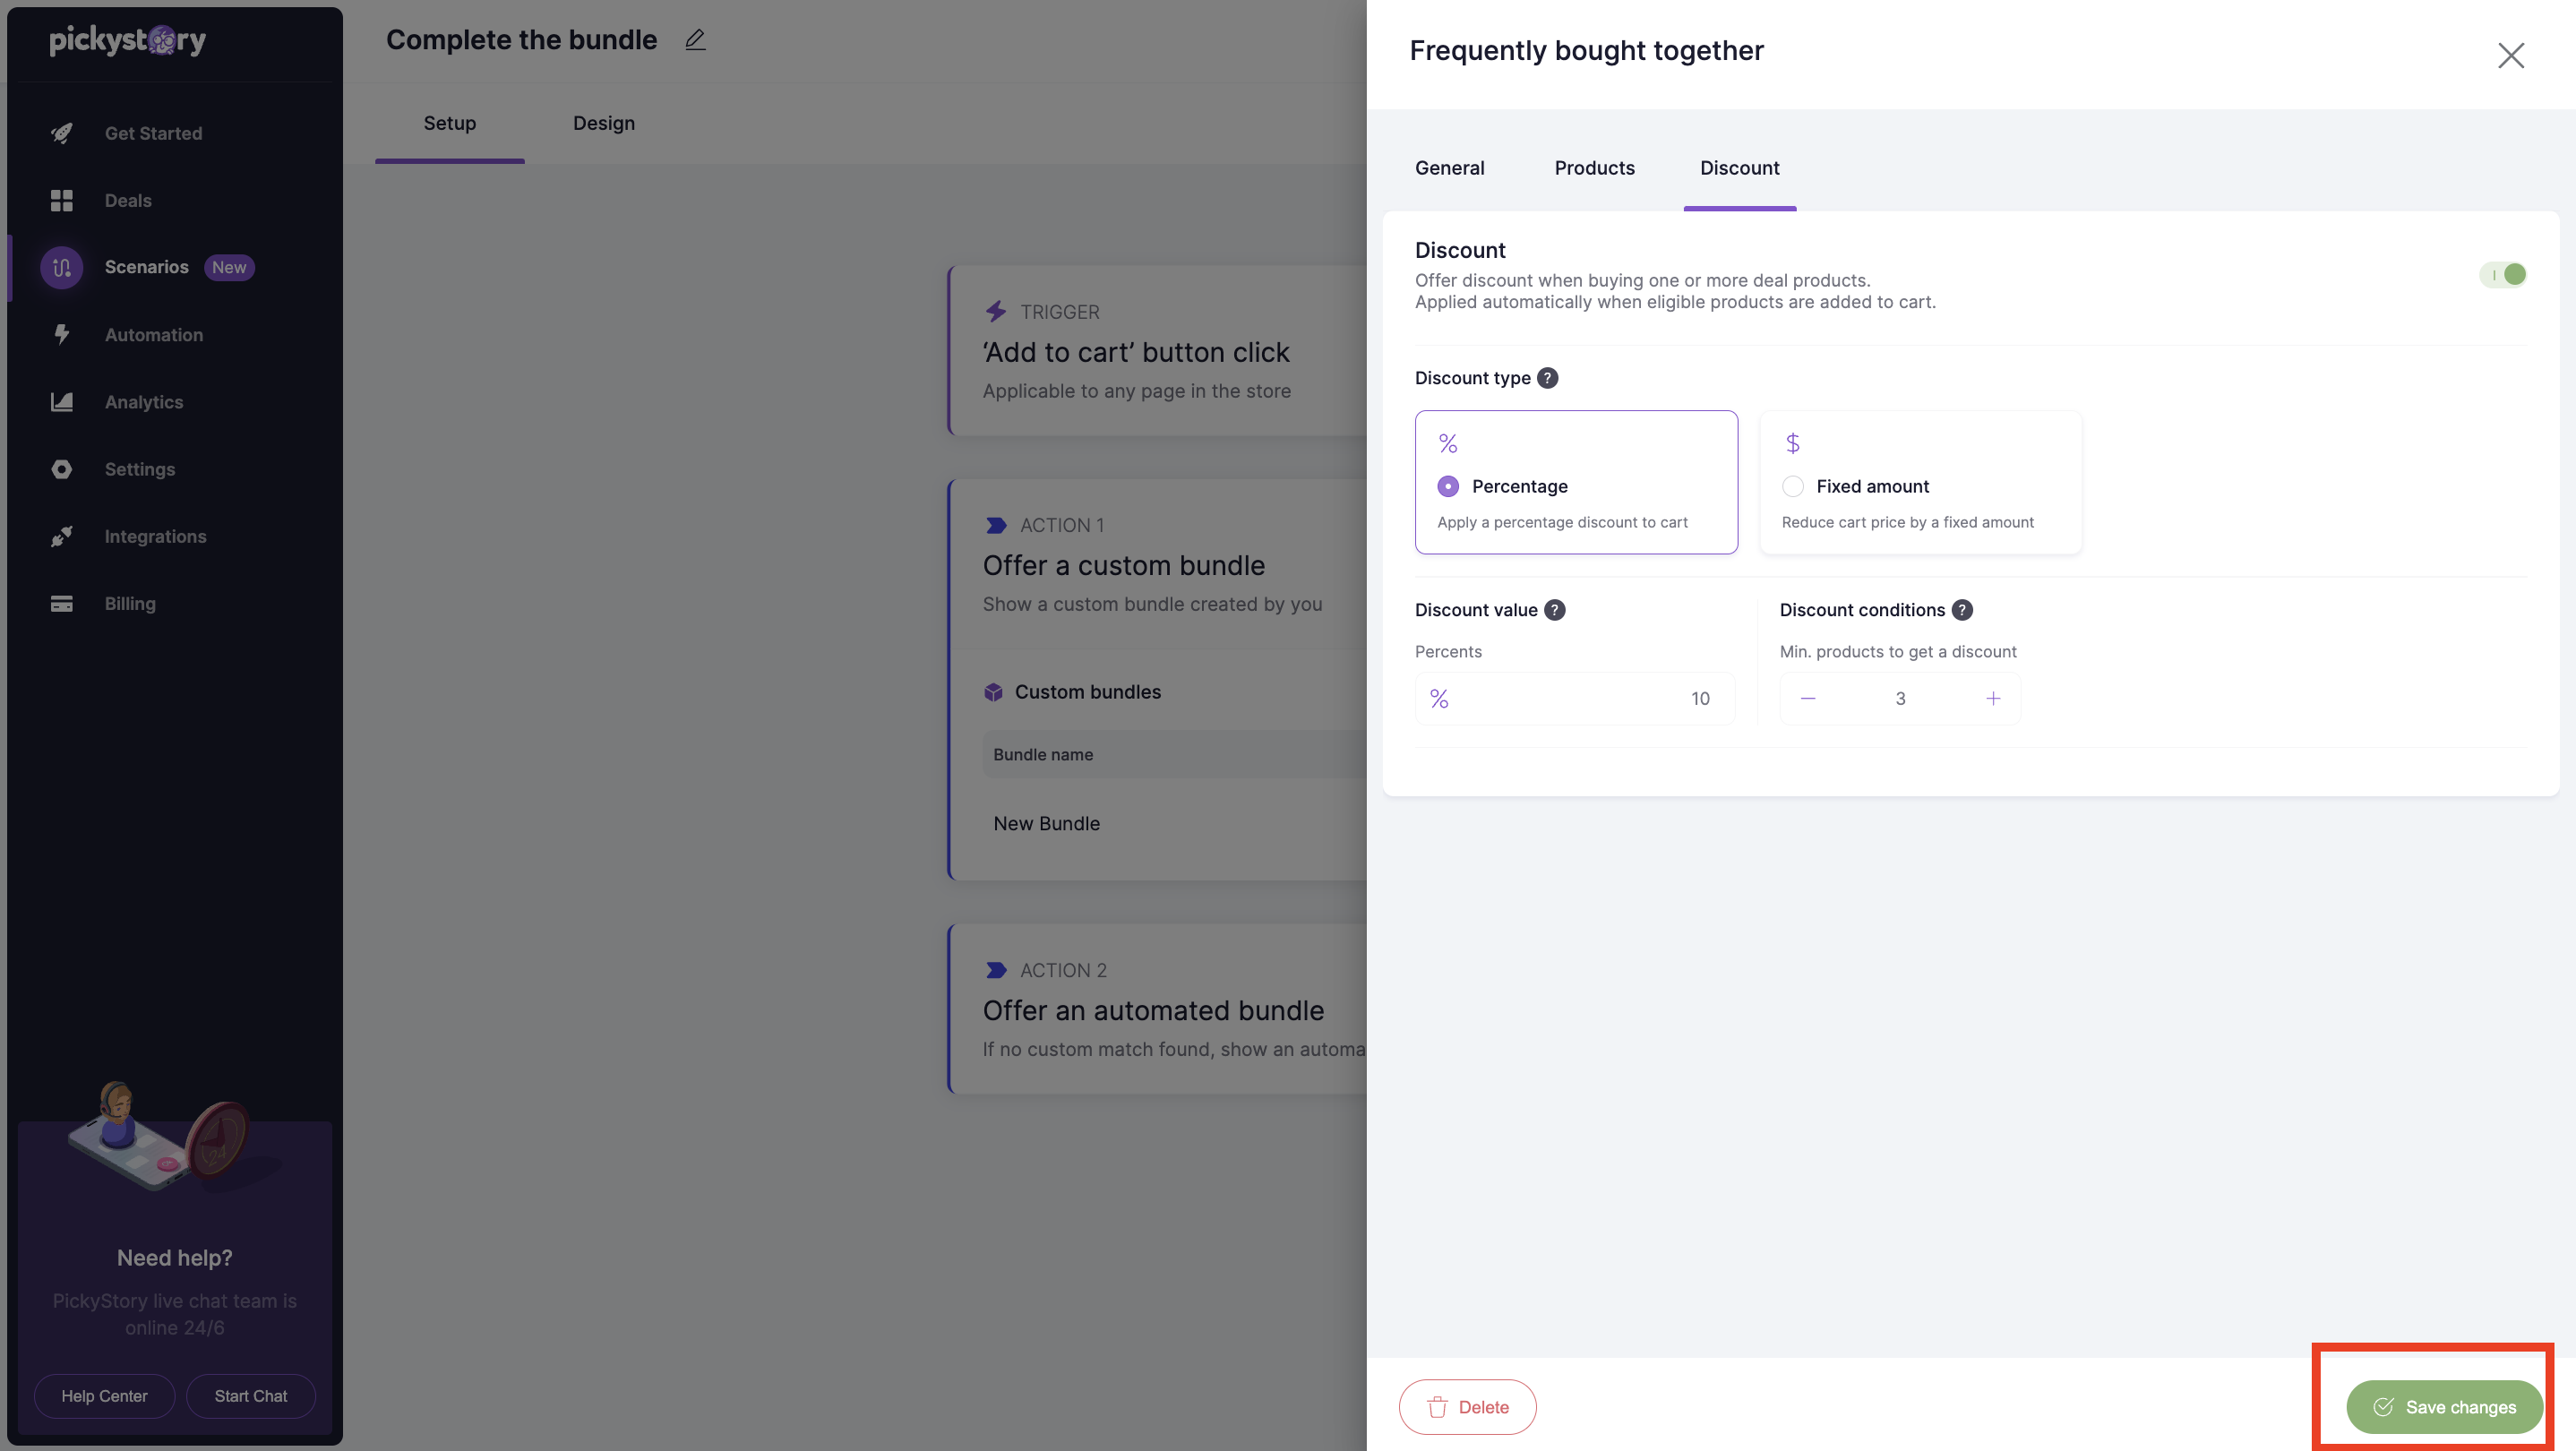
3\. Add the products, set the discount and save the new changes-&#x20;

<figure><img src="https://25037085.fs1.hubspotusercontent-eu1.net/hubfs/25037085/image-png-Oct-22-2023-11-16-26-4199-AM.png" alt=""><figcaption></figcaption></figure>

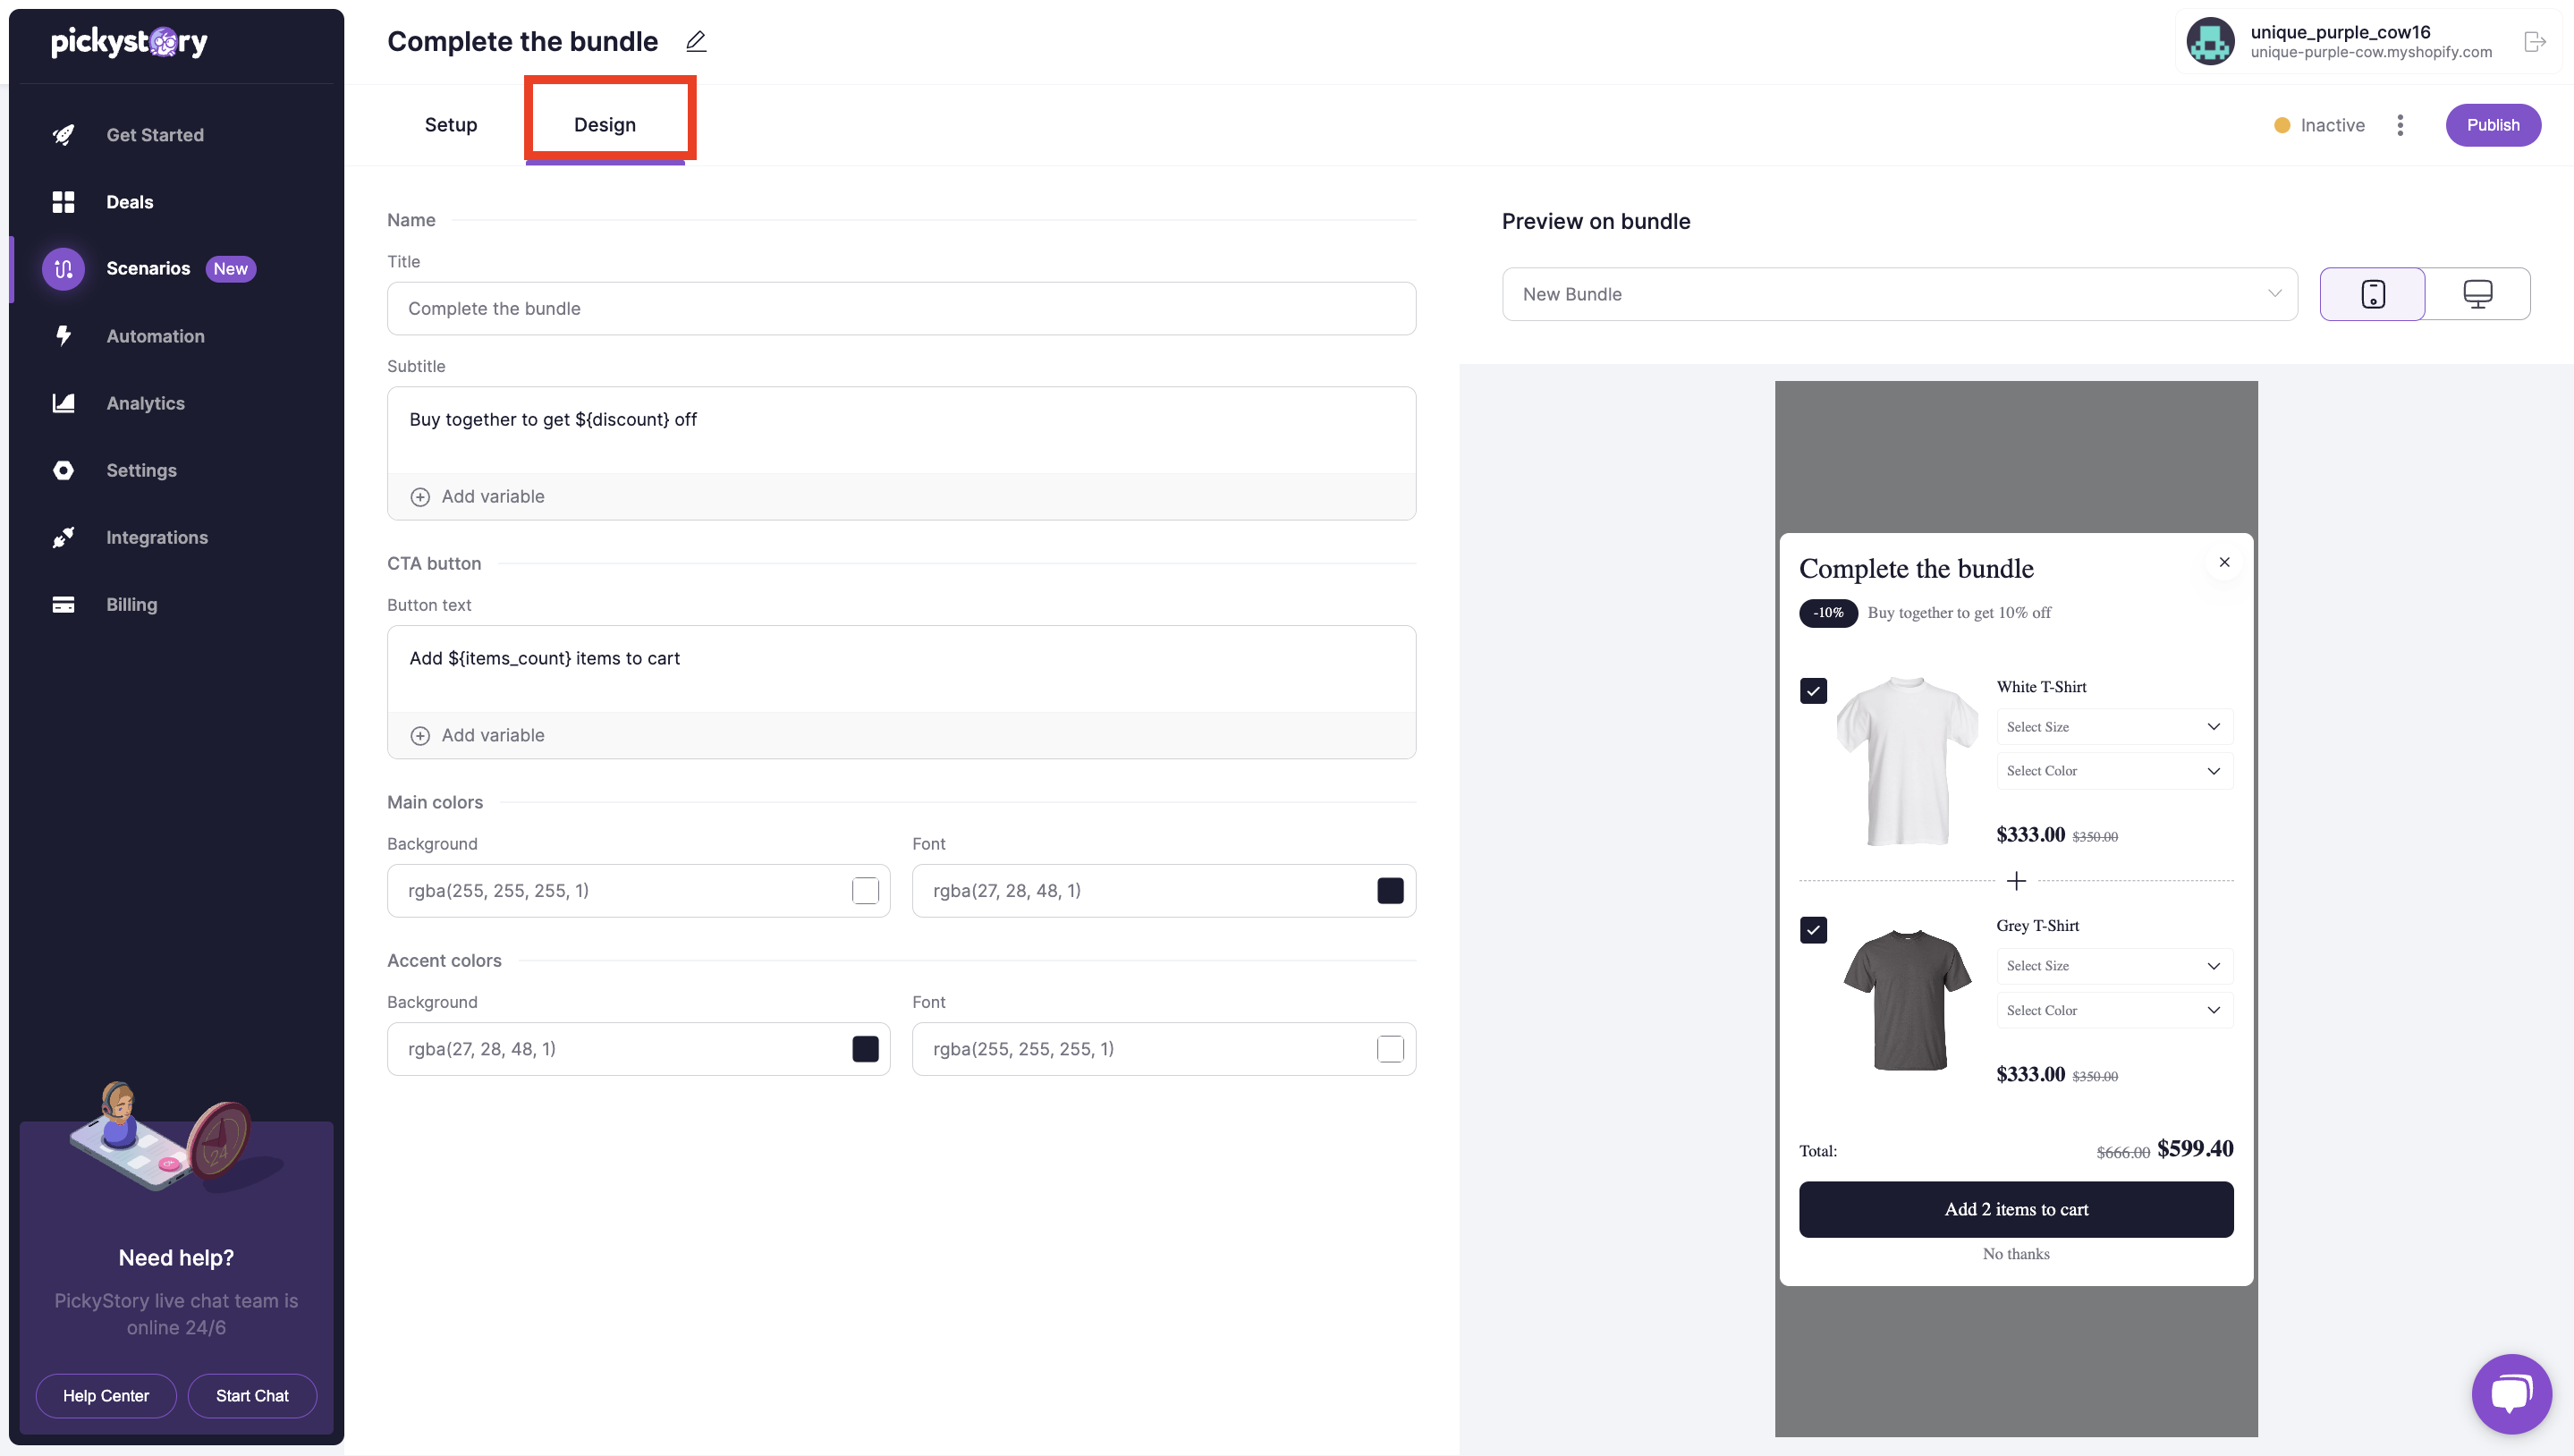
4\. Go to the Design tab and customize the scenario-

<figure><img src="https://25037085.fs1.hubspotusercontent-eu1.net/hubfs/25037085/image-png-Oct-22-2023-11-17-56-0097-AM.png" alt=""><figcaption></figcaption></figure>

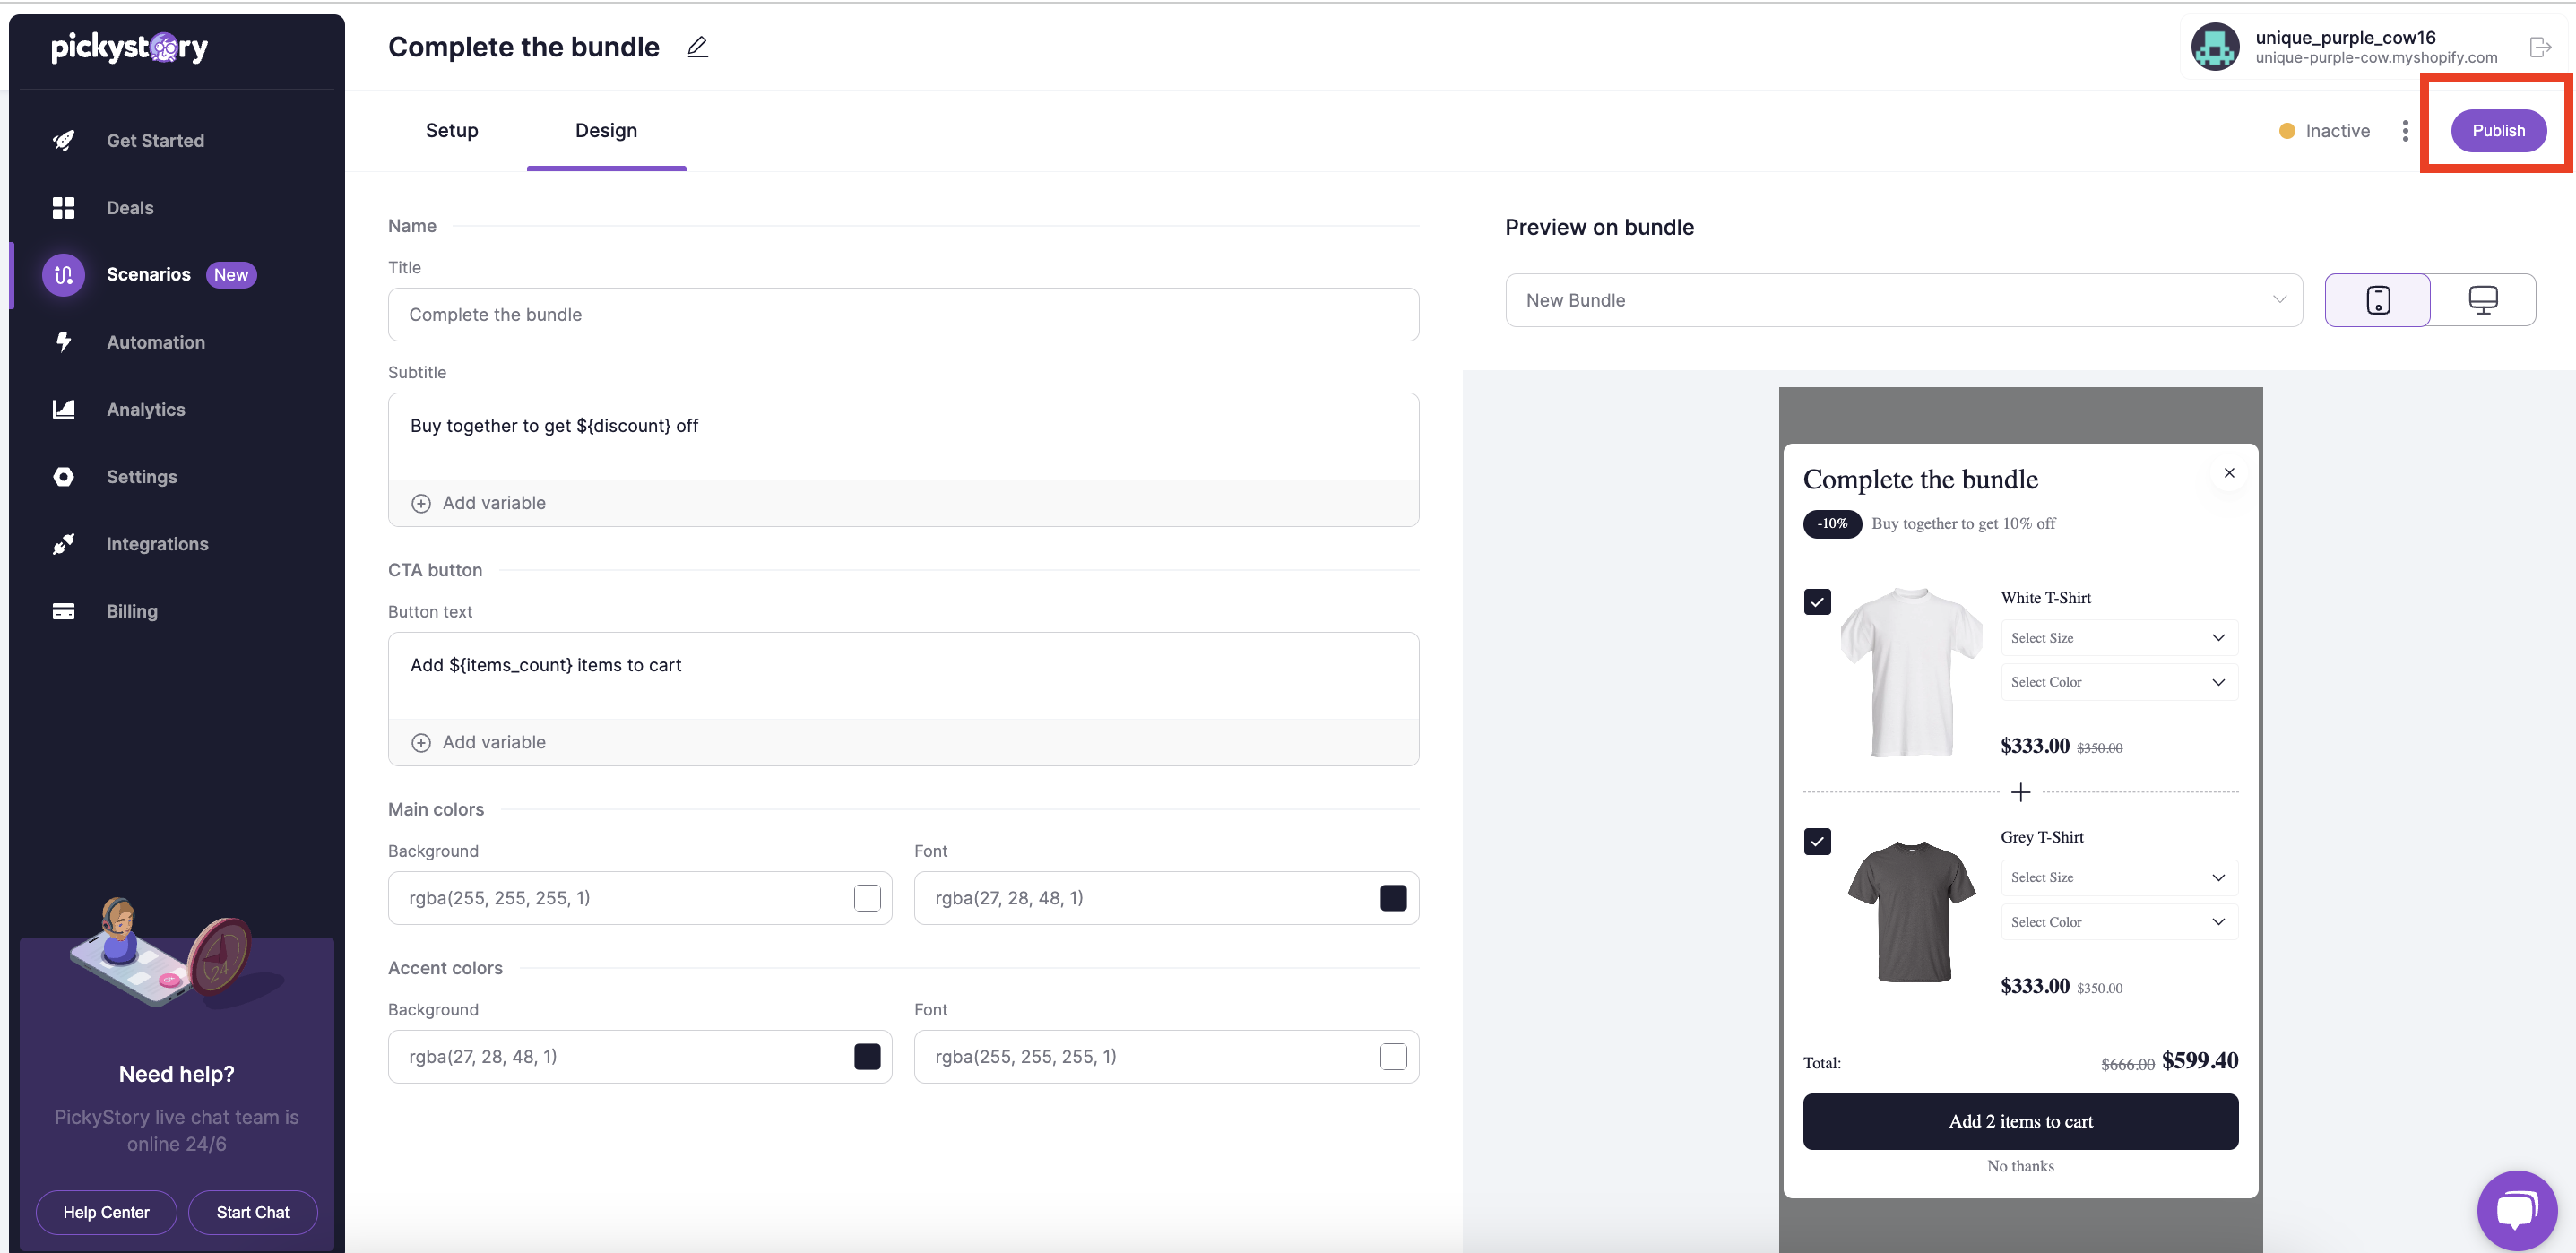
5\. Publish the scenario-

&#x20;

<figure><img src="https://25037085.fs1.hubspotusercontent-eu1.net/hubfs/25037085/image-png-Oct-22-2023-11-19-58-9470-AM.png" alt=""><figcaption></figcaption></figure>

&#x20;

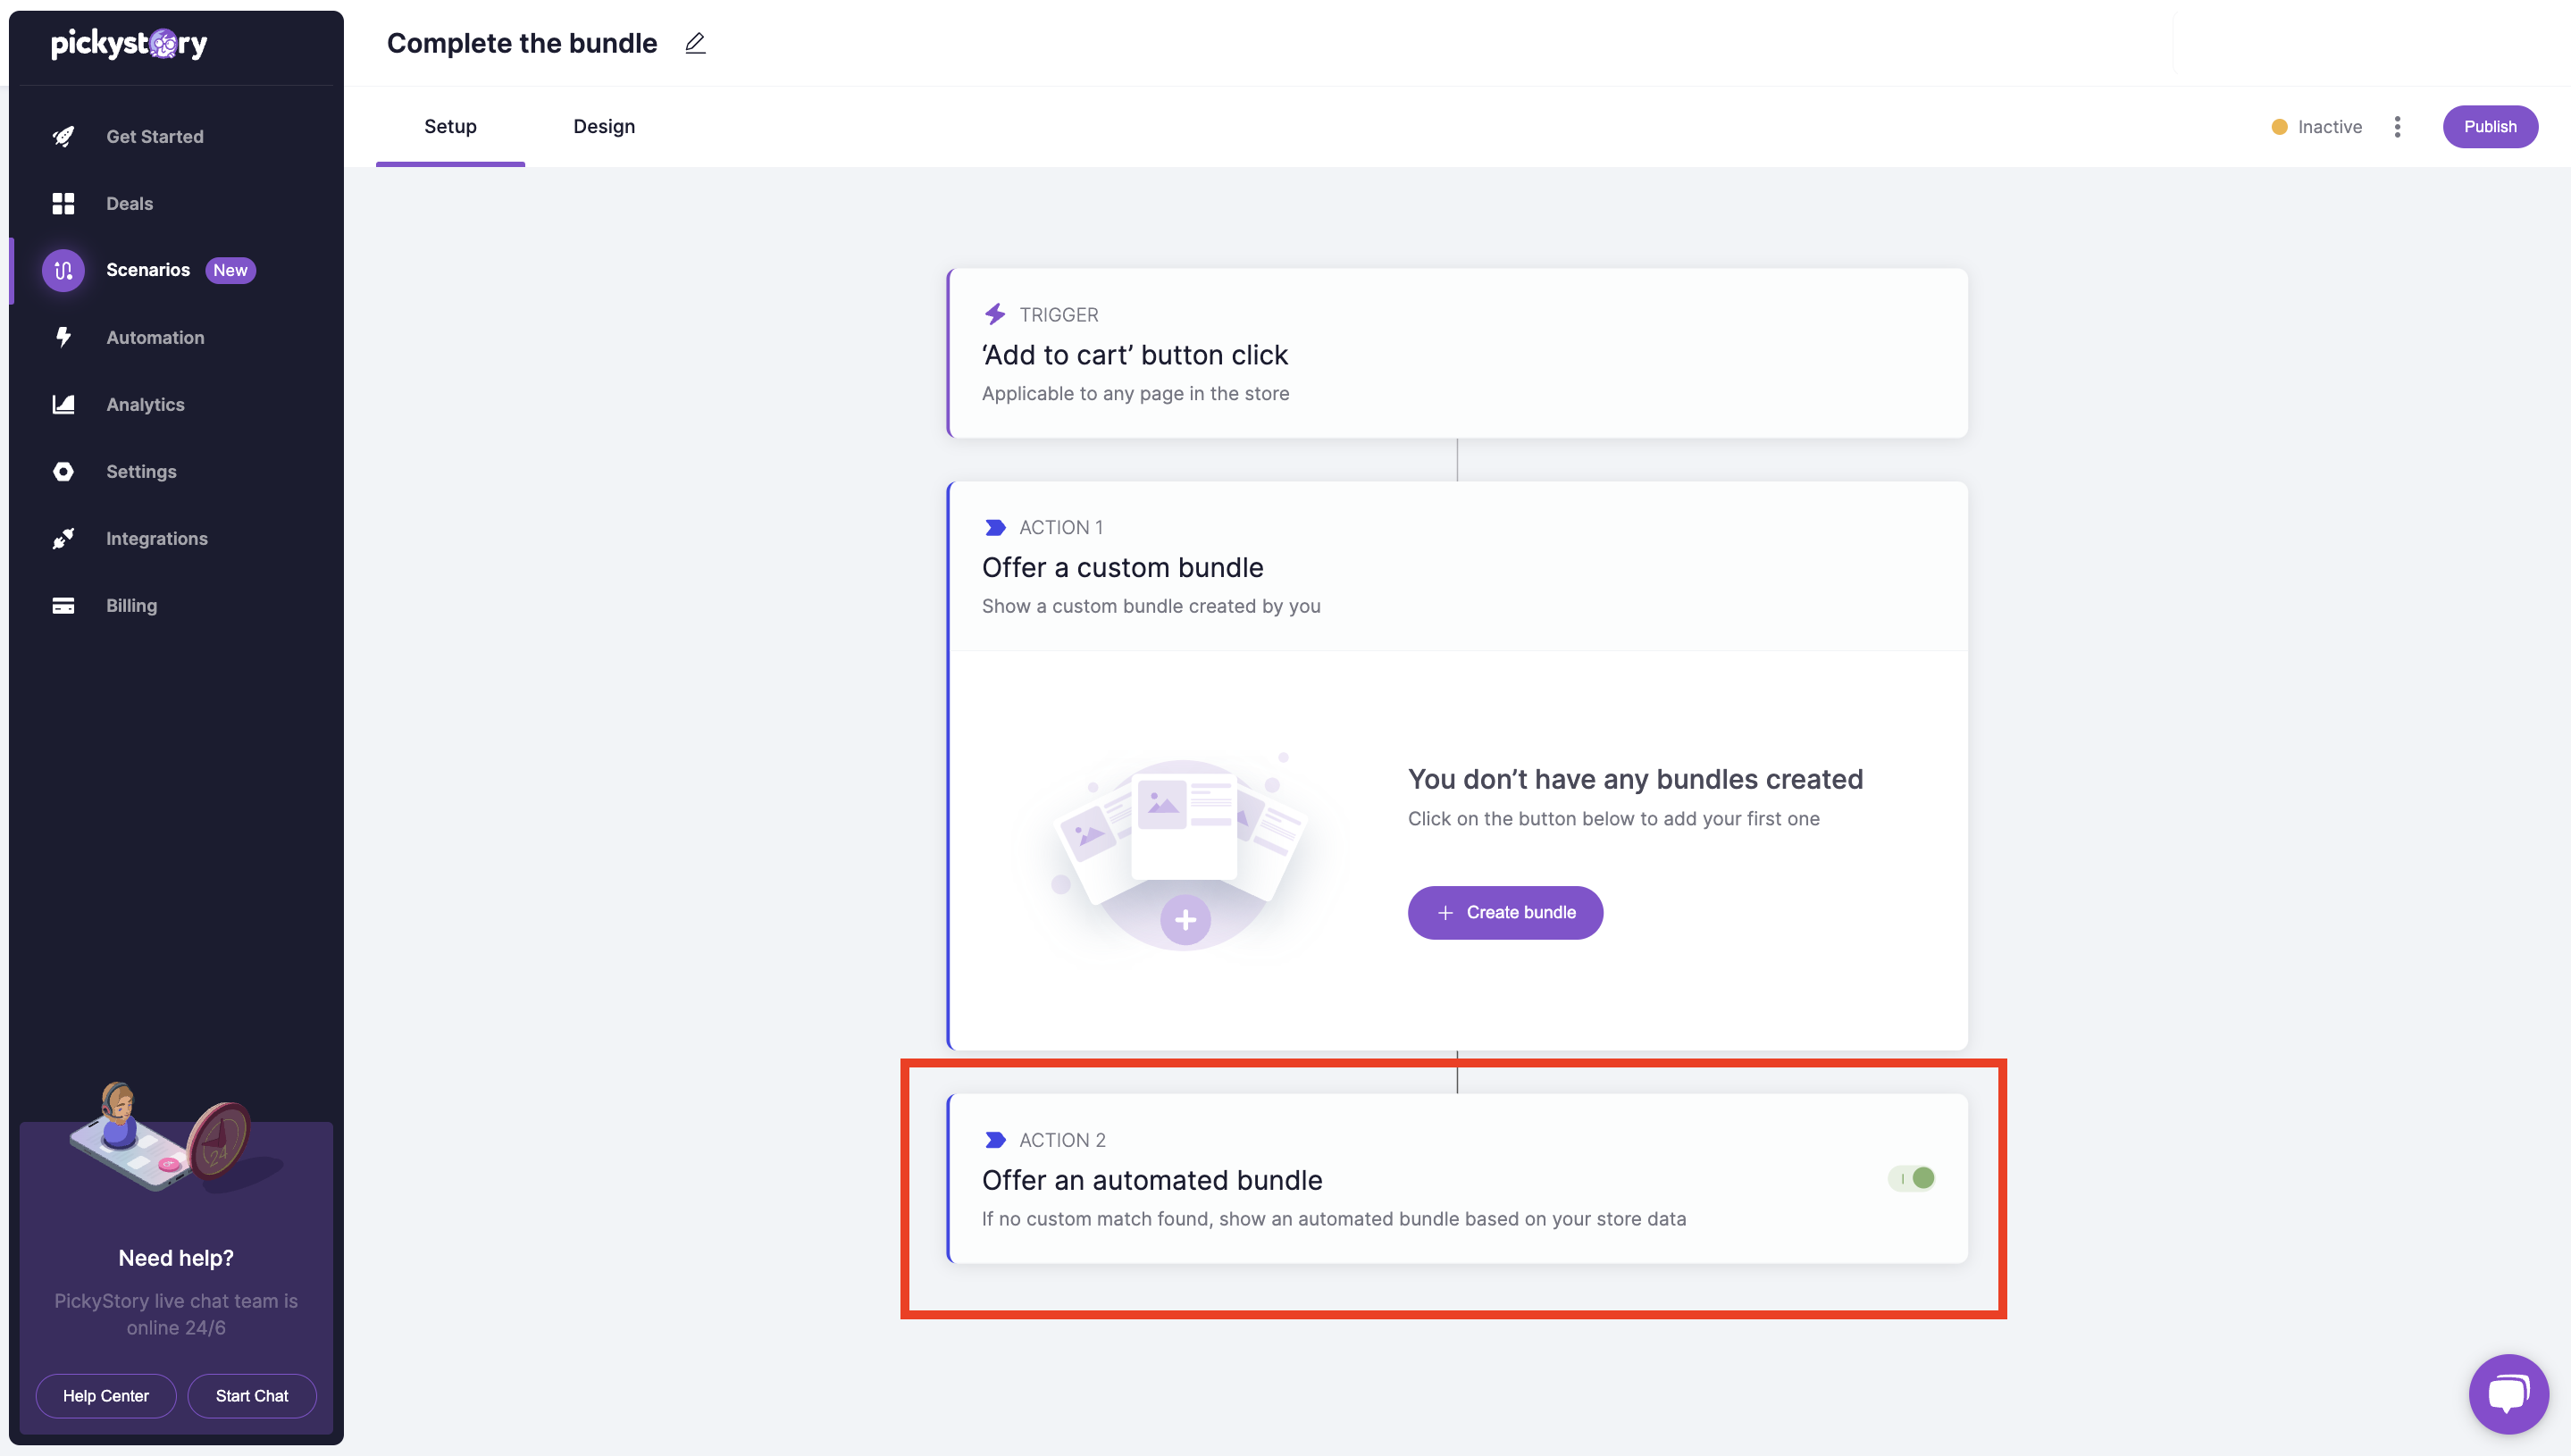
**Automated Bundles:** \
Enable the option of automated bundles and hit publish-

<figure><img src="https://25037085.fs1.hubspotusercontent-eu1.net/hubfs/25037085/image-png-Oct-22-2023-11-23-11-5610-AM.png" alt=""><figcaption></figcaption></figure>


# Frequently Bought Together


# How to create a Frequently Bought Together scenario

Creating a Frequently Bought Together Scenario

{% hint style="info" %}
This feature is available to customers who installed the app **after October 6th, 2023**
{% endhint %}

Frequently bought together bundles are great for promoting popular product combinations to increase AOV. You can choose between custom or automated product combinations. You can also mix both.\
\
When displayed on product pages, by default, frequently bought together bundles will be shown on all product pages that are part of the bundle.\
\
If automated bundles are enabled, they will be shown on pages where custom bundles couldn't be found.\
\
Steps to create:\
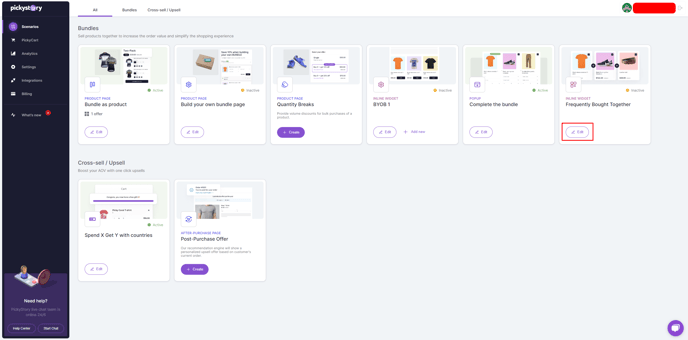
1\. Go to Scenarios, and click on create-<br>

<figure><img src="https://25037085.fs1.hubspotusercontent-eu1.net/hub/25037085/hubfs/image-png-Apr-17-2024-03-53-59-6037-PM.png?width=688&#x26;height=340&#x26;name=image-png-Apr-17-2024-03-53-59-6037-PM.png" alt=""><figcaption></figcaption></figure>

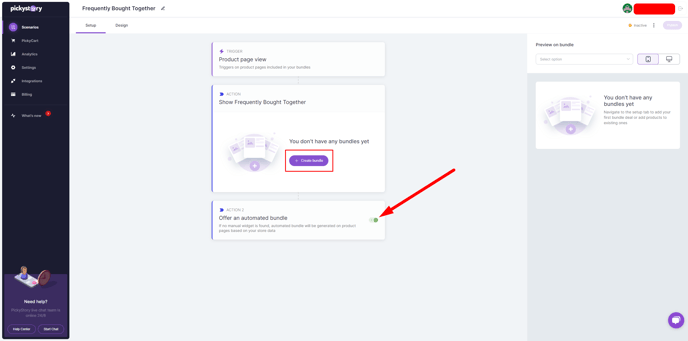
2\. Create a new bundle(you can also check "How to enable Automated Frequently Bought Together bundles?")-<br>

<figure><img src="https://25037085.fs1.hubspotusercontent-eu1.net/hub/25037085/hubfs/image-png-Apr-17-2024-03-55-59-8572-PM.png?width=688&#x26;height=341&#x26;name=image-png-Apr-17-2024-03-55-59-8572-PM.png" alt=""><figcaption></figcaption></figure>

3\. Add the products-

<img src="https://25037085.fs1.hubspotusercontent-eu1.net/hub/25037085/hubfs/image-png-Apr-17-2024-07-28-24-5525-PM.png?width=688&#x26;height=342&#x26;name=image-png-Apr-17-2024-07-28-24-5525-PM.png" alt="" height="342" width="688">

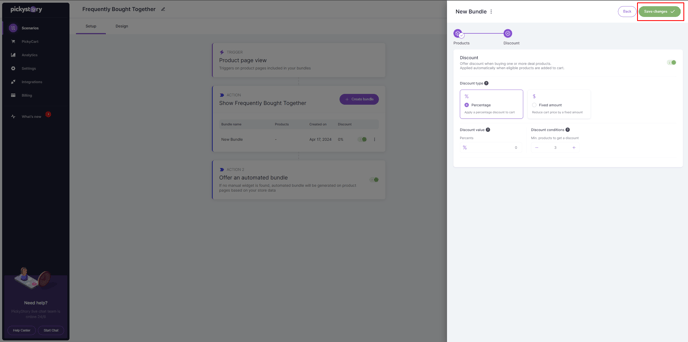
4\. Set the discount and save the new changes-&#x20;

<img src="https://25037085.fs1.hubspotusercontent-eu1.net/hub/25037085/hubfs/image-png-Apr-17-2024-03-56-50-0956-PM.png?width=688&#x26;height=342&#x26;name=image-png-Apr-17-2024-03-56-50-0956-PM.png" alt="" height="342" width="688">

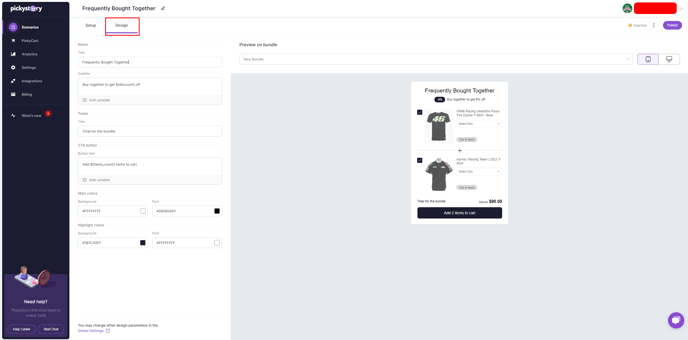
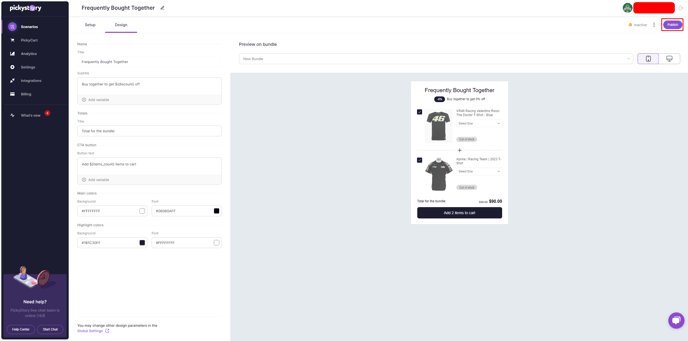
5\. Go to the Design tab and customize the scenario-

\
5.1 After that, click on Publish-&#x20;

<figure><img src="https://25037085.fs1.hubspotusercontent-eu1.net/hub/25037085/hubfs/image-png-Apr-17-2024-03-58-31-1669-PM.png?width=688&#x26;height=340&#x26;name=image-png-Apr-17-2024-03-58-31-1669-PM.png" alt=""><figcaption></figcaption></figure>

<img src="https://25037085.fs1.hubspotusercontent-eu1.net/hub/25037085/hubfs/image-png-Apr-17-2024-03-59-01-1911-PM.png?width=688&#x26;height=341&#x26;name=image-png-Apr-17-2024-03-59-01-1911-PM.png" alt="" height="341" width="688">

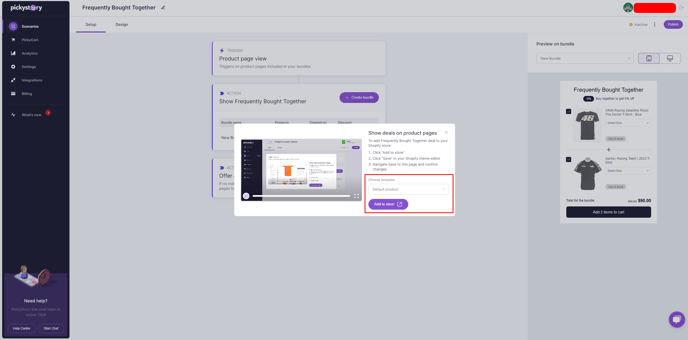
6\. Choose the template of your product page and click on add to store. You will be redirected to Shopify's theme editor-&#x20;

<img src="https://25037085.fs1.hubspotusercontent-eu1.net/hub/25037085/hubfs/image-png-Apr-17-2024-04-00-04-5489-PM.png?width=688&#x26;height=341&#x26;name=image-png-Apr-17-2024-04-00-04-5489-PM.png" alt="" height="341" width="688">

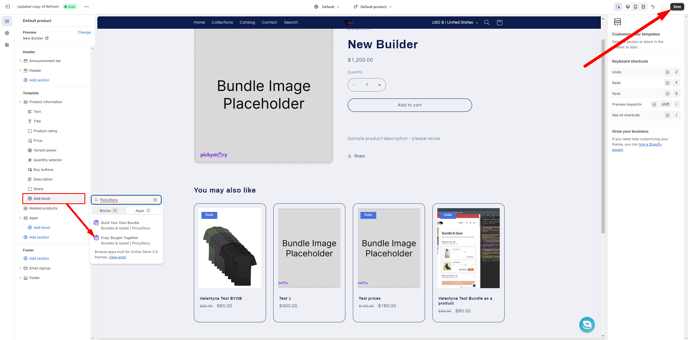
7\. Add PickyStory app block to your page and click save-\
\
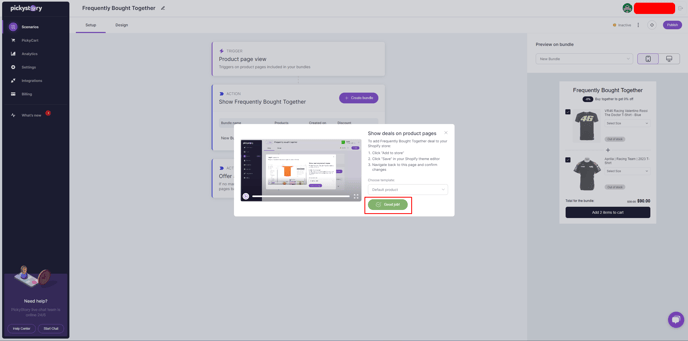
8\. Once the offer is live on the page you will see a confirmation in the app-<br>

<figure><img src="https://25037085.fs1.hubspotusercontent-eu1.net/hub/25037085/hubfs/image-png-Apr-17-2024-04-13-16-5692-PM.png?width=688&#x26;height=342&#x26;name=image-png-Apr-17-2024-04-13-16-5692-PM.png" alt=""><figcaption></figcaption></figure>

<figure><img src="https://25037085.fs1.hubspotusercontent-eu1.net/hub/25037085/hubfs/image-png-Apr-17-2024-04-02-21-6089-PM.png?width=688&#x26;height=341&#x26;name=image-png-Apr-17-2024-04-02-21-6089-PM.png" alt=""><figcaption></figcaption></figure>


# Spend X Get Y


# How to create a Spend X get Y scenario

Creating a Spend X get Y scenario

With PickyStory’s "Spend X get Y" scenario, you can encourage customers to increase their cart value by applying an offer when they reach the revenue goal you have set. You can also add different rewards for different countries.

{% hint style="info" %}
Spend X get Y scenario is available when using PickyCart, make sure PickyCart is enabled
{% endhint %}

Here’s how to set this up:

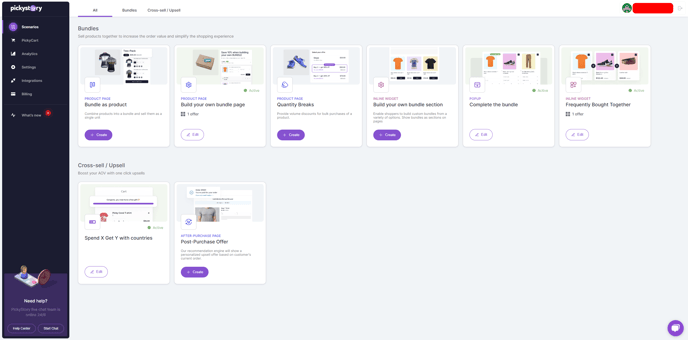
1\.  Navigate to the "Scenarios" section of the platform and click on the "Edit" option on the Spend X Get Y Scenario.

<img src="https://25037085.fs1.hubspotusercontent-eu1.net/hub/25037085/hubfs/image-png-Apr-15-2024-12-27-53-4724-PM.png?width=688&#x26;height=341&#x26;name=image-png-Apr-15-2024-12-27-53-4724-PM.png" alt="" height="341" width="688">

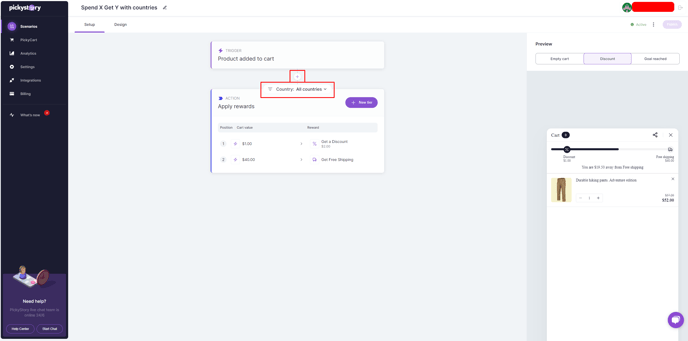
2.1 Within the scenario editing interface, click on "Country" to select the specific countries that you want the Spend X Get Y rewards to apply or the "+" icon above to create different setups for different countries

<img src="https://25037085.fs1.hubspotusercontent-eu1.net/hub/25037085/hubfs/image-png-Apr-15-2024-12-25-58-4458-PM.png?width=688&#x26;height=341&#x26;name=image-png-Apr-15-2024-12-25-58-4458-PM.png" alt="" height="341" width="688">

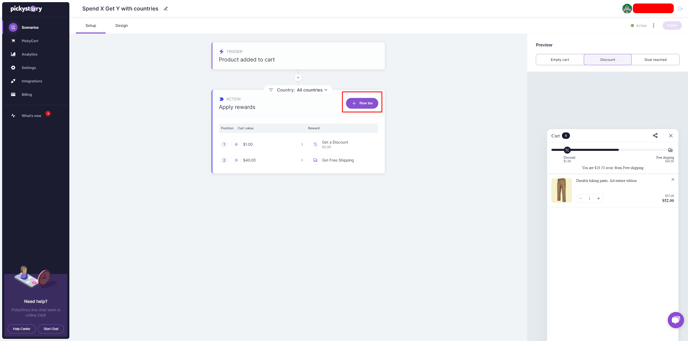
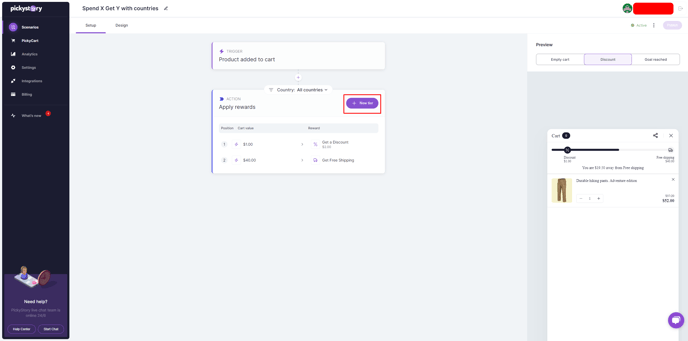
2.2  Click on the "New Tier" button to initiate the process of adding a new tier to the Spend X Get Y setup.

<img src="https://25037085.fs1.hubspotusercontent-eu1.net/hub/25037085/hubfs/image-png-Apr-15-2024-12-23-40-5967-PM.png?width=688&#x26;height=342&#x26;name=image-png-Apr-15-2024-12-23-40-5967-PM.png" alt="" height="342" width="688">

3\. On the left side of the tier setup panel, specify the monetary amount customers need to spend to qualify for the reward and on the right side, choose the specific reward customers will receive upon reaching the spending threshold. Options may include free shipping, a complimentary gift, or a discount on their order.

<img src="https://25037085.fs1.hubspotusercontent-eu1.net/hub/25037085/hubfs/Untitled%20(2)-png.png?width=395&#x26;height=560&#x26;name=Untitled%20(2)-png.png" alt="" height="560" width="395">

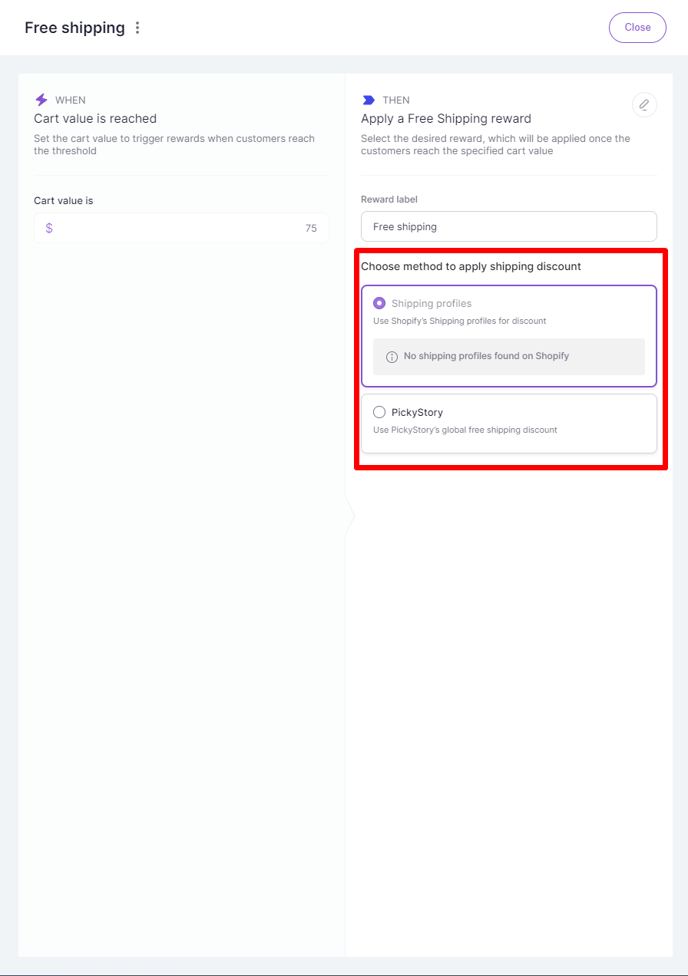
3.1 For the "Free Shipping" option, you can now select the specific Shipping profile for the free shipping to apply or apply it on PickyStory's global free shipping profile.

<img src="https://25037085.fs1.hubspotusercontent-eu1.net/hub/25037085/hubfs/image-png-Apr-17-2024-07-05-42-0642-PM.png?width=688&#x26;height=977&#x26;name=image-png-Apr-17-2024-07-05-42-0642-PM.png" alt="" height="977" width="688">

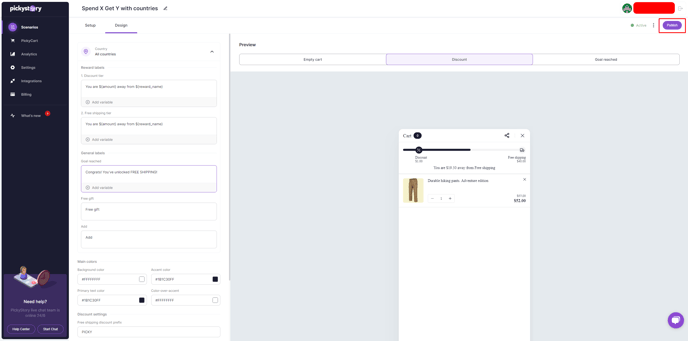
4\. Navigate to the "Design" tab within the editing interface to access customization options. Modify the labels associated with the reward, general instructions, and any color settings for the progress bar to align with your brand or campaign aesthetics.

<img src="https://25037085.fs1.hubspotusercontent-eu1.net/hub/25037085/hubfs/image-png-Apr-15-2024-12-28-44-0006-PM.png?width=688&#x26;height=341&#x26;name=image-png-Apr-15-2024-12-28-44-0006-PM.png" alt="" height="341" width="688">

5\. Once all desired adjustments have been made, click on the "Publish" button to activate the updated scenario and make it live for customers to engage with.

<img src="https://25037085.fs1.hubspotusercontent-eu1.net/hub/25037085/hubfs/image-png-Apr-15-2024-12-30-00-1193-PM.png?width=688&#x26;height=341&#x26;name=image-png-Apr-15-2024-12-30-00-1193-PM.png" alt="" height="341" width="688">

6\. To include multiple tiers within the Spend X Get Y scenario, repeat steps 2 and 3 for each additional tier you wish to add. This allows for creating tiered incentive structures with varying spending thresholds and corresponding rewards.

<img src="https://25037085.fs1.hubspotusercontent-eu1.net/hub/25037085/hubfs/image-png-Apr-15-2024-12-27-15-9693-PM.png?width=688&#x26;height=341&#x26;name=image-png-Apr-15-2024-12-27-15-9693-PM.png" alt="" height="341" width="688">


# Post-Purchase Offer


# How to create a post-purchase scenario

Creating a post-purchase scenario

With PickyStory’s Post-purchase scenario, you can boost your order value by offering an additional highly relevant product after checkout.\ <br>

Here’s how to set it up:

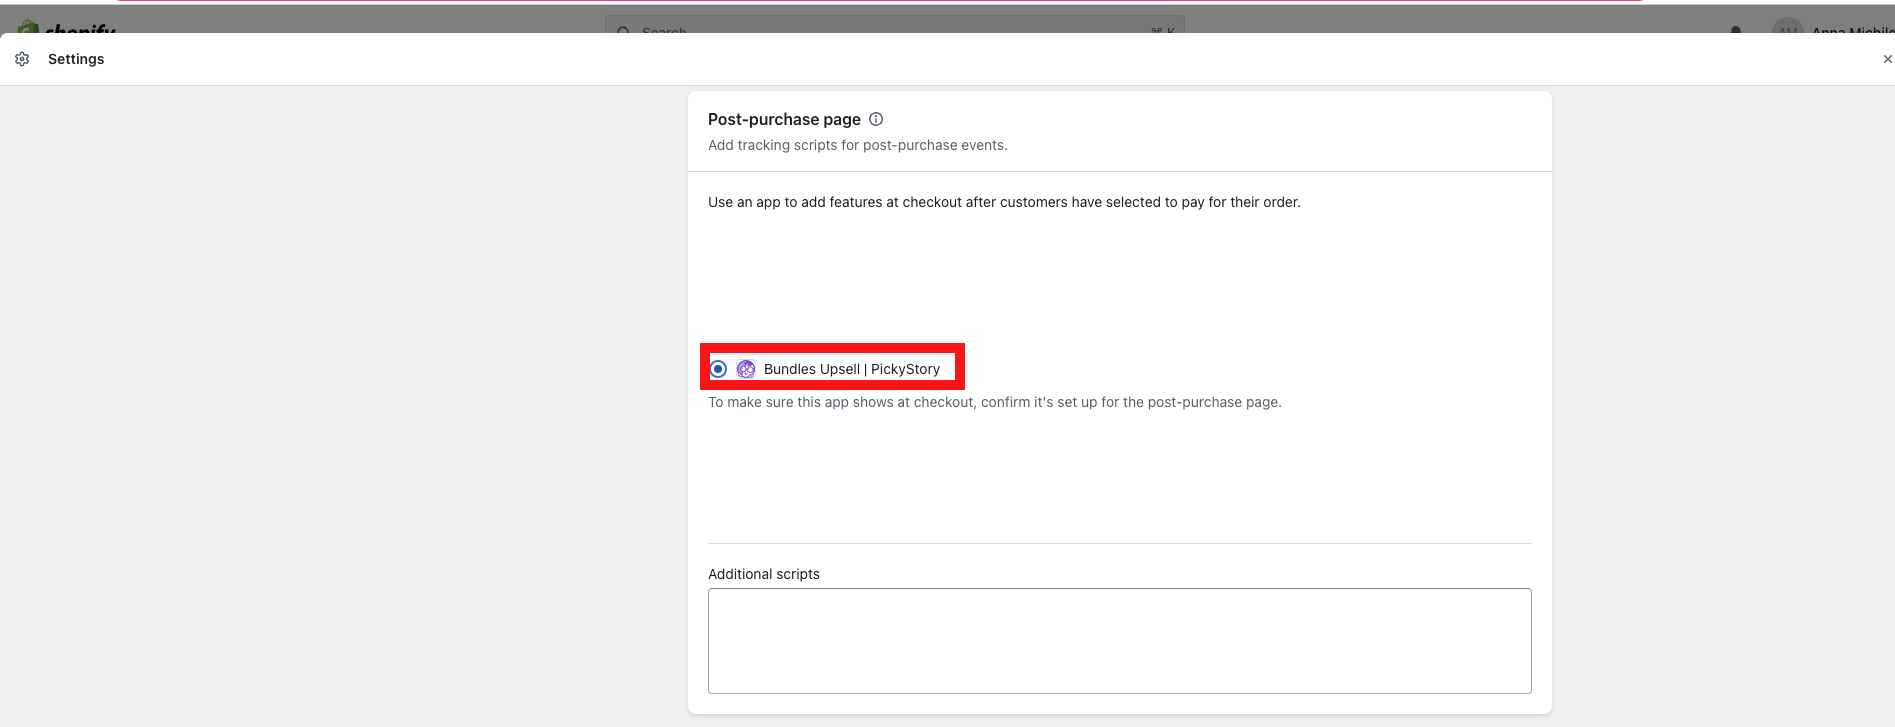
1\.  In your Shopify admin, go to Settings -> Checkout -> Choose PickyStory as your Post-purchase page.&#x20;

<figure><img src="https://25037085.fs1.hubspotusercontent-eu1.net/hubfs/25037085/image-png-Jul-17-2023-11-33-46-5178-AM.png" alt=""><figcaption></figcaption></figure>

2\. Go to PickyStory's app and click on Scenarios -> "Create" in Post-purchase scenario.

![](https://25037085.fs1.hubspotusercontent-eu1.net/hub/25037085/hubfs/image-png-May-07-2024-02-23-28-7930-PM.png?width=2558\&height=1210\&name=image-png-May-07-2024-02-23-28-7930-PM.png)

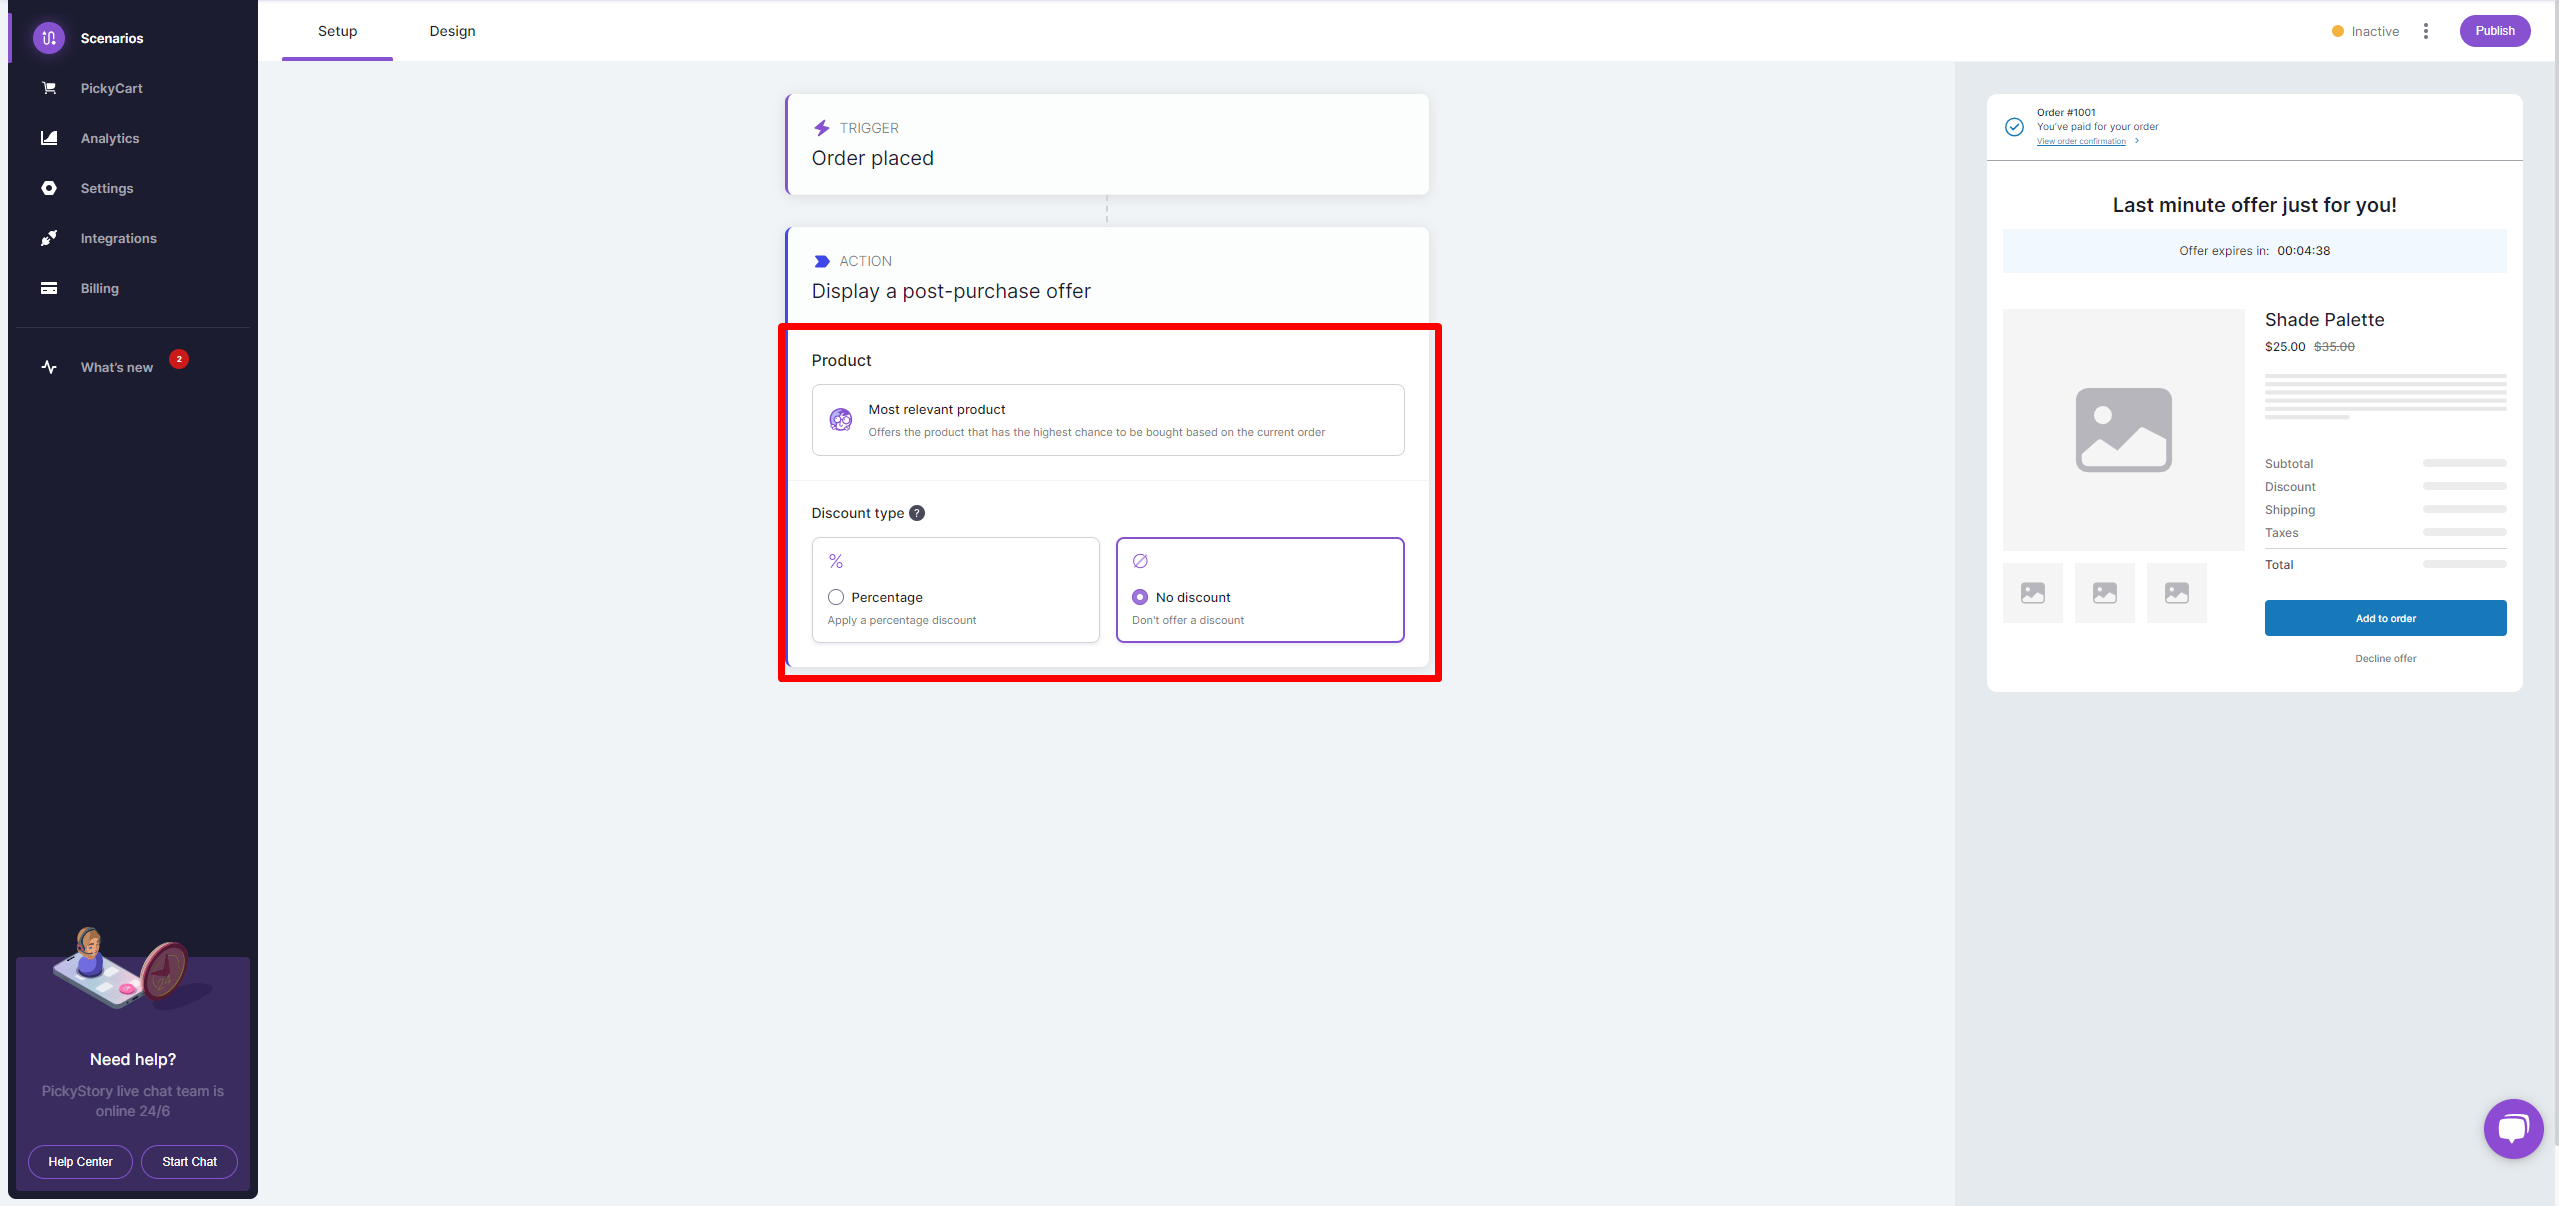
3\. Choose your discount type and discount value.<br>

<figure><img src="https://25037085.fs1.hubspotusercontent-eu1.net/hub/25037085/hubfs/image-png-May-07-2024-02-26-57-0535-PM.png?width=2559&#x26;height=1206&#x26;name=image-png-May-07-2024-02-26-57-0535-PM.png" alt=""><figcaption></figcaption></figure>

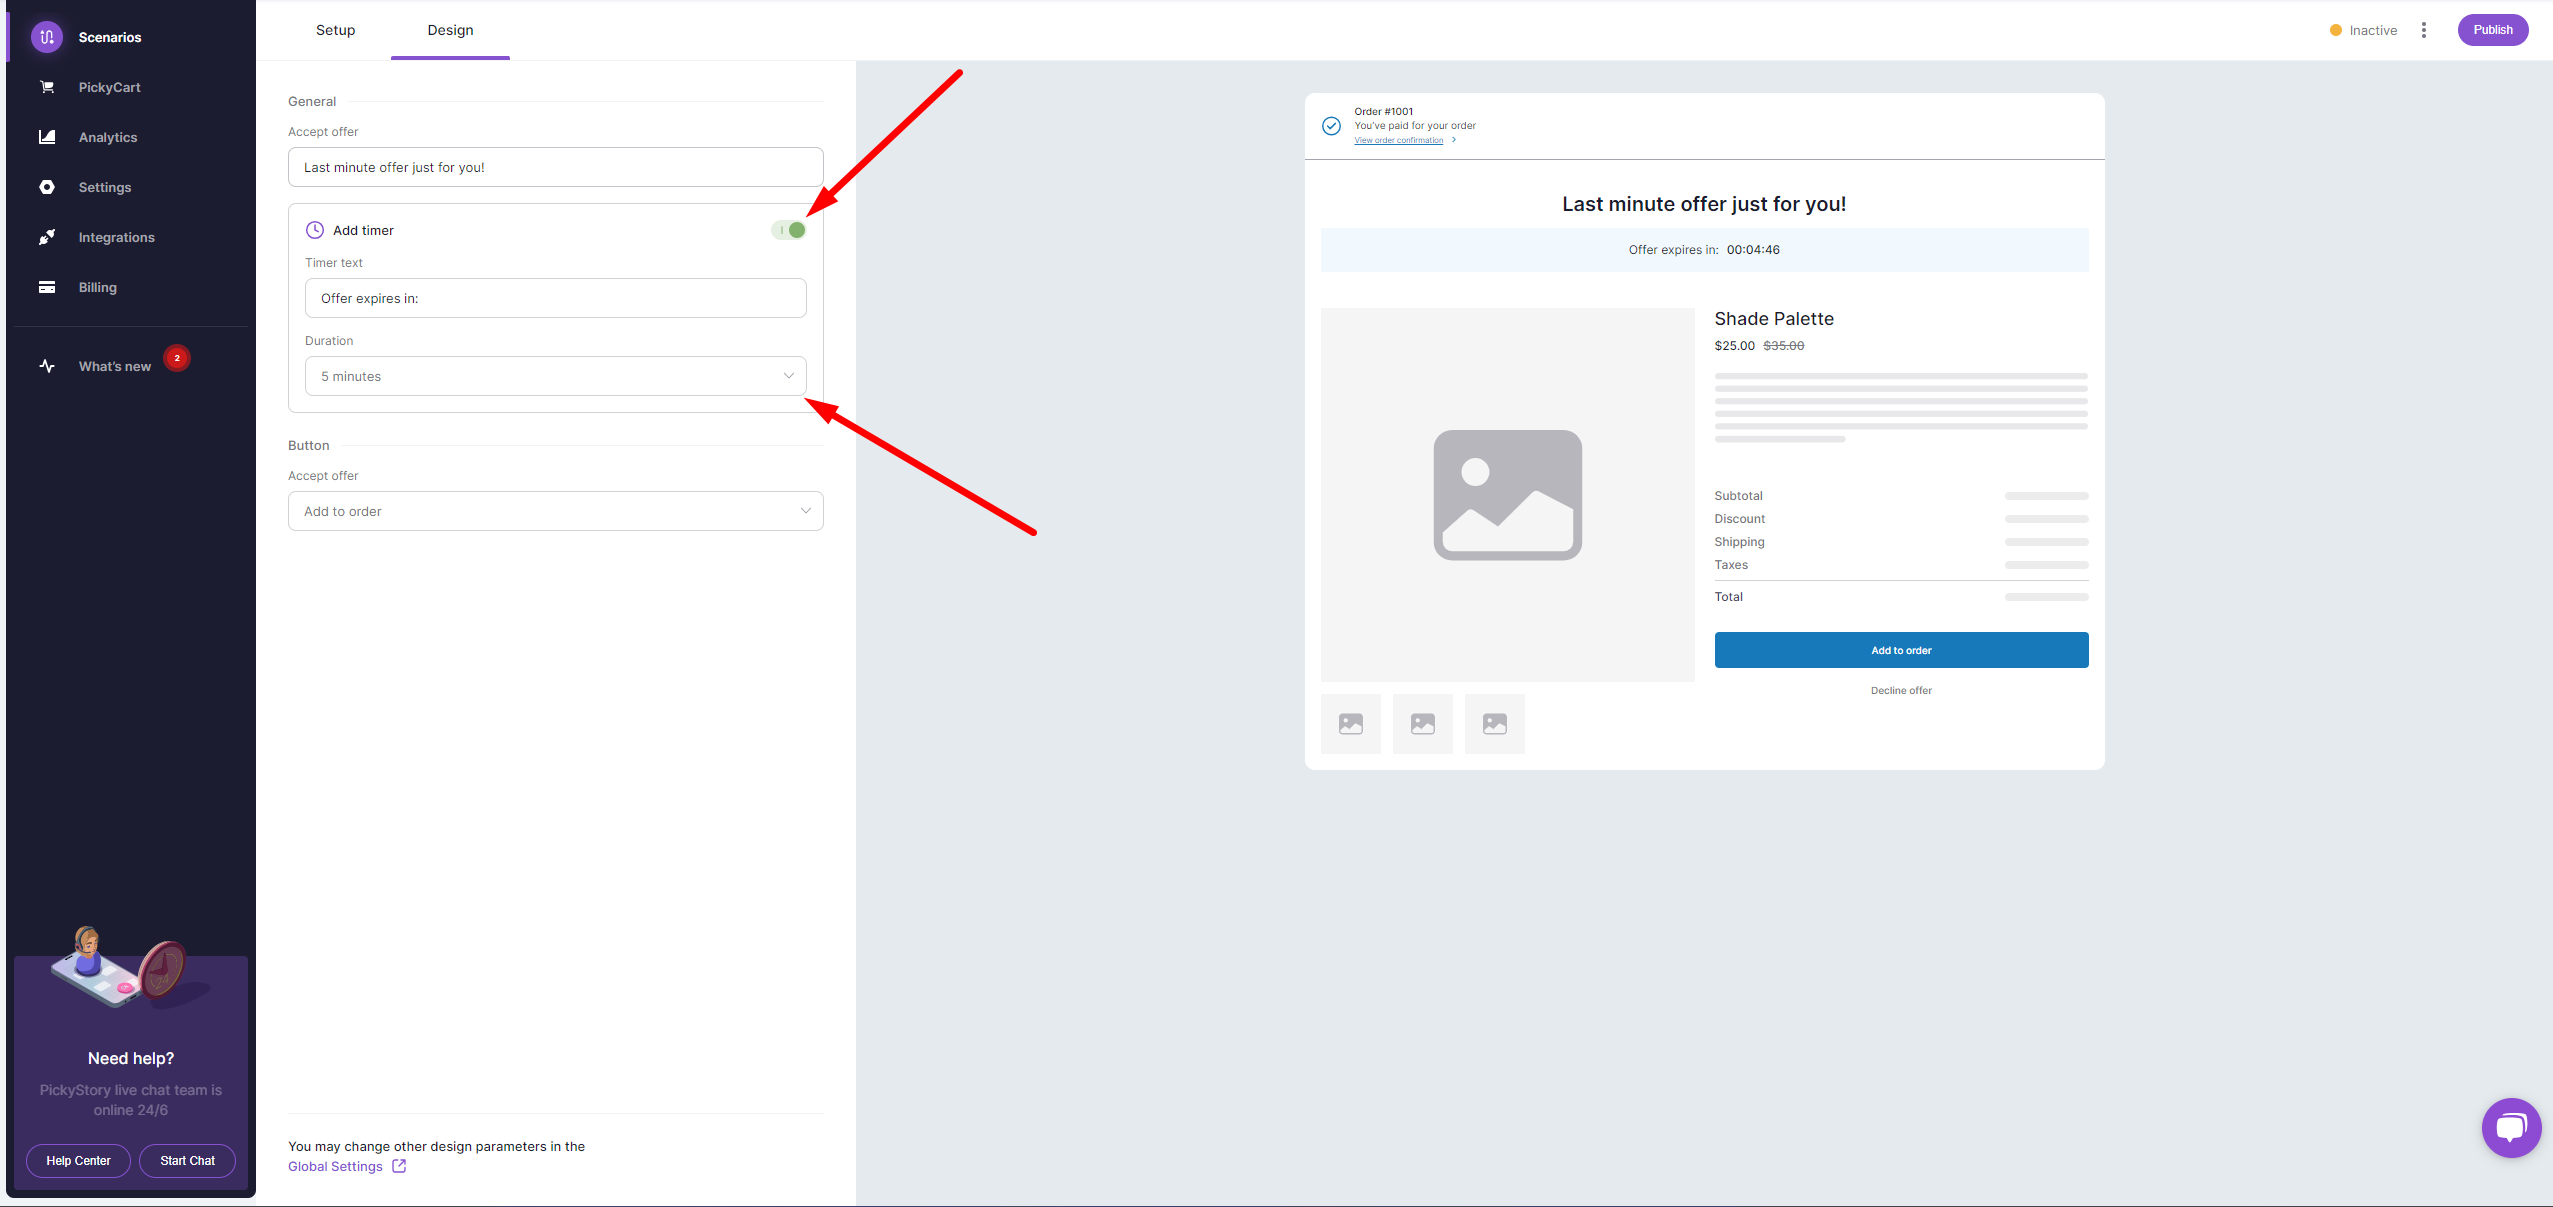
4\. In Design -> Enable/disable the timer and set up the time.<br>

<figure><img src="https://25037085.fs1.hubspotusercontent-eu1.net/hub/25037085/hubfs/image-png-May-07-2024-02-27-49-7453-PM.png?width=2553&#x26;height=1207&#x26;name=image-png-May-07-2024-02-27-49-7453-PM.png" alt=""><figcaption></figcaption></figure>

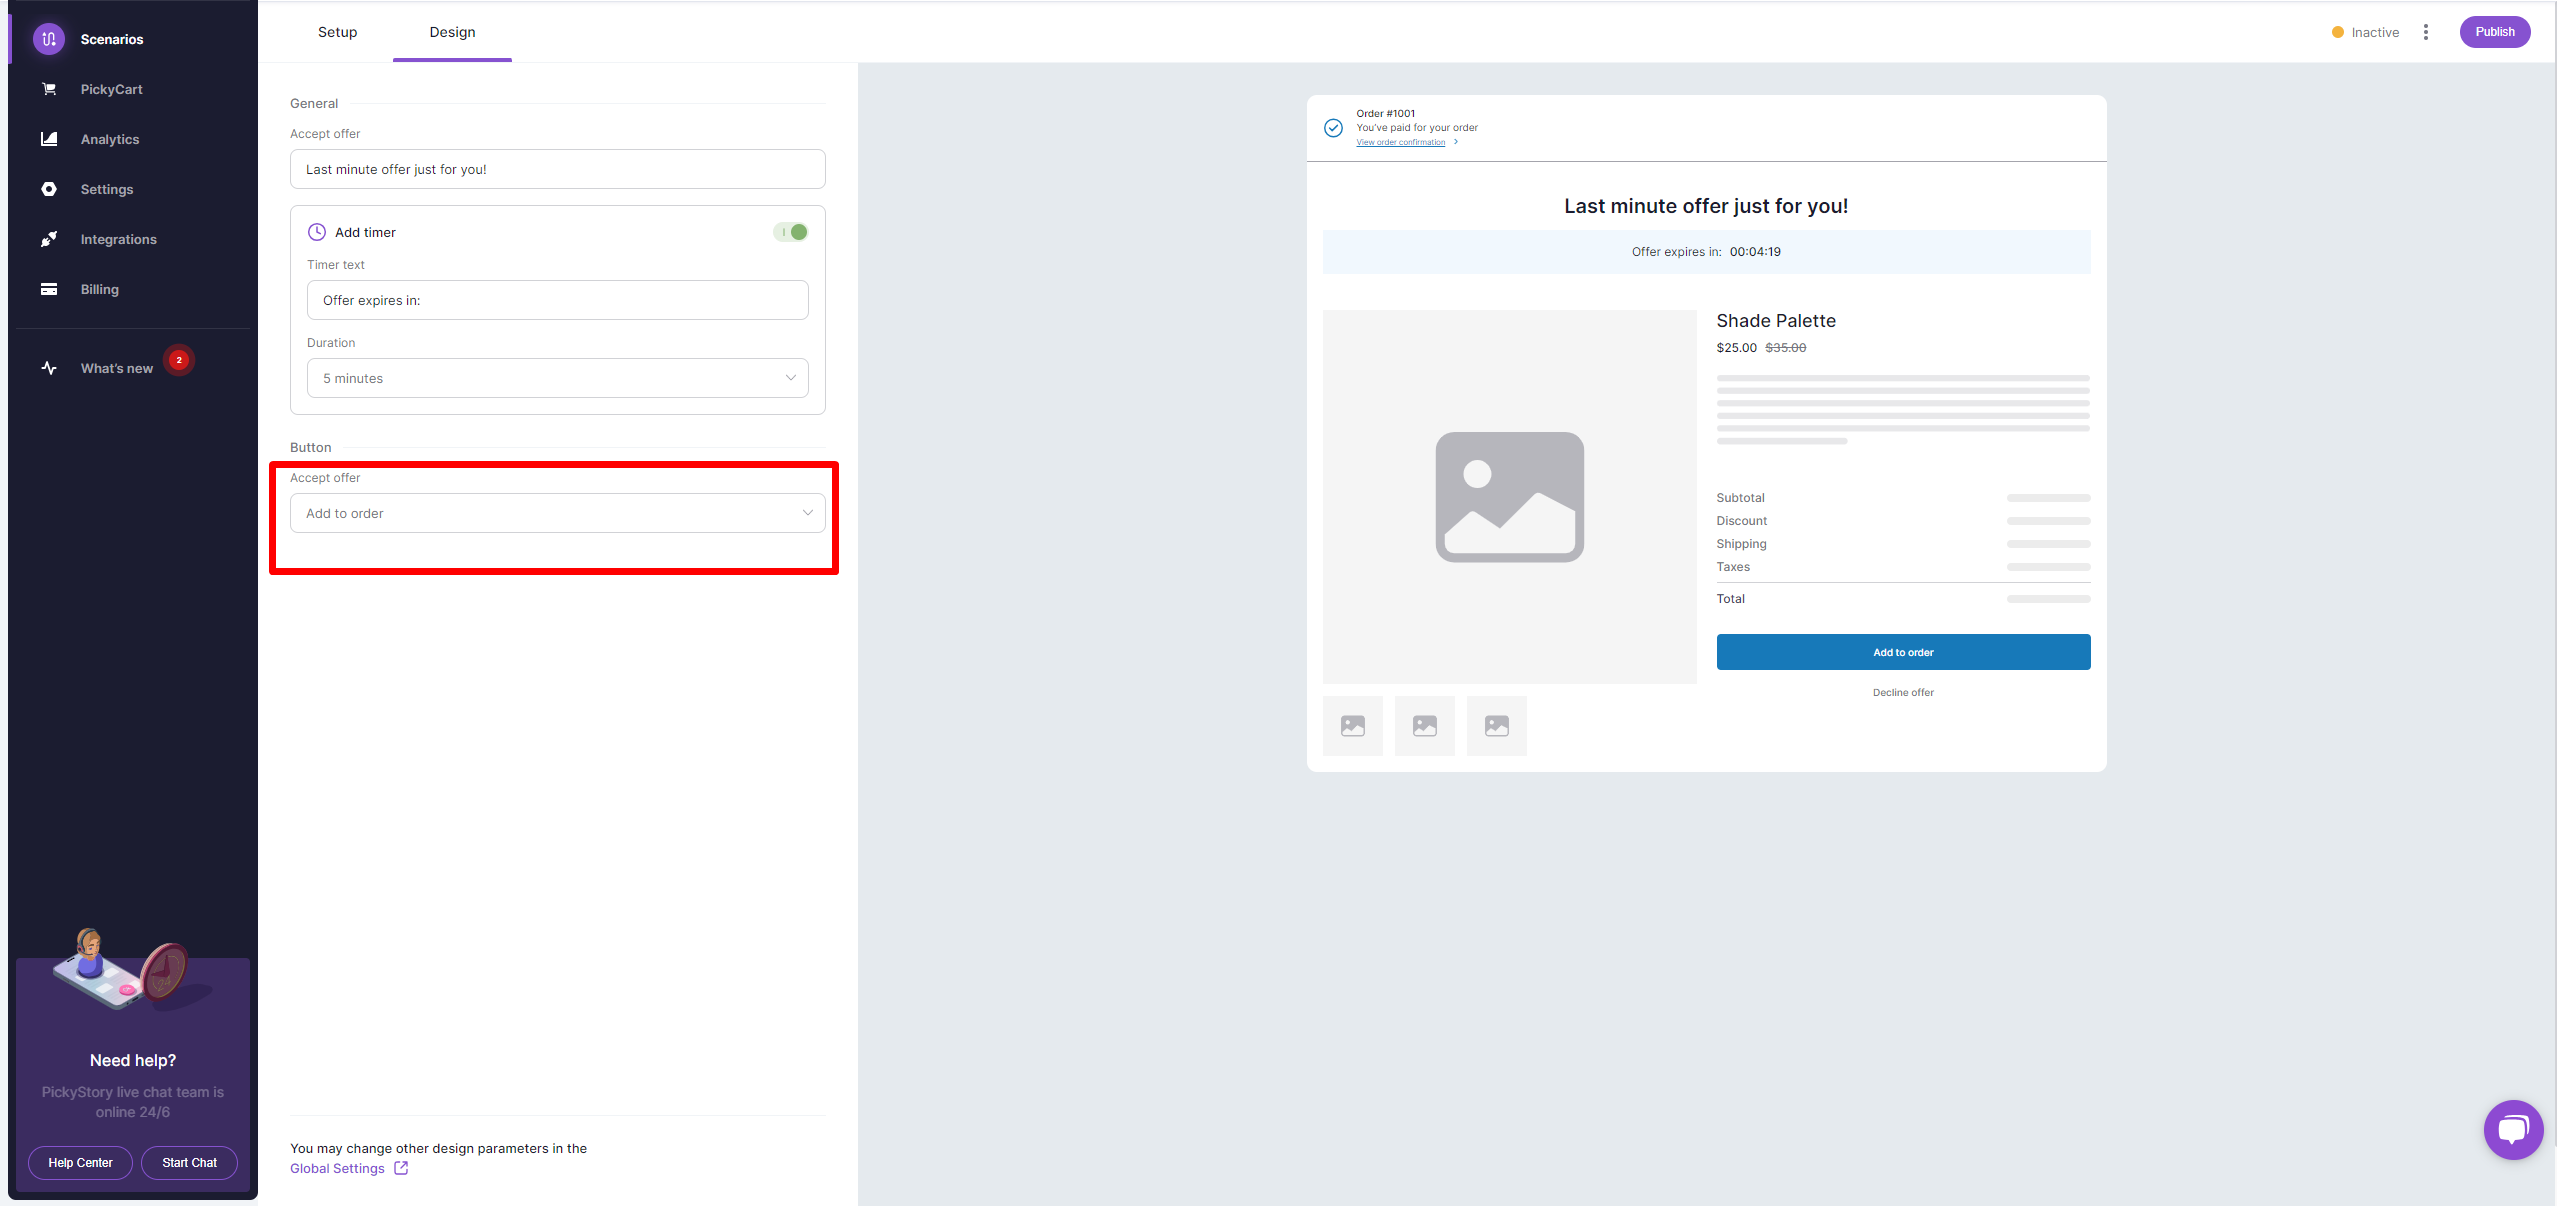
5\. Choose the Call-to-action text.<br>

<figure><img src="https://25037085.fs1.hubspotusercontent-eu1.net/hub/25037085/hubfs/image-png-May-07-2024-02-28-23-3891-PM.png?width=2557&#x26;height=1206&#x26;name=image-png-May-07-2024-02-28-23-3891-PM.png" alt=""><figcaption></figcaption></figure>

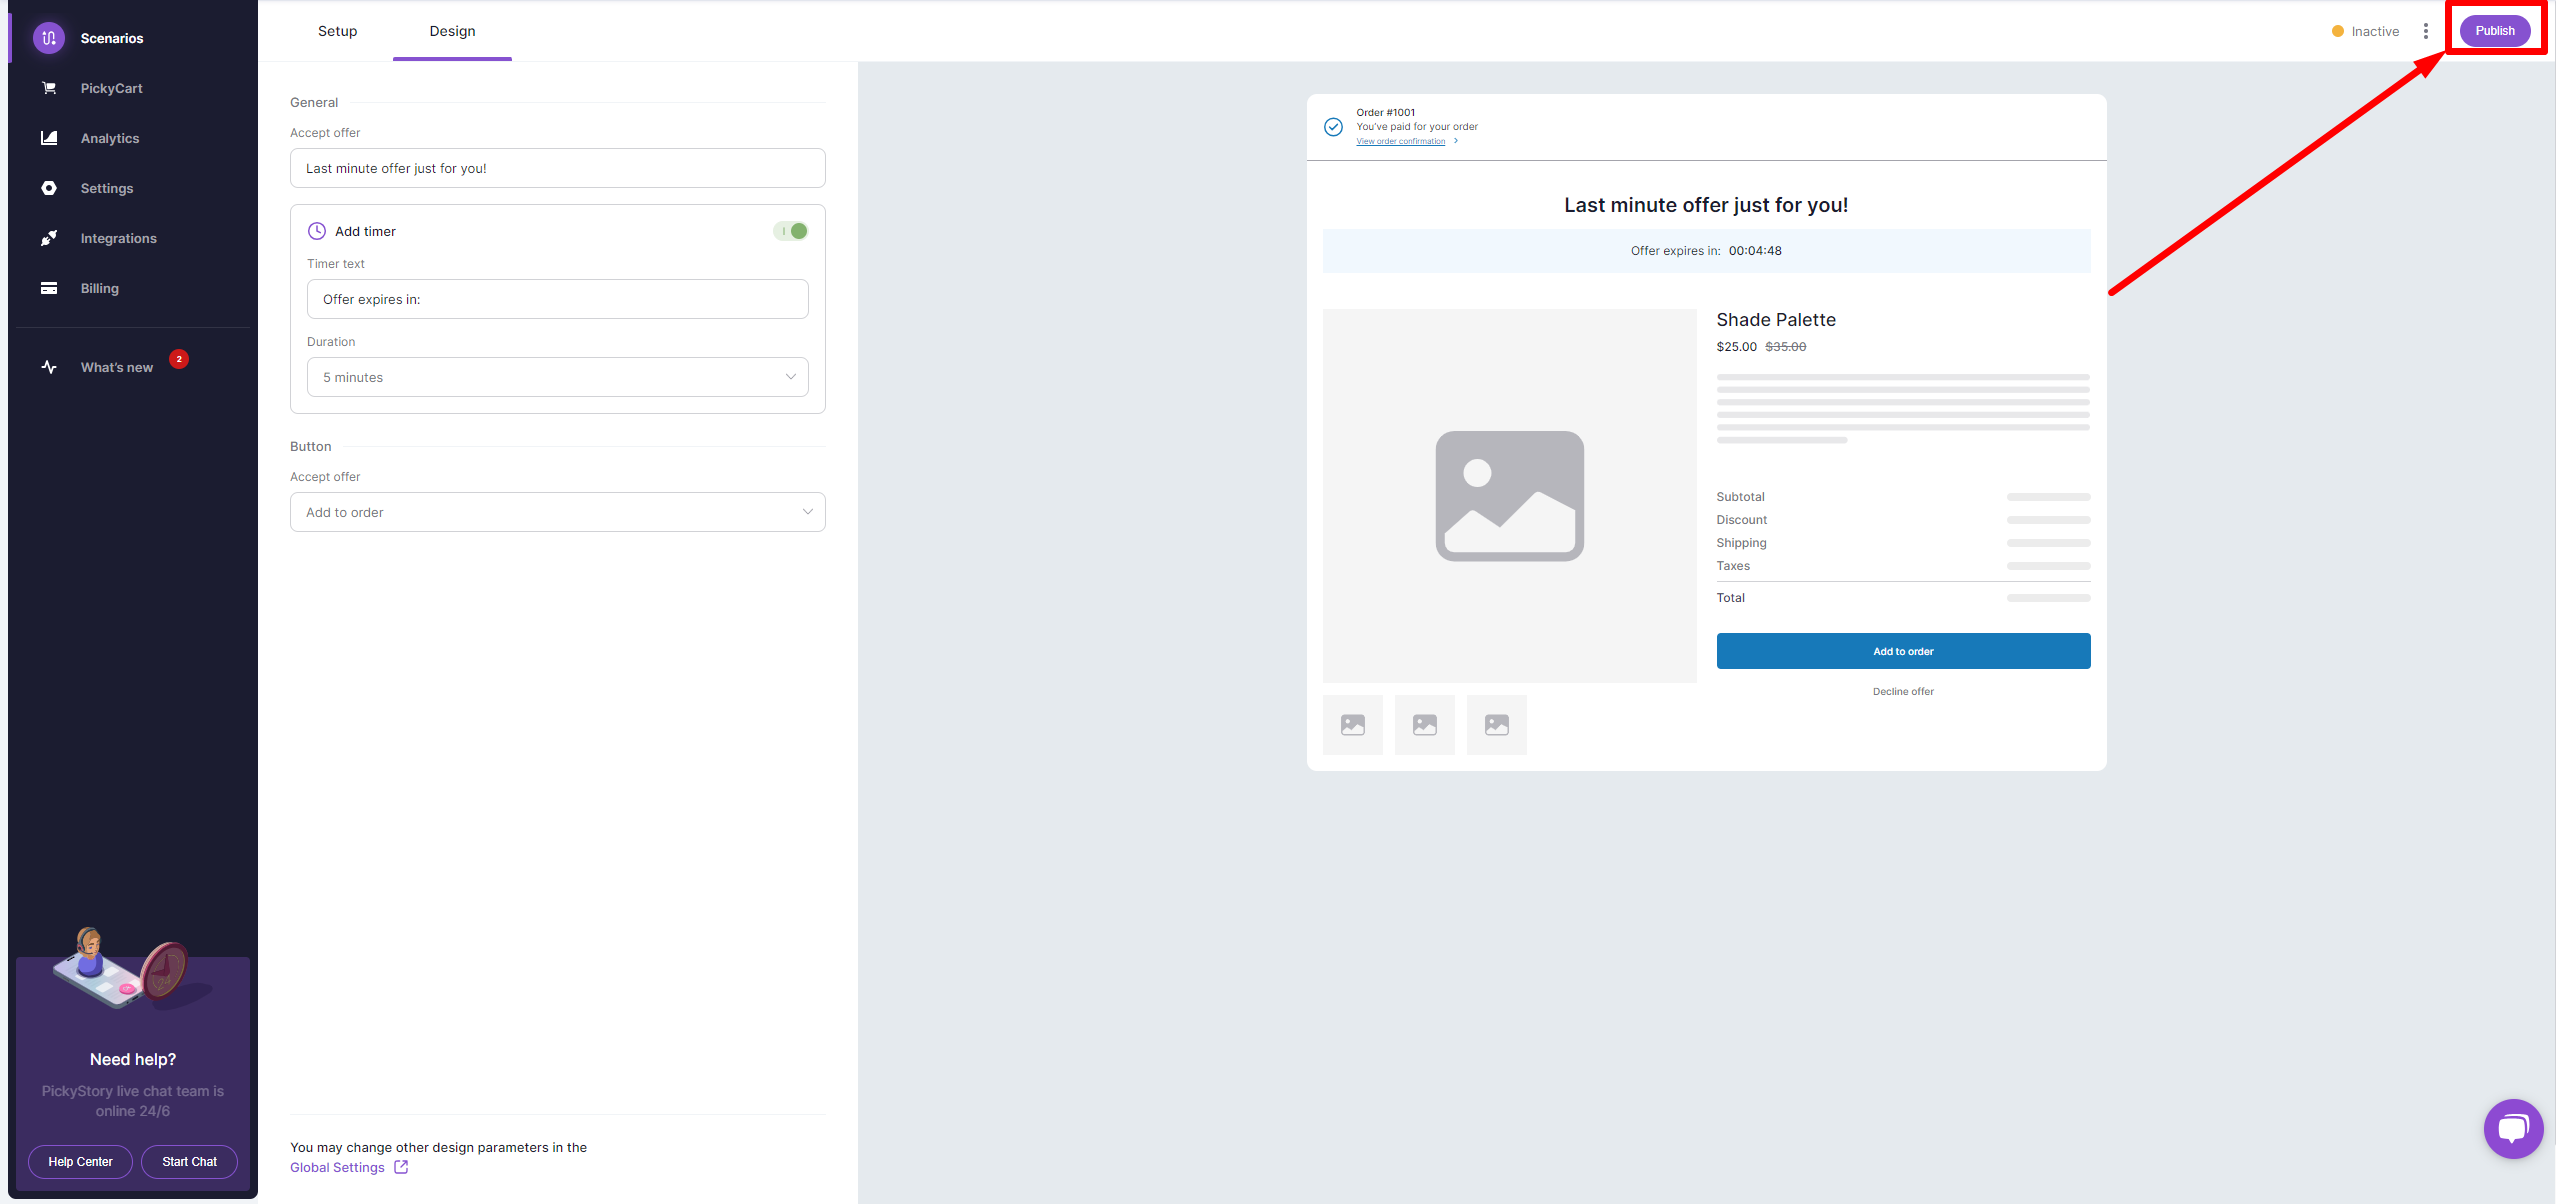
6\. Publish the scenario to make it live in your store.<br>

<figure><img src="https://25037085.fs1.hubspotusercontent-eu1.net/hub/25037085/hubfs/image-png-May-07-2024-02-28-49-6306-PM.png?width=2556&#x26;height=1204&#x26;name=image-png-May-07-2024-02-28-49-6306-PM.png" alt=""><figcaption></figcaption></figure>

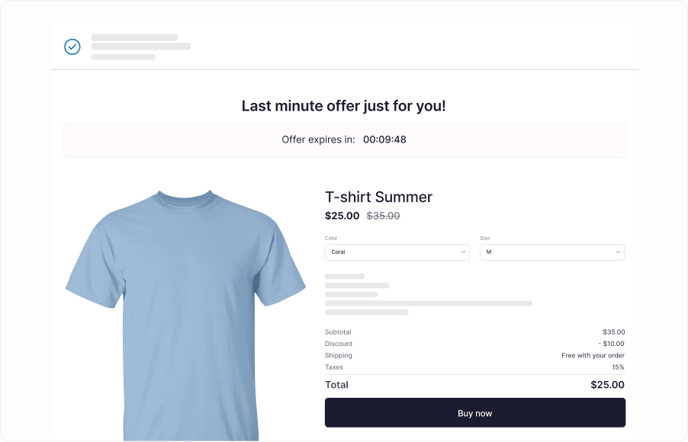
Your post-purchase offer is now live and will look like that- <br>

<figure><img src="https://25037085.fs1.hubspotusercontent-eu1.net/hub/25037085/hubfs/post-purchase.png?width=688&#x26;height=442&#x26;name=post-purchase.png" alt=""><figcaption></figcaption></figure>


# Subscriptions


# Page 2


# Bundles & Upsell

Set up and manage bundling scenarios, including fixed product bundles, frequently bought together suggestions, mix-and-match options, and a variety of other upsell and cross-sell offers on product pages and regular pages. The integration with your Shopify store ensures that inventory is automatically synchronized and discounts are applied smoothly.

### Scenarios

<table data-view="cards"><thead><tr><th></th><th data-hidden data-card-target data-type="content-ref"></th><th data-hidden data-card-cover data-type="files"></th></tr></thead><tbody><tr><td>Bundle as Product            </td><td><a href="/pages/u6nrNFHpuDxwb7dyIS8t">/pages/u6nrNFHpuDxwb7dyIS8t</a></td><td><a href="/files/JteYN27dnuWGGJ2qDhWU">/files/JteYN27dnuWGGJ2qDhWU</a></td></tr><tr><td>Build Your Own Bundle Page    </td><td><a href="/pages/FeY3fQmSAJSpVa3oPKCj">/pages/FeY3fQmSAJSpVa3oPKCj</a></td><td><a href="/files/Z3whhsSbZBzsTh114UlP">/files/Z3whhsSbZBzsTh114UlP</a></td></tr><tr><td>Build Your Own Bundle Section  </td><td><a href="/pages/zTIm16jnDz8hA3w6WdLK">/pages/zTIm16jnDz8hA3w6WdLK</a></td><td><a href="/files/q67gxlqbxaCeGytuwPSo">/files/q67gxlqbxaCeGytuwPSo</a></td></tr><tr><td>Quantity Breaks   </td><td><a href="/pages/IpvVvQVwbKYNPDUn8mf6">/pages/IpvVvQVwbKYNPDUn8mf6</a></td><td><a href="/files/zqIZTvD3cgKh1SS3Orm1">/files/zqIZTvD3cgKh1SS3Orm1</a></td></tr><tr><td>Upsell Popup</td><td><a href="/pages/OKSlzgIlNjxW43E7PVUq">/pages/OKSlzgIlNjxW43E7PVUq</a></td><td><a href="/files/uNz5O7H5QJpwAXv1B6s3">/files/uNz5O7H5QJpwAXv1B6s3</a></td></tr><tr><td>Frequently Bought Together   </td><td><a href="/pages/6kSRuoQalenfDd8ULOuY">/pages/6kSRuoQalenfDd8ULOuY</a></td><td><a href="/files/TMNG0JSJBDtHTvtFhjvF">/files/TMNG0JSJBDtHTvtFhjvF</a></td></tr></tbody></table>

***

### Other

<table data-view="cards"><thead><tr><th></th><th data-hidden data-type="content-ref"></th><th data-hidden data-card-cover data-type="files"></th><th data-hidden data-card-target data-type="content-ref"></th></tr></thead><tbody><tr><td>Analytics</td><td><a href="/pages/jAaALnI4tYbRfycMFOZk">/pages/jAaALnI4tYbRfycMFOZk</a></td><td><a href="/files/fGdwoUZMHi9R1A9SF8kV">/files/fGdwoUZMHi9R1A9SF8kV</a></td><td><a href="/pages/jAaALnI4tYbRfycMFOZk">/pages/jAaALnI4tYbRfycMFOZk</a></td></tr><tr><td>Settings</td><td><a href="/pages/yGZjRAOhxKx0iIvWs3Go">/pages/yGZjRAOhxKx0iIvWs3Go</a></td><td><a href="/files/s6UKx0x7VNHUcvtwizxu">/files/s6UKx0x7VNHUcvtwizxu</a></td><td><a href="/pages/yGZjRAOhxKx0iIvWs3Go">/pages/yGZjRAOhxKx0iIvWs3Go</a></td></tr><tr><td>Integrations</td><td><a href="/pages/f883S7xm1eVfubNPq2Sl">/pages/f883S7xm1eVfubNPq2Sl</a></td><td><a href="/files/M2sBNzYTmpK7NK2nBv3N">/files/M2sBNzYTmpK7NK2nBv3N</a></td><td><a href="/pages/f883S7xm1eVfubNPq2Sl">/pages/f883S7xm1eVfubNPq2Sl</a></td></tr><tr><td>Billing</td><td><a href="/pages/ZsXtIQr7ws3ILxg8HKhb">/pages/ZsXtIQr7ws3ILxg8HKhb</a></td><td><a href="/files/4N49hU0u26c0GXZEXnTJ">/files/4N49hU0u26c0GXZEXnTJ</a></td><td><a href="/pages/ZsXtIQr7ws3ILxg8HKhb">/pages/ZsXtIQr7ws3ILxg8HKhb</a></td></tr></tbody></table>


# What Types of Scenarios are Supported in Bundles & Upsell

We offer a versatile range of product scenarios designed to enhance upselling strategies without the need to switch between multiple apps. These scenarios help Shopify merchants create compelling deals to boost sales and improve customer experience.&#x20;

## Here’s an overview of the scenarios supported:

### 1. Bundle as Product

**Description**:

Bundle multiple products into a single item that can be added to collections and marketed as one product. Ideal for creating gift packs or multipacks that appear on a dedicated product page.

**Popular Use Cases:**

* Buy A+B+C for a combined price (e.g., Buy A, B, C for $50)
* Offer curated packs from specific collections (e.g., Buy any pack from the Gifts collection for $99)
* Sell multi-packs of a single product (e.g., Buy a 3-pack of one product)

### 2. Bundle Builders (Build Your Own Bundle)

**Description**:

Allow customers to create their own custom bundles by selecting from a range of curated products. This gives customers flexibility and personalization options.

**Popular Use Cases:**

* Select any 3 items from a specific collection (e.g., summer collection)
* Combine products across categories (e.g., Pick any 3 t-shirts and any pair of pants)
* Choose a set number of products from a larger selection (e.g., Choose 3 out of 8 soaps)

### 3. Quantity Breaks

**Description**:

Encourage bulk purchases with tiered pricing. Set different price points for various quantities, motivating customers to buy more for better discounts.

**Popular Use Cases:**

* Buy in bulk with escalating discounts (e.g., Buy 3 for 10% off, 6 for 15% off)
* Offer fixed-price bundles for different quantities (e.g., Buy 3 for $50, 6 for $85)

### 4. Complete the Bundle (Pop-Up)

**Description**:

When a product that is part of a bundle is added to the cart, a pop-up shows the remaining items in the bundle and any available discounts. This encourages customers to complete the bundle.

**Popular Use Cases:**

* Suggest related products to complete a bundle (e.g., Add a phone, suggest a case and screen protector)
* Highlight discounts for bundled items (e.g., Buy a camera, get 10% off accessories)
* Upsell with complementary products (e.g., Add running shoes, suggest matching sportswear)

### 5. Frequently Bought Together (FBT) Bundles

**Description**:

Group similar or complementary products that are often purchased together. This helps increase average order value by offering a convenient package of related items.

**Popular Use Cases:**

* Bundle complementary items (e.g., Laptop and keyboard)
* Upsell higher-tier products (e.g., Buy a 55” TV instead of a 42”)
* Offer a discount for multiple items (e.g., Bundle 3 products to get a discount)

***

<table data-card-size="large" data-view="cards"><thead><tr><th></th><th></th><th data-hidden data-type="content-ref"></th><th data-hidden data-card-target data-type="content-ref"></th></tr></thead><tbody><tr><td><mark style="color:purple;"><strong>Get Bundles &#x26; Upsell</strong></mark> </td><td>Try free</td><td><a href="https://apps.shopify.com/product-kits-bundles-pickystory">https://apps.shopify.com/product-kits-bundles-pickystory</a></td><td><a href="https://apps.shopify.com/product-kits-bundles-pickystory?surface_intra_position=1&#x26;surface_type=partners&#x26;surface_version=redesign">https://apps.shopify.com/product-kits-bundles-pickystory?surface_intra_position=1&#x26;surface_type=partners&#x26;surface_version=redesign</a></td></tr></tbody></table>


# What Discount combinations are available with Amplify?

Learn what types of discount combinations are available when using Amplify in your store.

## What is Discount Combinations

A **discount combination** refers to the practice of applying multiple discounts or promotional offers to a single purchase. This can involve stacking different types of discounts, such as percentage reductions, coupon codes, or bulk purchase deals. For example, a customer might apply a store-wide sale, a loyalty discount, and a special coupon to maximize savings. While retailers sometimes restrict discount combinations, savvy shoppers often seek ways to combine offers for the best possible deal. Understanding how discount combinations work can lead to significant savings and a more strategic shopping experience.

Each offer you create with Amplify has one of the following classes, depending on what the discount applies to:<br>

* Order discount - SXGY scenario \[cart discount]
* Product discount - Deals, Scenarios, SXGY scenario \[free gift]
* Shipping discount - SXGY scenario \[free shipping]

&#x20;

## **Most used discount combinations:**

The following table illustrates examples of possible discount combinations and displays which combinations are supported.

<table data-full-width="true"><thead><tr><th width="197"></th><th align="center">Deal /Scenario</th><th align="center">SXGY Shipping</th><th align="center">SXGY free gift</th><th align="center">SXGY order discount</th><th align="center">Post-Purchase</th><th data-hidden></th></tr></thead><tbody><tr><td>Scenario</td><td align="center">           <span data-gb-custom-inline data-tag="emoji" data-code="1f7e2">🟢</span></td><td align="center">                  <span data-gb-custom-inline data-tag="emoji" data-code="1f7e2">🟢</span></td><td align="center">                  <span data-gb-custom-inline data-tag="emoji" data-code="1f7e2">🟢</span></td><td align="center">                  <span data-gb-custom-inline data-tag="emoji" data-code="1f7e2">🟢</span></td><td align="center">                  <span data-gb-custom-inline data-tag="emoji" data-code="1f7e2">🟢</span></td><td></td></tr><tr><td>SXGY shipping</td><td align="center">           <span data-gb-custom-inline data-tag="emoji" data-code="1f7e2">🟢</span></td><td align="center">                  <span data-gb-custom-inline data-tag="emoji" data-code="26ab">⚫</span></td><td align="center">                  <span data-gb-custom-inline data-tag="emoji" data-code="1f7e2">🟢</span></td><td align="center">                  <span data-gb-custom-inline data-tag="emoji" data-code="1f7e2">🟢</span></td><td align="center">                  <span data-gb-custom-inline data-tag="emoji" data-code="1f7e2">🟢</span></td><td></td></tr><tr><td>SXGY free gift</td><td align="center">           <span data-gb-custom-inline data-tag="emoji" data-code="1f7e2">🟢</span></td><td align="center">                  <span data-gb-custom-inline data-tag="emoji" data-code="1f7e2">🟢</span></td><td align="center">                  <span data-gb-custom-inline data-tag="emoji" data-code="1f7e2">🟢</span></td><td align="center">                  <span data-gb-custom-inline data-tag="emoji" data-code="1f7e2">🟢</span></td><td align="center">                  <span data-gb-custom-inline data-tag="emoji" data-code="1f7e2">🟢</span></td><td></td></tr><tr><td>SXGY order discount</td><td align="center">           <span data-gb-custom-inline data-tag="emoji" data-code="1f7e2">🟢</span></td><td align="center">                  <span data-gb-custom-inline data-tag="emoji" data-code="1f7e2">🟢</span></td><td align="center">                  <span data-gb-custom-inline data-tag="emoji" data-code="1f7e2">🟢</span></td><td align="center">                  <span data-gb-custom-inline data-tag="emoji" data-code="26ab">⚫</span></td><td align="center">                  <span data-gb-custom-inline data-tag="emoji" data-code="1f7e2">🟢</span></td><td></td></tr><tr><td>Post-Purchase</td><td align="center">           <span data-gb-custom-inline data-tag="emoji" data-code="1f7e2">🟢</span></td><td align="center">                  <span data-gb-custom-inline data-tag="emoji" data-code="1f7e2">🟢</span></td><td align="center">                  <span data-gb-custom-inline data-tag="emoji" data-code="1f7e2">🟢</span></td><td align="center">                  <span data-gb-custom-inline data-tag="emoji" data-code="1f7e2">🟢</span></td><td align="center">                  <span data-gb-custom-inline data-tag="emoji" data-code="26ab">⚫</span></td><td></td></tr></tbody></table>

{% hint style="info" %}
🟢 Discounts will be combined &#x20;

🔴 Discounts will not be combined (only one discount will apply)&#x20;

⚫ Irrelevant
{% endhint %}

If you want to achieve the combination of Deal/Scenario+Spend X Get free shipping, please reach out to our support team to enable CartTranform.&#x20;

#### Shopify limitations with CartTransform:

* \`checkout.liquid\` customizations aren't compatible with bundles.
* &#x20;[\[Shopify Scripts\]](https://shopify.dev/docs/api/liquid/objects#script) aren't compatible with bundles. If you publish a script, then bundles are moved to a draft status. To sell products in a bundle again, you must unpublish the script.
* Bundles can be sold through only the Online Store sales channel. Bundles can’t be sold through Shopify Point of Sale or with selling plans.
* Some apps and payment gateways aren't compatible with bundle
  * [**Global-e**](https://www.global-e.com/shopify-partnership-us)
  * [**Licensify**](https://apps.shopify.com/beauty-license-verification-v2)
  * The legacy Recharge subscriptions app

#### Amplify temporary limitations with CartTransform :

* The bundle cannot contain more than 4 products.
* CartTransform will not function properly if more than 2 bundles are added to the cart.\ <br>

## **Full discount combination table:**

<table data-full-width="true"><thead><tr><th width="203"></th><th width="143">Deal/Scenario</th><th width="146" align="center">SXGY Shipping</th><th width="140">SXGY Free gift</th><th width="144">Post-Purchase</th><th width="336">Shopify manual shipping (Discount code)</th><th width="239">Shopify automatic shipping</th><th width="334">Shopify manual product (discount code)</th><th width="238">Shopify automatic product</th><th width="293">Shopify manual order (discount code)</th><th>Shopify automatic order</th></tr></thead><tbody><tr><td>Deal/ Scenario</td><td>            <span data-gb-custom-inline data-tag="emoji" data-code="1f7e2">🟢</span></td><td align="center">             <span data-gb-custom-inline data-tag="emoji" data-code="1f7e2">🟢</span></td><td>           <span data-gb-custom-inline data-tag="emoji" data-code="1f7e2">🟢</span></td><td>           <span data-gb-custom-inline data-tag="emoji" data-code="1f7e2">🟢</span></td><td>                                      <span data-gb-custom-inline data-tag="emoji" data-code="1f7e2">🟢</span></td><td>                        <span data-gb-custom-inline data-tag="emoji" data-code="1f7e2">🟢</span></td><td>                                     <span data-gb-custom-inline data-tag="emoji" data-code="1f7e2">🟢</span></td><td>                        <span data-gb-custom-inline data-tag="emoji" data-code="1f7e2">🟢</span></td><td>                                    <span data-gb-custom-inline data-tag="emoji" data-code="1f7e2">🟢</span></td><td>       <span data-gb-custom-inline data-tag="emoji" data-code="1f7e2">🟢</span></td></tr><tr><td>SXGY Shipping</td><td>            <span data-gb-custom-inline data-tag="emoji" data-code="1f7e2">🟢</span></td><td align="center">             <span data-gb-custom-inline data-tag="emoji" data-code="26ab">⚫</span></td><td>           <span data-gb-custom-inline data-tag="emoji" data-code="1f7e2">🟢</span></td><td>           <span data-gb-custom-inline data-tag="emoji" data-code="1f7e2">🟢</span></td><td>                                      <span data-gb-custom-inline data-tag="emoji" data-code="1f7e2">🟢</span></td><td>                        <span data-gb-custom-inline data-tag="emoji" data-code="1f7e2">🟢</span></td><td>                                     <span data-gb-custom-inline data-tag="emoji" data-code="1f7e2">🟢</span></td><td>                        <span data-gb-custom-inline data-tag="emoji" data-code="1f7e2">🟢</span></td><td>                                    <span data-gb-custom-inline data-tag="emoji" data-code="1f7e2">🟢</span></td><td>       <span data-gb-custom-inline data-tag="emoji" data-code="1f7e2">🟢</span></td></tr><tr><td>SXGY Free gift</td><td>            <span data-gb-custom-inline data-tag="emoji" data-code="1f7e2">🟢</span></td><td align="center">             <span data-gb-custom-inline data-tag="emoji" data-code="1f7e2">🟢</span></td><td>           <span data-gb-custom-inline data-tag="emoji" data-code="1f7e2">🟢</span></td><td>           <span data-gb-custom-inline data-tag="emoji" data-code="1f7e2">🟢</span></td><td>                                      <span data-gb-custom-inline data-tag="emoji" data-code="1f7e2">🟢</span></td><td>                        <span data-gb-custom-inline data-tag="emoji" data-code="1f7e2">🟢</span></td><td>                                     <span data-gb-custom-inline data-tag="emoji" data-code="1f7e2">🟢</span></td><td>                        <span data-gb-custom-inline data-tag="emoji" data-code="1f7e2">🟢</span></td><td>                                    <span data-gb-custom-inline data-tag="emoji" data-code="1f7e2">🟢</span></td><td>       <span data-gb-custom-inline data-tag="emoji" data-code="1f7e2">🟢</span></td></tr><tr><td>SXGY Order discount</td><td>            <span data-gb-custom-inline data-tag="emoji" data-code="1f7e2">🟢</span></td><td align="center">             <span data-gb-custom-inline data-tag="emoji" data-code="1f7e2">🟢</span></td><td>           <span data-gb-custom-inline data-tag="emoji" data-code="1f7e2">🟢</span></td><td>           <span data-gb-custom-inline data-tag="emoji" data-code="1f7e2">🟢</span></td><td>                                      <span data-gb-custom-inline data-tag="emoji" data-code="1f7e2">🟢</span></td><td>                        <span data-gb-custom-inline data-tag="emoji" data-code="1f7e2">🟢</span></td><td>                                     <span data-gb-custom-inline data-tag="emoji" data-code="1f7e2">🟢</span></td><td>                        <span data-gb-custom-inline data-tag="emoji" data-code="1f7e2">🟢</span></td><td>                                    <span data-gb-custom-inline data-tag="emoji" data-code="1f7e2">🟢</span></td><td>       <span data-gb-custom-inline data-tag="emoji" data-code="1f7e2">🟢</span></td></tr><tr><td>Post-Purchase</td><td>            <span data-gb-custom-inline data-tag="emoji" data-code="1f7e2">🟢</span></td><td align="center">             <span data-gb-custom-inline data-tag="emoji" data-code="1f7e2">🟢</span></td><td>           <span data-gb-custom-inline data-tag="emoji" data-code="1f7e2">🟢</span></td><td>           <span data-gb-custom-inline data-tag="emoji" data-code="26ab">⚫</span></td><td>                                      <span data-gb-custom-inline data-tag="emoji" data-code="1f7e2">🟢</span></td><td>                        <span data-gb-custom-inline data-tag="emoji" data-code="1f7e2">🟢</span></td><td>                                     <span data-gb-custom-inline data-tag="emoji" data-code="1f7e2">🟢</span></td><td>                        <span data-gb-custom-inline data-tag="emoji" data-code="1f7e2">🟢</span></td><td>                                    <span data-gb-custom-inline data-tag="emoji" data-code="1f7e2">🟢</span></td><td>       <span data-gb-custom-inline data-tag="emoji" data-code="1f7e2">🟢</span></td></tr></tbody></table>

***

## Commonly Asked Questions about Discount Combinations

<details>

<summary>What are discount combinations?</summary>

Discount combinations allow customers to apply multiple discounts—such as bundled offers, percentage-off sales, and coupon codes—within a single transaction, boosting their overall savings.

</details>

<details>

<summary><strong>Can bundling offers be combined with other discounts?</strong></summary>

Yes, depending on your store’s settings. Many Shopify stores allow bundling offers to be stacked with other discounts, but this can be customized within your discount settings.

</details>

<details>

<summary><strong>Are there limits on how many discounts can be combined in a bundle?</strong></summary>

The number of discounts that can be combined is up to you. Shopify’s discount settings allow store owners to define whether multiple discounts, such as coupons and automatic discounts, can be used together.

</details>

<details>

<summary><strong>Do Shopify's automatic discounts work with bundles?</strong></summary>

Yes, automatic discounts can be configured to work alongside your bundling application. However, you’ll need to ensure they are enabled to stack with other offers in your discount settings.

</details>

<details>

<summary>What happens if a customer tries to combine discounts that aren’t allowed?</summary>

If your store doesn’t allow stacking certain discounts, Shopify will automatically apply the best available discount or notify the customer that the combination isn’t valid.

</details>

## Conclusion

Understanding and utilizing discount combinations can be a powerful way for shoppers to maximize their savings. By knowing how different types of discounts interact and taking advantage of stacking opportunities, consumers can significantly reduce the cost of their purchases. However, it’s important to stay informed about retailers' policies, as some may limit or exclude certain combinations. With a strategic approach, savvy shoppers can make the most of available deals, turning everyday purchases into smart savings opportunities.

***

<table data-card-size="large" data-column-title-hidden data-view="cards" data-full-width="false"><thead><tr><th></th><th></th><th data-hidden></th><th data-hidden></th><th data-hidden data-card-target data-type="content-ref"></th><th data-hidden data-card-cover data-type="files"></th></tr></thead><tbody><tr><td><mark style="color:purple;"><strong>Get Bundles &#x26; Upsell</strong></mark> </td><td>Try free </td><td> </td><td><p>1. Discount combinations</p><p>2. Bundle discount strategies</p><p>3. Stacking multiple discounts</p><p>4.Bundle and coupon stacking</p><p>5. Using discount codes with bundles</p><p>6.How to apply multiple discounts</p><p>7. Discount stacking rules</p><p>8. Boost sales with bundle offers</p><p>9. Combining promotions and discounts</p><p>10. Discount stacking for better sales</p><p> </p></td><td><a href="https://apps.shopify.com/product-kits-bundles-pickystory?surface_intra_position=1&#x26;surface_type=partners&#x26;surface_version=redesign">https://apps.shopify.com/product-kits-bundles-pickystory?surface_intra_position=1&#x26;surface_type=partners&#x26;surface_version=redesign</a></td><td></td></tr></tbody></table>


# How to Contact Support

Whether you have questions, need assistance, or are looking for guidance, there are two easy ways to reach us. While both options ensure that your inquiries are addressed promptly, we recommend contacting us from inside the app for a more seamless and efficient experience.

### 1. Contacting Us from Inside the App (Recommended)

If you're logged into your store within the app, contacting us is quick and straightforward. Here’s how:

* Look for the chat icon at the bottom-right corner of your dashboard.
* Click on the chat icon to open a conversation with our support team.
* Send us a message! We’re available from **Monday - Friday, 2 AM - 6 PM EST**, to assist you.

Using the in-app chat allows us to identify your store and its configurations right away, ensuring we can provide tailored support faster.

<figure><img src="/files/rLWbIxgqDTQ5kRdhdjqz" alt=""><figcaption></figcaption></figure>

### 2. Contacting Us via Our Website

You can also reach out to us directly from our website, whether you're browsing the homepage, pricing page, or any other section. Here’s how:

* Visit our [website](https://heyamplify.com/).
* Look for the **chat widget** at the bottom-right corner of the screen.
* Open the widget, and a support chat will appear. Enter your message, and our team will respond promptly.

This method is perfect for general inquiries or if you haven’t logged into your store yet.

<figure><img src="/files/4EySgAdxtdKOqSMhnpu7" alt=""><figcaption></figcaption></figure>

### 3. Contacting Us via Email

If you prefer, you can reach us via email at [**hello@heyamplify.com**](mailto:hello@heyamplify.com). When sending us an email, please include your store's handle or URL. This helps us quickly identify your store and provide you with the most accurate support.

We aim to respond to all emails promptly, so feel free to reach out for any assistance or inquiries.

### Conclusion

No matter which method you choose, our team is ready to help! For the fastest and most personalized support, we recommend reaching out to us from inside the app. However, if you're exploring our website, our chat widget is always available to assist with your questions.

***

<table data-card-size="large" data-column-title-hidden data-view="cards" data-full-width="false"><thead><tr><th></th><th></th><th data-hidden></th><th data-hidden></th><th data-hidden data-card-target data-type="content-ref"></th><th data-hidden data-card-cover data-type="files"></th></tr></thead><tbody><tr><td><mark style="color:purple;"><strong>Get Bundles &#x26; Upsell</strong></mark> </td><td>Try free </td><td> </td><td><p>1. Discount combinations</p><p>2. Bundle discount strategies</p><p>3. Stacking multiple discounts</p><p>4.Bundle and coupon stacking</p><p>5. Using discount codes with bundles</p><p>6.How to apply multiple discounts</p><p>7. Discount stacking rules</p><p>8. Boost sales with bundle offers</p><p>9. Combining promotions and discounts</p><p>10. Discount stacking for better sales</p><p> </p></td><td><a href="https://apps.shopify.com/product-kits-bundles-pickystory?surface_intra_position=1&#x26;surface_type=partners&#x26;surface_version=redesign">https://apps.shopify.com/product-kits-bundles-pickystory?surface_intra_position=1&#x26;surface_type=partners&#x26;surface_version=redesign</a></td><td></td></tr></tbody></table>


# How to Manage Shopify Sales Channels for Amplify Bundles

{% hint style="warning" %} <mark style="color:red;">**Important update: February 1, 2025**</mark>\
&#x20;  Between January 17 and February 1, newly created bundles were not automatically added to the Online Store channel on Shopify due to an unexpected bug following an upgrade to Shopify’s newest API. As part of this transition, this operation’s method was completely changed, requiring us to make significant adjustments.

&#x20;  Our team identified the issue and worked to resolve it. We’re happy to confirm that all bundles created during this period have now been retroactively added to the Online Store channel. \
&#x20;  Please note that we did not change the statuses of any bundles - whether they were set to draft or active - only their availability on the online store channel.
{% endhint %}

## Steps on How to Manage Shopify Sales Channels for Amplify Bundles

#### **1. Find Your New Amplify Bundle in Shopify**

1. Log in to your **Shopify Admin**.
2. Navigate to **Products** in the left-hand menu.
3. Among the products of your Shopify store, you can find your newly created Amplify bundle by searching its name.

***

#### **2. Open Sales Channel Settings**

1. On the product page of your bundle, locate the **Publishing** section on the right-hand side.
2. Click the **three-dot menu** (•••) next to **Sales Channels**.

<figure><img src="/files/Jx9DEiOAwpLL4AShJIda" alt=""><figcaption></figcaption></figure>

***

#### **3. Add the Bundle to the "Online Store"**

1. A pop-up will appear labeled **Manage Sales Channels**.
2. Check the box for **Online Store**.
3. Click **Done**.

<figure><img src="/files/fyIgu7CYt12S3Yz6wPli" alt=""><figcaption></figcaption></figure>

***

#### **4. Save Your Changes**

1. Scroll to the top of the product page.
2. Click **Save** to apply the changes.

Your bundle is now included in the **Online Store**, and will become visible to your customers.

***

<table data-card-size="large" data-column-title-hidden data-view="cards" data-full-width="false"><thead><tr><th></th><th></th><th data-hidden></th><th data-hidden></th><th data-hidden data-card-target data-type="content-ref"></th><th data-hidden data-card-cover data-type="files"></th></tr></thead><tbody><tr><td><mark style="color:purple;"><strong>Get Bundles &#x26; Upsell</strong></mark> </td><td>Try free </td><td> </td><td><p>1. Sales channel</p><p>2. Online store</p><p>3. New bundle bug</p><p>4. Product Page bug</p><p>5. PDP bug</p><p>6. Can't see bundle</p><p>7. Online store missing</p><p>8. Sales channel missing</p></td><td><a href="https://apps.shopify.com/product-kits-bundles-pickystory?surface_intra_position=1&#x26;surface_type=partners&#x26;surface_version=redesign">https://apps.shopify.com/product-kits-bundles-pickystory?surface_intra_position=1&#x26;surface_type=partners&#x26;surface_version=redesign</a></td><td></td></tr></tbody></table>


# How to Use the JavaScript SDK with Amplify Platform

## **What is the JavaScript SDK?**

The **JavaScript SDK** is a browser-based API provided by Amplify that allows developers to access real-time store and bundle information. This SDK enables developers to create custom storefront designs and behavior by integrating advanced logic, event handling, and dynamic interactions.

## **How It Works**

* The JavaScript SDK acts as a bridge between the Amplify Platform and the storefront, providing structured data that developers can use to implement dynamic and customized experiences.
* It is available **only for** [**Amplify One customers**](https://heyamplify.com/pricing/), and merchants must contact the sales team to enable access.
* Developers can use this SDK to modify the way Amplify widgets interact with the store, allowing for advanced styling and custom logic.

## **How to Use the JavaScript SDK**

If you're interested in using the JavaScript SDK:

1. **Ensure you're on the Amplify One plan.** If you are not, [reach out to our sales team ](https://heyamplify.com/?open-demo-popup=true)to discuss upgrading.
2. **Access the API documentation** (not publicly available—[contact our support team](https://support.heyamplify.com/bundles-and-upsell/how-to-contact-support) for details).
3. **Integrate the SDK** in the storefront and modify bundle behavior.

## **Important Notes**

* This SDK is **not a direct customization tool for merchants**—it is meant for developers who wish to integrate dynamic behaviors into their store.
* The resources are constantly expanded to satisfy any scenario. If you have a custom behavior, design, etc. that you want to implement into Amplify bundles, you can [**contact our support team**](https://support.heyamplify.com/bundles-and-upsell/how-to-contact-support) to learn more.

## **Want Access to the JavaScript SDK?**

If you're interested in enabling this feature, please [**contact our sales team**](https://heyamplify.com/?open-demo-popup=true) to learn more about our [**Amplify One plan**](https://heyamplify.com/pricing/) and how it can enhance your store’s customization capabilities. [**Our support team**](https://support.heyamplify.com/bundles-and-upsell/how-to-contact-support) is also available to assist with any questions you might have.


# How to Fix the 404 Error in Amplify Bundles

## **What is the 404 Error in a Bundle?**

The **404 error** appears when the bundle page is not accessible to customers. This typically happens when the parent bundle product is either:

* **Set as a Draft in Shopify** (meaning it is not published)
* **Not assigned to the correct sales channel** (Online Store sales channel is not selected)

If a parent bundle product is not visible to customers, they won’t be able to purchase it, which can lead to missed sales opportunities. This guide will walk you through how to resolve the issue and ensure your bundles are properly displayed.

## **How to Fix the 404 Error in a Bundle**

### **No. 1 : Check if the Product Status is Set to Active**

A common reason for a bundle showing a **404 error** is that it is still in **Draft** mode in Shopify.

* **Go to Shopify Admin** > **Products**.
* Search for the bundle name that is showing the **404 error**.
* In the **Product Status** section, check if it is set to **Draft**.
* If it is in **Draft**, change the status to **Active**.
* Click **Save** and refresh the bundle page.

Once the product is set to **Active**, it should be accessible to customers.

<figure><img src="/files/C9eajgyMeLecHNgUv0zx" alt=""><figcaption></figcaption></figure>

***

### **No. 2 : Ensure the Bundle Is Assigned to the Online Store Sales Channel**

#### **1. Find Your Amplify Bundle in Shopify**

1. Log in to your **Shopify Admin**.
2. Navigate to **Products** in the left-hand menu.
3. Among the products of your Shopify store, you can find your Amplify bundle by searching its name.

***

#### **2. Open Sales Channel Settings**

1. On the product menu of your bundle, locate the **Publishing** section on the right-hand side.
2. Click the **three-dot menu** (•••) next to **Sales Channels**.

<figure><img src="/files/Jx9DEiOAwpLL4AShJIda" alt=""><figcaption></figcaption></figure>

***

#### **3. Add the Bundle to the "Online Store"**

1. A pop-up will appear labeled **Manage Sales Channels**.
2. Check the box for **Online Store**.
3. Click **Done**.

<figure><img src="/files/fyIgu7CYt12S3Yz6wPli" alt=""><figcaption></figcaption></figure>

***

#### **4. Save Your Changes**

1. Scroll to the top of the product page.
2. Click **Save** to apply the changes.

Your bundle is now included in the **Online Store**, and will become visible to your customers.

***

## Commonly asked questions about the 404 error

<details>

<summary>On which types of bundles can a 404 error occur?</summary>

The 404 error can happen on bundles that are created as:

* [**Bundle as Product**](/bundles-and-upsell/scenarios/bundle-as-product/how-to-create-a-bundle-as-product-scenario-1) – This type of bundle appears as a standalone product in your store and requires proper publishing settings.
* [**Build Your Own Bundle Page**](/bundles-and-upsell/scenarios/build-your-own-bundle-page/how-to-create-a-build-your-own-bundle-page-scenario) – This bundle type functions as a customizable bundle builder with its own product page and must also be set to Active and assigned to the Online Store sales channel.

If either of these bundle types is unpublished or not correctly assigned to the Online Store sales channel, the 404 error will appear on the bundle page, instead of the bundle itself.

</details>

<details>

<summary>Do I need to republish my bundle every time I make changes?</summary>

Not necessarily. As long as the product remains **Active** and assigned to the **Online Store**, changes should reflect automatically. However, if you change the bundle’s status (e.g., moving it to **Draft** and back to **Active**), you may need to refresh the page or clear your browser cache.

</details>

<details>

<summary>Can customers still purchase a bundle if it's not assigned to the Online Store?</summary>

No, if a bundle is not assigned to the **Online Store sales channel**, it won’t be visible on your storefront, meaning customers won’t be able to find or purchase it. Make sure to check and update the sales channel settings in Shopify to avoid this issue.

</details>

<details>

<summary>Will the 404 error affect my existing bundle orders?</summary>

No, the 404 error only affects the visibility of the bundle in your store. Any existing orders that contain the bundle will remain unaffected. However, if customers try to revisit the bundle page from their order confirmation email or other links, they won’t be able to access it until you apply the corresponding settings.&#x20;

</details>

***

## Conclusion

The 404 error on a bundle usually happens because the bundle is either **not published (Draft mode)** or **not assigned to the Online Store sales channel**. By following the steps outlined in this guide, you can quickly resolve this issue and ensure your customers can access and purchase your bundles.

If the issue persists after making these changes, consider **clearing your cache, checking for conflicting apps or custom code, and verifying the product’s visibility settings** in Shopify. Keeping your bundles properly configured will help you **maximize sales and provide a smooth shopping experience for your customers**.

<table data-card-size="large" data-column-title-hidden data-view="cards" data-full-width="false"><thead><tr><th></th><th></th><th data-hidden></th><th data-hidden></th><th data-hidden data-card-target data-type="content-ref"></th><th data-hidden data-card-cover data-type="files"></th></tr></thead><tbody><tr><td><mark style="color:purple;"><strong>Get Bundles &#x26; Upsell</strong></mark> </td><td>Try free </td><td> </td><td><p>1. Sales channel</p><p>2. Online store</p><p>3. New bundle bug</p><p>4. Product Page bug</p><p>5. PDP bug</p><p>6. Can't see bundle</p><p>7. Online store missing</p><p>8. Sales channel missing</p></td><td><a href="https://apps.shopify.com/product-kits-bundles-pickystory?surface_intra_position=1&#x26;surface_type=partners&#x26;surface_version=redesign">https://apps.shopify.com/product-kits-bundles-pickystory?surface_intra_position=1&#x26;surface_type=partners&#x26;surface_version=redesign</a></td><td></td></tr></tbody></table>


# Bundle as Product

Combine products into a bundle and sell them as a single unit. The bundle has a dedicated product page


# How to Create a Bundle as Product Scenario?

Learn how to create and customize Bundle as Product deals to enhance your store offerings.

{% hint style="info" %}
*This version is available to customers who installed the app **after March 27, 2025.** For the legacy version, you can* [***see this article***](/bundles-and-upsell/scenarios/bundle-as-product/how-to-create-a-bundle-as-product-scenario-1)***.***&#x20;
{% endhint %}

### What is a “Bundle as Product”? <a href="#what-is-a-bundle-as-product" id="what-is-a-bundle-as-product"></a>

A “**Bundle as Product**” allows you to combine multiple items into a single product pack. This pack is treated as one standalone product with its own product page, rather than an addition to existing products in your store. Commonly referred to as fixed bundles, product sets, or value packs, these bundles can be customized and optimized for your store’s needs.

### Steps to Create a Bundle as a Product <a href="#steps-to-create-a-bundle-as-a-product" id="steps-to-create-a-bundle-as-a-product"></a>

**Step 1. Access the Scenarios Section**

Go to the Scenarios section in your dashboard and click on “**Create**” under the “**Bundle as Product**” scenario.

<figure><img src="/files/WFeJpxutihlPGXyC6iO9" alt=""><figcaption></figcaption></figure>

**Step 2. Create a New Bundle**

Select the option to create a new bundle.

<figure><img src="/files/hsUW1xWN2uHGijL9ltvD" alt=""><figcaption></figcaption></figure>

**Step 3. Add Products to Your Bundle**

Choose the products you want to include in this bundle

<figure><img src="/files/oombFrQ6y5G9654gmga1" alt=""><figcaption></figcaption></figure>

**Step 4. Name Your Bundle and Add Visuals**

Give your bundle a name and add an image and description. These details will automatically update on your Shopify store

<figure><img src="/files/ztRTtC30ioUArZtpB7jd" alt=""><figcaption></figcaption></figure>

**Step 5. Set the Discount**

Apply a discount to the bundle if desired and save the changes

<figure><img src="/files/zvWTLTgqfiqtnhI2DTis" alt=""><figcaption></figcaption></figure>

### Bundle Customization <a href="#bundle-customization" id="bundle-customization"></a>

**Step 6. Customize the Bundle’s Appearance**

Navigate to the Design tab to customize the look and feel of your bundle scenario. Tailor the design to match your store’s branding.

<figure><img src="/files/P0vCEkzpPQcXz5fJH7l8" alt=""><figcaption></figcaption></figure>

**Step 7: Add the App Block**

1. Click **Publish** in the app.

<figure><img src="/files/MkNEeOT2YlDag8Z6yxvl" alt=""><figcaption></figcaption></figure>

2. A popup window will appear, prompting you to select a product template to which the app block should be added.
3. After selecting the template, click the **Add to Store** button.

<figure><img src="/files/euzg5Kvu2FdI0UwRtAKx" alt=""><figcaption></figcaption></figure>

4. You’ll be redirected to Shopify’s **theme editor** where the App Block should be inserted.
5. From the left-side editor, you can **add** and **reposition** the block just like any other page element.
6. Click **Save** in Shopify once the block is positioned to your liking.

<figure><img src="/files/gfHFJB1j7Q22YXiyUk9L" alt=""><figcaption></figcaption></figure>

**Step 8: Confirm and Finalize in Amplify**

1. After saving in Shopify, return to the Amplify app.
2. You’ll see a **"Good Job!"** confirmation message.

**The Bundle is now live in your store! 🎉**
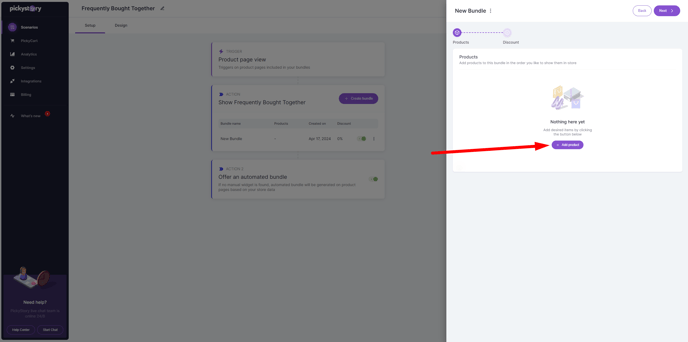
***

### Adding the Bundle to a Specific Collection <a href="#adding-the-bundle-to-a-specific-collection" id="adding-the-bundle-to-a-specific-collection"></a>

If you want to add the bundle to a specific collection, add tags or product category

**Step 1. Edit on Shopify**

<figure><img src="/files/zFsZOlStjM6poDbQ5muF" alt=""><figcaption></figcaption></figure>

**Step 2. Organize Your Bundle**

In the Product organization section, add tags or select a product category to include your bundle in specific collections or search results.

<figure><img src="/files/PBiJQdt9f3BZBWsfVjIW" alt=""><figcaption></figcaption></figure>

### Common Questions About Bundle as Product Deals <a href="#common-questions-about-bundle-as-product-deals" id="common-questions-about-bundle-as-product-deals"></a>

<details>

<summary>Why is my bundle not showing on the product page?</summary>

Make sure you completed the App Block setup via the Publish flow in Amplify and saved changes in Shopify.

</details>

<details>

<summary>Can I customize where the App Block appears on the page?</summary>

Yes, once in Shopify's theme editor, you can move the App Block like any other element.

</details>

<details>

<summary><strong>Do I need to repeat the App Block setup for every bundle?</strong></summary>

No, it applies to the selected template. Future bundles using that template will display automatically.

</details>

<details>

<summary><strong>What happens if I don't return to the Amplify app after saving?</strong></summary>

The bundle will not be published until you confirm via the "Good Job" screen in Amplify.

</details>

<details>

<summary>Can I reuse the same template for different bundles?</summary>

Absolutely. The App Block will load the correct content based on the bundle assigned to the product.

</details>

***

### Conclusion <a href="#conclusion" id="conclusion"></a>

With the updated process for adding an App Block directly through Amplify's Publish flow, setting up a “Bundle as Product” is smoother than ever. This ensures that your bundle widgets load properly on your product pages, enhancing the customer experience and boosting your upselling strategy. Follow the steps above to make the most of this powerful feature.

***

<table data-card-size="large" data-column-title-hidden data-view="cards" data-full-width="false"><thead><tr><th></th><th></th><th data-hidden></th><th data-hidden></th><th data-hidden data-card-target data-type="content-ref"></th><th data-hidden data-card-cover data-type="files"></th></tr></thead><tbody><tr><td><mark style="color:purple;"><strong>Get Bundles &#x26; Upsell</strong></mark> </td><td>Try free </td><td> </td><td><p>1. What exactly is a “Bundle as Product” and how does it differ from regular product bundles?</p><p>2. Can I choose the products included in the bundle, or is it pre-set?</p><p>3. Is there a discount applied to the bundle, and how much do I save compared to buying the products separately?</p><p>4. How do I find the bundle product in the store? Is it listed in a specific collection?</p><p>5. Can I customize the bundle, such as changing the quantity of a specific item or swapping out one product for another?</p><p>6. What happens if one of the items in the bundle is out of stock?</p><p>7. Can I use a discount code on top of the bundle discount?</p><p>8. Is the bundle available for international shipping, and are there any special shipping conditions?</p><p>9. Will I earn loyalty points or rewards on the entire bundle purchase, or just on individual items?</p><p>10. What is the return policy for the bundle? Do I need to return the entire bundle, or can I return individual items?</p><p>i want to sell my products as multipacks in my store </p><p>how can i create a bundle as a single product </p></td><td><a href="https://apps.shopify.com/product-kits-bundles-pickystory?surface_intra_position=1&#x26;surface_type=partners&#x26;surface_version=redesign">https://apps.shopify.com/product-kits-bundles-pickystory?surface_intra_position=1&#x26;surface_type=partners&#x26;surface_version=redesign</a></td><td></td></tr></tbody></table>


# How to create a Bundle as Product Scenario?

Learn how to create and customize Bundle as Product deals to enhance your store offerings.

{% hint style="info" %}
*This feature is available to customers who installed the app **after November 14th, 2023***
{% endhint %}

## What is a “Bundle as Product”?

A “**Bundle as Product**” allows you to combine multiple items into a single product pack. This pack is treated as one standalone product with its own product page, rather than an addition to existing products in your store. Commonly referred to as fixed bundles, product sets, or value packs, these bundles can be customized and optimized for your store’s needs.

## Steps to Create a Bundle as a Product

#### Step 1. Access the Scenarios Section

Go to the Scenarios section in your dashboard and click on “**Create**” under the “**Bundle as Product**” scenario.

<figure><img src="/files/WFeJpxutihlPGXyC6iO9" alt=""><figcaption></figcaption></figure>

#### Step 2. Create a New Bundle

Select the option to create a new bundle.

<figure><img src="/files/hsUW1xWN2uHGijL9ltvD" alt=""><figcaption></figcaption></figure>

#### Step 3. Add Products to Your Bundle

Choose the products you want to include in this bundle

<figure><img src="/files/oombFrQ6y5G9654gmga1" alt=""><figcaption></figcaption></figure>

#### Step 4. Name Your Bundle and Add Visuals&#x20;

Give your bundle a name and add an image and description. These details will automatically update on your Shopify store

<figure><img src="/files/ztRTtC30ioUArZtpB7jd" alt=""><figcaption></figcaption></figure>

#### Step 5. Set the Discount

Apply a discount to the bundle if desired and save the changes

<figure><img src="/files/zvWTLTgqfiqtnhI2DTis" alt=""><figcaption></figcaption></figure>

## Bundle Customization

#### Step 6. Customize the Bundle’s Appearance

Navigate to the Design tab to customize the look and feel of your bundle scenario. Tailor the design to match your store’s branding.

<figure><img src="/files/P0vCEkzpPQcXz5fJH7l8" alt=""><figcaption></figcaption></figure>

#### Step 7. Publish the Scenario

Once you’re satisfied with the setup, publish the scenario. Your bundle is now live and available for purchase in your store! 🎉

<figure><img src="/files/MkNEeOT2YlDag8Z6yxvl" alt=""><figcaption></figcaption></figure>

#### **The Bundle is now live in your store! 🎉**

***

## Adding the Bundle to a Specific Collection

If you want to add the bundle to a specific collection, add tags or product category

#### Step 1. Edit in Shopify

<figure><img src="/files/8FfqDsiN1FgshajlGgpN" alt=""><figcaption></figcaption></figure>

#### Step 2. Organize Your Bundle

In the Product organization section, add tags or select a product category to include your bundle in specific collections or search results.

<figure><img src="/files/Z8Sn055ZkX2ALSh4PC62" alt=""><figcaption></figcaption></figure>

## Common Questions About Bundle as Product Deals

<details>

<summary>Can I customize the products included in a bundle?</summary>

Yes, you can customize the appearance of your Bundle as Product by going to the Design tab. Here, you can adjust colors, fonts, and other visual elements to align with your store’s branding.

</details>

<details>

<summary>Can I add my bundle to multiple collections in Shopify?</summary>

Yes, you can add a Bundle as Product to a specific collection by tagging the bundle or assigning it to a product category within Shopify.

</details>

<details>

<summary>How does inventory management work with bundled products?</summary>

When you create a bundle as a product in Amplify, the app automatically tracks the inventory of each individual product included in the bundle. As customers purchase the bundle, Amplify adjusts the inventory levels for each component product based on the quantity sold. This ensures that your stock levels are always up to date and helps prevent overselling. If any product in the bundle goes out of stock, the bundle will be marked as unavailable or adjusted according to your store’s inventory settings

</details>

<details>

<summary>Are there any limitations on the number of products I can include in a Bundle as Product?</summary>

There is no specific limit on the number of products you can include in a Bundle as Product, but it’s a good idea to keep it manageable to ensure a smooth user experience.

</details>

<details>

<summary>Can I edit a Bundle as Product after it has been published?</summary>

Yes, you can edit a Bundle as Product even after it has been published. Simply go back to the Scenarios section, find the bundle you want to edit, and make the necessary changes.

</details>

## Conclusion

By following these steps, you can effectively create and manage “Bundle as Product” deals, also known as fixed bundles or product packs, to enhance your Shopify store. These bundles offer a streamlined shopping experience for your customers and can be a powerful tool for increasing sales.

***

<table data-card-size="large" data-column-title-hidden data-view="cards" data-full-width="false"><thead><tr><th></th><th></th><th data-hidden></th><th data-hidden></th><th data-hidden data-card-target data-type="content-ref"></th><th data-hidden data-card-cover data-type="files"></th></tr></thead><tbody><tr><td><mark style="color:purple;"><strong>Get Bundles &#x26; Upsell</strong></mark> </td><td>Try free </td><td> </td><td><p>1. What exactly is a “Bundle as Product” and how does it differ from regular product bundles?</p><p>2. Can I choose the products included in the bundle, or is it pre-set?</p><p>3. Is there a discount applied to the bundle, and how much do I save compared to buying the products separately?</p><p>4. How do I find the bundle product in the store? Is it listed in a specific collection?</p><p>5. Can I customize the bundle, such as changing the quantity of a specific item or swapping out one product for another?</p><p>6. What happens if one of the items in the bundle is out of stock?</p><p>7. Can I use a discount code on top of the bundle discount?</p><p>8. Is the bundle available for international shipping, and are there any special shipping conditions?</p><p>9. Will I earn loyalty points or rewards on the entire bundle purchase, or just on individual items?</p><p>10. What is the return policy for the bundle? Do I need to return the entire bundle, or can I return individual items?</p><p>i want to sell my products as multipacks in my store </p><p>how can i create a bundle as a single product </p></td><td><a href="https://apps.shopify.com/product-kits-bundles-pickystory?surface_intra_position=1&#x26;surface_type=partners&#x26;surface_version=redesign">https://apps.shopify.com/product-kits-bundles-pickystory?surface_intra_position=1&#x26;surface_type=partners&#x26;surface_version=redesign</a></td><td></td></tr></tbody></table>

***


# How to Find the Template Used for Your Bundle Product Pages in Shopify

Easily identify which template is being used for your product pages to help you locate app blocks and customize your store layout.

## Why You Need to Know Your Product Page Template

Understanding which template your product pages are using in Shopify is essential when you want to add or adjust app blocks, like those from Amplify. Knowing the correct template ensures that any changes or customizations you make will appear correctly on your store’s front end.

## Steps to Find Your Product Page Template in Shopify

#### Step 1. Open a Product in Shopify Admin

Log in to your Shopify admin panel and navigate to Products. Select the bundle product from your list to open its details page.

#### Step 2. Scroll Down to Theme Template

Once you are on the product details page, scroll down until you find the Theme template section. This section will display the name of the template currently being used for that specific product page.

<figure><img src="/files/zMnyhr61KNeYKKOV5uSe" alt=""><figcaption></figcaption></figure>

## Why This is Important

Knowing your product page template helps you accurately add or locate app blocks, ensuring that any features or customizations, such as those from Amplify, integrate smoothly with your store’s design. This is particularly useful for maintaining a consistent look and feel across your product pages and improving the customer experience.

## Common Questions About Product Page Templates

<details>

<summary>How do I change the template for my product pages in Shopify?</summary>

To change the template for your product pages, go to your Shopify admin, navigate to Products, select the product you want to edit, scroll down to Theme template, and choose the desired template from the dropdown menu.

</details>

<details>

<summary>Why can’t I find the app block on my product page?</summary>

If the app block isn’t visible, ensure that the app is installed correctly and that the block is added to the appropriate section in your theme editor. Also, make sure the template being used supports app blocks. Additionally, please reach out to support, our team will be glad to help.

</details>

<details>

<summary>What should I do if the template name is not showing up in the Theme template section?</summary>

Please reach out to support, our team will be glad to assist

</details>

<details>

<summary>How can I use this information to customize my product pages?</summary>

You can use the template information to determine which layout and features are applied to your product pages, allowing you to customize the design and functionality to better suit your store’s branding and customer experience

</details>

## Conclusion

By following these steps, you can easily find out which template is being used for your product pages in Shopify. This knowledge is key for effectively managing and customizing your store’s layout, ensuring all app blocks and design elements are properly aligned with your chosen theme.

***

<table data-card-size="large" data-view="cards"><thead><tr><th></th><th></th><th data-hidden data-type="content-ref"></th><th data-hidden></th><th data-hidden data-card-target data-type="content-ref"></th></tr></thead><tbody><tr><td><mark style="color:purple;"><strong>Get Bundles &#x26; Upsell</strong></mark></td><td>Try free</td><td><a href="https://apps.shopify.com/product-kits-bundles-pickystory?surface_intra_position=1&#x26;surface_type=partners&#x26;surface_version=redesign">https://apps.shopify.com/product-kits-bundles-pickystory?surface_intra_position=1&#x26;surface_type=partners&#x26;surface_version=redesign</a></td><td><p>1. Identify Shopify theme template</p><p>2. Check Shopify product page setup</p><p>3. Locate product template in admin</p><p>4. Determine Shopify page layout</p><p>5. Find active Shopify theme</p><p>6. Shopify product page customization</p><p>7. View current Shopify template</p><p>8. Access Shopify theme settings</p><p>9. Shopify app block location</p><p>10. Track Shopify theme usage</p></td><td><a href="https://apps.shopify.com/product-kits-bundles-pickystory?surface_intra_position=1&#x26;surface_type=partners&#x26;surface_version=redesign">https://apps.shopify.com/product-kits-bundles-pickystory?surface_intra_position=1&#x26;surface_type=partners&#x26;surface_version=redesign</a></td></tr></tbody></table>


# How to Offer a Free Gift through Bundle as Product

Learn how to offer a free gift to your customers using the Bundle as Product feature in Bundles & Upsell. By offering free gifts, you can increase sales and incentivize larger purchases.

## What is the Bundle as Product Scenario?

The Bundle as Product scenario allows you to group multiple products together as one item in your store. With this feature, you can offer a free gift as part of the bundle, encouraging customers to purchase the main product and receive an additional item for free.

## Steps to Offer a Free Gift through Bundle as Product

Follow these steps to set up a Bundle as Product that includes a free gift:

#### Step 1. Create a New Bundle

In the Bundles & Upsell app, go to the Scenarios section and click Create. Select Bundle as Product as the scenario type.

<figure><img src="/files/NERSamNaFH2Bch8AL0ay" alt=""><figcaption></figcaption></figure>

<figure><img src="/files/hsUW1xWN2uHGijL9ltvD" alt=""><figcaption></figcaption></figure>

#### Step 2. Add the Main Products

In the bundle creation screen, add the main product(s) that customers need to purchase.

<figure><img src="/files/oombFrQ6y5G9654gmga1" alt=""><figcaption></figcaption></figure>

#### Step 3. Customize the Bundle

Add a name, image, and description for the bundle. Clearly communicate to customers that they are receiving a free gift with their purchase (e.g., “Buy Product X and get a free Y!”). You can customize the bundle further by adding colors, fonts, or other design elements in the Design tab.

<figure><img src="/files/ztRTtC30ioUArZtpB7jd" alt=""><figcaption></figcaption></figure>

<figure><img src="/files/P0vCEkzpPQcXz5fJH7l8" alt=""><figcaption></figcaption></figure>

#### Step 4. Select Free Gift

In the Discount section, choose the Free Gift option and then in the Products Section select the product you would like to offer as the gift. This ensures the chosen item is automatically added to the bundle at no additional cost.

<figure><img src="/files/QL8ISx2YgbBOV2wmxxBG" alt=""><figcaption></figcaption></figure>

<figure><img src="/files/eZcmmQtN8kwy29g3Pwg6" alt=""><figcaption></figcaption></figure>

#### Step 4.1. Choose the variants

Once you add the product you can choose the variants you want to offer.

<figure><img src="/files/fNyxuioPuU9kzkxnJJ0U" alt=""><figcaption></figcaption></figure>

#### Step 5. Publish the Bundle

Once you have configured the bundle, click Save and Publish to make the offer live in your store.

<figure><img src="/files/MkNEeOT2YlDag8Z6yxvl" alt=""><figcaption></figcaption></figure>

#### Step 6. Add the Bundle to Collections or Specific Pages

To increase visibility, you can add the bundle to specific collections or product pages by tagging the bundle or assigning it to a product category in Shopify.

<figure><img src="/files/Z8Sn055ZkX2ALSh4PC62" alt=""><figcaption></figcaption></figure>

## Common Questions About Offering a Free Gift through Bundle as Product

<details>

<summary>Can I customize the appearance of the free gift bundle?</summary>

Yes, you can fully customize the name, image, description, and design of the bundle in the Design tab to match your store’s branding.

</details>

<details>

<summary>Is the free gift automatically added to the bundle?</summary>

Yes, once the bundle is created, the free gift will automatically be included when the customer purchases the main product(s).

</details>

<details>

<summary>Can I add the free gift bundle to specific collections?</summary>

Yes, you can assign the bundle to specific collections or product pages by tagging it in Shopify.

</details>

## Conclusion

Offering a free gift through the Bundle as Product feature is a great way to incentivize purchases and boost sales. By following these steps, you can easily set up a bundle with a free gift and offer added value to your customers.

***

<table data-card-size="large" data-view="cards"><thead><tr><th></th><th></th><th data-hidden></th><th data-hidden data-card-target data-type="content-ref"></th></tr></thead><tbody><tr><td><mark style="color:purple;"><strong>Get Bundles &#x26; Upsell</strong></mark> </td><td>Try free</td><td><p>1. Offer free gift Shopify</p><p>2. Free gift bundle Shopify</p><p>3. Bundle as Product free gift</p><p>4. Set up free gift Amplify </p><p>5. Free gift with purchase Shopify</p><p>6. Create free gift bundle</p><p>7. Amplify free gift setup</p><p>8. Add free gift to bundle</p><p>9. Shopify bundle free gift</p><p>10. Incentivize sales with free gift</p></td><td><a href="https://apps.shopify.com/product-kits-bundles-pickystory">https://apps.shopify.com/product-kits-bundles-pickystory</a></td></tr></tbody></table>


# How to preview bundles in-store

This guide walks you through the steps to preview a bundle in your store. By following a few simple actions in the **Scenarios** section, you can easily view how your bundle will appear on the product page. Here’s how to locate your bundle, access the action menu, and preview it live in your store.

## Here's how you can preview bundles in-store

#### Step 1. Locate the bundle

In Scenarios, go to the section where all your bundles are listed.

<figure><img src="/files/maSmEx5KtJ97vfnQYI5u" alt=""><figcaption></figcaption></figure>

#### Step 2. **Find the Action Button (Three Dots)**

Next to each bundle, you will notice an action button represented by three vertical dots (⋮). This button offers various quick actions you can perform on the bundle.

<figure><img src="/files/JISKVfKbe5JgD3I8puoQ" alt=""><figcaption></figcaption></figure>

#### Step 3. Select "View in Store"

From the dropdown menu, select the **View in store** option. This will automatically redirect you to the product page where the selected bundle is visible.

<figure><img src="/files/odAyh8ad7YjNSfiGfLqu" alt=""><figcaption></figcaption></figure>

## Common Questions About How to preview bundles in-store

<details>

<summary>Can I view the bundle on the store without publishing it?</summary>

No, the "View in store" option will only show the bundle on the live page if it has already been published. Unpublished bundles won’t be visible on the store.

</details>

<details>

<summary>What happens when I click "View in store"?</summary>

When you click "View in store," you will be redirected to the page where the bundle is available. This lets you see exactly how the bundle appears to customers in your store.

</details>

<details>

<summary><strong>Is it possible to edit the bundle directly from the "View in store" page?</strong></summary>

No, the "View in store" option only allows you to view the live version of the bundle. To make edits, return to the bundle management section in your dashboard and make changes there.

</details>

<details>

<summary>Can I use the "View in store" option for all types of bundles?</summary>

Yes, the "View in store" option works for all types of bundles, as long as they are published and visible on your store.

</details>

<details>

<summary>Will the "View in store" page show real-time pricing and availability of the bundle?</summary>

Yes, when you use "View in store," the page will reflect the real-time pricing, availability, and any updates you've made to the bundle.

</details>

## Conclusion

Previewing a bundle in-store is a quick and easy process. By locating the bundle in the **Scenarios** section, using the action menu, and selecting "View in Store," you can ensure your bundles are displayed correctly. If you have any additional questions about previewing bundles, refer to the common questions section or reach out to our support team for assistance.

***

<table data-card-size="large" data-column-title-hidden data-view="cards" data-full-width="false"><thead><tr><th></th><th></th><th data-hidden></th><th data-hidden></th><th data-hidden data-card-target data-type="content-ref"></th><th data-hidden data-card-cover data-type="files"></th></tr></thead><tbody><tr><td><mark style="color:purple;"><strong>Get Bundles &#x26; Upsell</strong></mark> </td><td>Try free </td><td> </td><td><p>1. View product bundle in store</p><p>2. Access bundle product page</p><p>3.How to find bundles on store page</p><p>4.View bundle details online</p><p>5.Navigate to bundle product page</p><p>6. See bundle in storefront</p><p>7. Store page bundle visibility</p><p>8. Locate bundle on website</p><p>9. View bundle in live store</p><p>10. Open product bundle in store</p><p> </p></td><td><a href="https://apps.shopify.com/product-kits-bundles-pickystory?surface_intra_position=1&#x26;surface_type=partners&#x26;surface_version=redesign">https://apps.shopify.com/product-kits-bundles-pickystory?surface_intra_position=1&#x26;surface_type=partners&#x26;surface_version=redesign</a></td><td></td></tr></tbody></table>


# How to customize discount prefix for Bundle as Product

Learn how to customize the discount code prefix for Bundle as Product offers, helping you create personalized, branded discount labels for your bundled promotions.

## Why should you change the discount prefix?

Customizing discount code prefixes for "**Bundle as Product"** promotions allows you to create unique and recognizable codes. This enhances brand visibility, simplifies campaign tracking, and helps customers easily identify bundled offers during checkout.

## Steps to Customize Discount Code Prefix for Bundle as Product:

#### **1. Open Settings**

Start by navigating to the "**Settings"** section in your admin panel.

<figure><img src="/files/54RrBbbd14Ibam3WONgy" alt=""><figcaption></figcaption></figure>

#### 2. Scroll Down to Cart and Checkout

Scroll down to find the "**Cart and Checkout"** section. This is where you can manage the checkout experience, including discount code configurations for bundles.

<figure><img src="/files/HJMZYxTPM6L3t9M0CBcl" alt=""><figcaption></figcaption></figure>

#### 3. Change Discount Label

Under Cart and Checkout, look for the "**Discount Label"** field. Enter your custom prefix here to personalize the discount code for your bundle offers.

<figure><img src="/files/B2ATRMoTKBv0mvG42Cid" alt=""><figcaption></figcaption></figure>

#### 4. Publish the Changes

Once the custom prefix is entered, click "**Publish"** to apply the changes and make the updated discount label active for all Bundle as Product promotions.

<figure><img src="/files/W7nQp63u9gM6wxW9bnVP" alt=""><figcaption></figcaption></figure>

## Common Questions about Discount Prefix for Bundle as Product

<details>

<summary><strong>What is a discount code prefix for Bundle as Product?</strong></summary>

It's the starting text for discount codes applied to "**Bundle as Product"** (e.g., “BUNDLE10\_”).

</details>

<details>

<summary><strong>Will changing the prefix affect existing bundle discount codes?</strong></summary>

No, changing the prefix will only affect new codes generated after the update.

</details>

<details>

<summary><strong>How does a custom discount prefix benefit my bundled promotions?</strong></summary>

It helps with branding, improves customer recognition, and makes discount codes easier to track.

</details>

<details>

<summary><strong>Can customers see the discount prefix during checkout?</strong></summary>

Yes, the full discount code, including the prefix, will be visible during the checkout process.

</details>

<details>

<summary><strong>How do I know if my custom prefix is working?</strong></summary>

After publishing, it’s always best to test the new discount codes to ensure they work correctly.

</details>

## Conclusion

Customizing discount code prefixes for **Bundle as Product** offers allows you to strengthen your brand identity and streamline campaign management. With a simple update to the settings, you can ensure that your bundled promotions stand out and are easy to identify for both you and your customers.

***

<table data-card-size="large" data-column-title-hidden data-view="cards" data-full-width="false"><thead><tr><th></th><th></th><th data-hidden></th><th data-hidden></th><th data-hidden data-card-target data-type="content-ref"></th><th data-hidden data-card-cover data-type="files"></th></tr></thead><tbody><tr><td><mark style="color:purple;"><strong>Get Bundles &#x26; Upsell</strong></mark> </td><td>Try free </td><td> </td><td><p>1. Bundle as Product discount</p><p>2. Discount code prefix</p><p>3. Custom bundle discount label</p><p>4. Bundle product discount prefix</p><p>5. Discount label customization</p><p>6. Discount code for bundled products</p><p>7. Bundle offer prefix</p><p>8. Branded discount codes</p><p>9. Custom discount label</p><p>10. Ecommerce bundle discount</p><p> </p></td><td><a href="https://apps.shopify.com/product-kits-bundles-pickystory?surface_intra_position=1&#x26;surface_type=partners&#x26;surface_version=redesign">https://apps.shopify.com/product-kits-bundles-pickystory?surface_intra_position=1&#x26;surface_type=partners&#x26;surface_version=redesign</a></td><td></td></tr></tbody></table>


# Build Your Own Bundle Page

Allow shoppers to build custom bundles from assigned products. The bundle has a dedicated product page


# How to Create a Build Your Own Bundle Page Scenario

Let customers create custom bundles with "Build Your Own Bundle" and show it as a product in your store

{% hint style="info" %}
This feature is available to customers who installed the app **after November 14th, 2023**
{% endhint %}

## What is a “Build Your Own Bundle”?

A “Build Your Own Bundle” feature allows customers to create personalized bundles by selecting their preferred products. This bundle is treated as a single product in your store, giving customers the flexibility to mix and match items to suit their needs.

## Steps to Create a Build Your Own Bundle Page

#### Step 1. Access the Scenarios Section

Go to the Scenarios section in your dashboard and click on “Create” under the “Build Your Own Bundle” scenario.

<figure><img src="/files/PmCuIaqLcbWAA4dma0lx" alt=""><figcaption></figcaption></figure>

#### Step 2. Set Up the Bundle Builder

Follow the prompts to set up the bundle builder, including selecting which products customers can choose from.

<figure><img src="/files/Uleqp7goJKkJRLPP4ZQP" alt=""><figcaption></figcaption></figure>

#### Step 3. Customize the Bundle Options

Customize the options available to customers, such as product variants and maximum or minimum quantities.

<figure><img src="/files/a4w7GBvpvYVqw0iRaOJt" alt=""><figcaption></figcaption></figure>

#### Step 4. Name Your Bundle and Add Visuals

Give your bundle a name and add an image and description that will appear on your Shopify store.

<figure><img src="/files/6oLvznXaGxNwpUzcIOiQ" alt=""><figcaption></figcaption></figure>

#### Step 5. Configure Pricing and Discounts

Set pricing rules and discounts for the custom bundles to encourage sales.

<figure><img src="/files/QP6PvPP49NEG0UvtSpDt" alt=""><figcaption></figcaption></figure>

## Customize

#### Step 6. Design the Bundle Page.

Go to the Design tab to customize the appearance of the bundle builder page, ensuring it aligns with your store’s branding.

<figure><img src="/files/RsZ13QQp6Sm0NFtJb12r" alt=""><figcaption></figcaption></figure>

#### Step 7. Publish the Scenario

Once everything is set up, publish the scenario. The builder is now live in your store, allowing customers to create their own bundles! 🎉

<figure><img src="/files/qkPWuoAuGXrZsuEjNKeu" alt=""><figcaption></figcaption></figure>

***

## Adding the Bundle to a Specific Collection

If you want to add the bundle to a specific collection, add tags or product category

#### 1. Edit in Shopify

Click on “Edit on Shopify" to manage your bundle’s placement.

<figure><img src="/files/1DGxpGUCDd20xJ2CRtVx" alt=""><figcaption></figcaption></figure>

#### 2. Organize Your Bundle

In the Product organization section, add tags or select a product category to include your bundle in specific collections or search results.

<figure><img src="/files/Ws4uc9knwsJqNFwVugsE" alt=""><figcaption></figcaption></figure>

## Common Questions About Build Your Own Bundle Page

<details>

<summary>How do I manage inventory for products in a Build Your Own Bundle?</summary>

Bundles & Upsell automatically track inventory for each individual product within a Build Your Own Bundle. As products are added to the bundle and purchased, the inventory is updated accordingly to prevent overselling.

</details>

<details>

<summary>What should I do if my Build Your Own Bundle isn’t displaying correctly?</summary>

If your Build Your Own Bundle isn’t displaying correctly, check that the app is properly installed, the scenario is published, and all settings are configured correctly.&#x20;

</details>

<details>

<summary>Can I add custom bundles to multiple collections in Shopify?</summary>

Yes, you can add a Build Your Own Bundle to a specific collection by tagging the bundle or assigning it to a product category within Shopify. This helps in organizing and displaying bundles in a way that aligns with your store’s structure.

</details>

## Conclusion

By following these steps, you can effectively create and manage a “Build Your Own Bundle” page in Shopify, offering customers a personalized shopping experience. This feature can boost customer satisfaction and increase average order value by allowing customers to tailor their purchases to their preferences.

***

<table data-card-size="large" data-view="cards"><thead><tr><th></th><th></th><th data-hidden data-type="content-ref"></th><th data-hidden></th><th data-hidden data-card-target data-type="content-ref"></th></tr></thead><tbody><tr><td><mark style="color:purple;"><strong>Get Bundles &#x26; Upsell</strong></mark>    </td><td>Try free </td><td><a href="https://apps.shopify.com/product-kits-bundles-pickystory?surface_intra_position=1&#x26;surface_type=partners&#x26;surface_version=redesign">https://apps.shopify.com/product-kits-bundles-pickystory?surface_intra_position=1&#x26;surface_type=partners&#x26;surface_version=redesign</a></td><td><p>1. Build your own bundle</p><p>2. Custom bundle creation</p><p>3. Create a personalized bundle</p><p>4. Bundle builder page</p><p>5. Custom product bundle</p><p>6. Flexible product bundle</p><p>7. DIY bundle creation</p><p>8. Shopify bundle customization</p><p>9. Custom bundle as product</p><p>10. Personalized bundle offer </p></td><td><a href="https://apps.shopify.com/product-kits-bundles-pickystory?surface_intra_position=1&#x26;surface_type=partners&#x26;surface_version=redesign">https://apps.shopify.com/product-kits-bundles-pickystory?surface_intra_position=1&#x26;surface_type=partners&#x26;surface_version=redesign</a></td></tr></tbody></table>


# How to Add a Custom Field in a Build Your Own Bundle Page

Enhance your Build Your Own Bundle (BYOB) page by adding custom fields that allow customers to personalize their bundles with specific inputs.

## What is a Custom Field in a Build Your Own Bundle Page?

A Custom Field in a Build Your Own Bundle (BYOB) page lets you gather additional information from customers, such as personalized text or specific instructions. This feature enhances the shopping experience by allowing customers to add unique details to their bundle, such as names, messages, or custom requests.

## Steps to Add a Custom Field in a Build Your Own Bundle Page

#### Step 1. Access Your Bundle in Amplify&#x20;

Navigate to the Bundles & Upsell app and open the Build Your Own Bundle Page deal, where you want to add a custom field. Click on the bundle you wish to modify.

#### Step 2. Add a Custom Note Section

Within the bundle editing interface, click on Add Section and select Custom Note. This action will allow you to insert a new field where customers can enter personalized information.

<figure><img src="/files/GSeljYR2iaKn9eGvUkFF" alt=""><figcaption></figcaption></figure>

#### Step 3. Choose the Type of Text Field

Decide on the type of text field you want to offer: Short Text for brief inputs or Long Text for more detailed responses. This flexibility helps you tailor the input field to suit the information you need from customers.

<figure><img src="/files/XIRmPEEbiJJsfJy2qiHh" alt=""><figcaption></figcaption></figure>

#### Step 4. Set Field Options

Configure the custom field according to your needs:

* Mandatory Field: Choose whether the field is required or optional for customers to fill out.

<figure><img src="/files/iIuiUU8ehA4TLJ53FvP6" alt=""><figcaption></figcaption></figure>

* Add Header: Enter a header or question that prompts customers to provide the desired input (e.g., “Enter the name to be engraved”).

<figure><img src="/files/6a6kpIVlpNX8uwfXMA15" alt=""><figcaption></figcaption></figure>

#### Step 5. Save Your Changes

Once you have set up the custom field and configured the options, go to the Discount section and click Save Changes. This ensures that all modifications are applied to your BYOB page.

<figure><img src="/files/1b4Xfk2KBDH3wQqhUiZe" alt=""><figcaption></figcaption></figure>

## Finalizing Your Build Your Own Bundle Page

After adding the custom field and saving your changes, the updated Build Your Own Bundle page will display the new input options for customers, enhancing their ability to personalize their bundles.

<figure><img src="/files/8c6aBaFpWKw1KbbMIbvn" alt=""><figcaption></figcaption></figure>

## Common Questions About Adding Custom Fields

<details>

<summary>What types of custom fields can I add to a Build Your Own Bundle page?</summary>

You can add several types of custom fields to a Build Your Own Bundle page, including short text fields for brief inputs, such as names or initials, and long text fields for more detailed responses, like special instructions or personalized messages. These fields can be customized to be optional or mandatory, depending on the information you need from your customers.​

</details>

<details>

<summary>Can I use custom fields to collect special instructions or notes from customers?</summary>

Yes, custom fields are ideal for collecting special instructions or notes from customers, such as engraving details, gift messages, or any other personalized requests.

</details>

<details>

<summary>Can I add multiple custom fields to a single bundle?</summary>

Yes, you can add multiple custom fields to a single bundle. This allows you to collect various pieces of information from customers, making the shopping experience more personalized and engaging.

</details>

## Conclusion

By adding custom fields to your Build Your Own Bundle page, you can offer a more personalized shopping experience for your customers. This feature allows them to add unique details to their bundles, making each purchase more meaningful and tailored to their preferences.

***

<table data-view="cards"><thead><tr><th></th><th></th><th data-hidden data-type="content-ref"></th><th data-hidden></th></tr></thead><tbody><tr><td><mark style="color:purple;">Get Bundles&#x26;Upsell</mark> </td><td>Try free</td><td><a href="https://apps.shopify.com/product-kits-bundles-pickystory">https://apps.shopify.com/product-kits-bundles-pickystory</a></td><td><p>1. Add custom field Shopify</p><p>2. Build Your Own Bundle customization</p><p>3. Custom note in product bundle</p><p>4. BYOBP custom field setup</p><p>5. Shopify custom text field</p><p>6. Custom field mandatory option</p><p>7. Shopify product page customization</p><p>8. Create custom input for bundle</p><p>9. Customizable bundle options</p><p>10. Add fields to bundle page</p></td></tr></tbody></table>


# Quantity Breaks

Provide volume discounts for bulk purchases of a product


# How to Create a Quantity Breaks Scenario

Offer volume discounts directly on product pages with the Quantity Breaks feature.

## What is a “Quantity Breaks” Scenario?

A “**Quantity Breaks**” scenario allows you to offer discounts based on the quantity of a product purchased. This tiered pricing strategy encourages customers to buy in bulk by providing a discount that increases with the number of items they buy.

## Steps to Create a Quantity Breaks Scenario

#### Step 1. Access the Scenarios Section

Go to the Scenarios section in your dashboard and click on “Create” under the “Quantity Breaks” scenario.

<figure><img src="/files/JgosGiDaz93p6zyanm94" alt=""><figcaption></figcaption></figure>

<figure><img src="/files/HDqf9IlMGgKm3Xh5bjeC" alt=""><figcaption></figcaption></figure>

#### Step 2. Select the Products

Choose the products you want to apply the quantity breaks to. You can select multiple products or focus on a specific category.

<figure><img src="/files/du6Pux8hek0nFGLjXet6" alt=""><figcaption></figcaption></figure>

#### Step 3. Set Up Discount Tiers

In the Discount Rules section, add new tiers. Name each tier, set the minimum quantity for each discount, and specify the discount percentage or amount. Click on “Save Changes” once all tiers are set up.

<figure><img src="/files/VBESwPhRoRNTUaxEU6sn" alt=""><figcaption></figcaption></figure>

## Customization

#### Step 4. Customize the Appearance

Navigate to the Design tab to customize how the quantity breaks and discounts will appear on your product pages. This ensures the information is clearly displayed to customers.

<figure><img src="/files/LHPdwqQhdleYyl6wnVPB" alt=""><figcaption></figcaption></figure>

#### Step 5. Review and Adjust Settings

Double-check your tier settings, product selections, and design customizations to ensure everything is correct.

#### Step 6. Publish the Scenario

Once you’re satisfied with the setup, publish the scenario. The Quantity Breaks scenario is now live in your store, offering volume discounts directly on your product pages! 🎉

<figure><img src="/files/3p4kWIuPFIjAXxBm4WmP" alt=""><figcaption></figcaption></figure>

## Common Questions About Quantity Breaks

<details>

<summary>Can I create tiered pricing for multiple products?</summary>

Yes, with Amplify's Quantity Breaks feature, you can create tiered pricing for multiple products. You can set different discount tiers for various quantities of products, allowing customers to receive larger discounts as they purchase more items.

</details>

<details>

<summary>What are other terms for “Quantity Breaks”?</summary>

Other terms for “Quantity Breaks” include volume discounts, bulk discounts, tiered pricing, and buy more, save more offers. These terms all refer to pricing strategies where customers receive discounts based on the quantity of items they purchase.

</details>

<details>

<summary>Are quantity discounts applied automatically at checkout?</summary>

Yes, quantity discounts set up through the Quantity break widget are applied automatically at checkout. Customers will see the discounted prices reflected in their cart based on the quantity they have added, providing a seamless shopping experience and encouraging larger purchases.

</details>

## Conclusion

By following these steps, you can effectively create a “Quantity Breaks” scenario in Shopify, offering customers incentives to buy more by providing bulk purchase discounts. This can increase average order value and drive more sales through strategic pricing.<br>

***

<table data-card-size="large" data-view="cards"><thead><tr><th></th><th></th><th data-hidden data-type="content-ref"></th><th data-hidden></th><th data-hidden data-card-target data-type="content-ref"></th></tr></thead><tbody><tr><td><mark style="color:purple;"><strong>Get Bundles &#x26; Upsell</strong></mark> </td><td>Try free </td><td><a href="https://apps.shopify.com/product-kits-bundles-pickystory?surface_intra_position=1&#x26;surface_type=partners&#x26;surface_version=redesign">https://apps.shopify.com/product-kits-bundles-pickystory?surface_intra_position=1&#x26;surface_type=partners&#x26;surface_version=redesign</a></td><td><p>1. Quantity breaks</p><p>2. Volume discount setup</p><p>3. Bulk purchase discount</p><p>4. Tiered pricing</p><p>5. Discount by quantity</p><p>6. Volume pricing strategy</p><p>7. Set up quantity discounts</p><p>8. Bulk buying discount</p><p>9. Multi-tier discount</p><p>10. Shopify quantity discounts</p></td><td><a href="https://apps.shopify.com/product-kits-bundles-pickystory?surface_intra_position=1&#x26;surface_type=partners&#x26;surface_version=redesign">https://apps.shopify.com/product-kits-bundles-pickystory?surface_intra_position=1&#x26;surface_type=partners&#x26;surface_version=redesign</a></td></tr></tbody></table>


# What is Single-Selection and how to enable it?

Learn how to set up and optimize Single Selection in Quantity Breaks to streamline variant choices and enhance the shopping experience for bulk purchases.

## What is Single-Selection?

Single Selection is a feature where the system automatically applies the same variant choice across all units in a "Quantity Break" deal for a single product. Since Quantity Breaks involve multiple quantities of the same product, this function ensures that customers only need to select the variant once, and that selection is applied to all items in the deal. This simplifies the process, making it easier for customers to purchase multiple units with consistent options in one step.

{% hint style="info" %}
This feature is also relevant to Bundle as Product deals
{% endhint %}

## Steps to Enable Single-Selection for Quantity breaks&#x20;

#### Step 1. Access the Scenarios Section

Go to the Scenarios section in your dashboard and click on “**Edit**” under the “**Quantity Breaks**” scenario.

<figure><img src="/files/JgosGiDaz93p6zyanm94" alt=""><figcaption></figcaption></figure>

#### **Step 2. Choose the product**

Click on the QB that contains the product you want to enable "**Single-Selection**". Then click on "**Product options**".

<figure><img src="/files/7fCyUrSlMeBmuR05ik8p" alt=""><figcaption></figcaption></figure>

#### Step 3.  Enable "Group option selection"

Enable "**Group option selection**" and then choose the variant that you want to apply Single-Selection to.

<figure><img src="/files/Cn7N5wfmBmsMWbV4k5Gy" alt=""><figcaption></figcaption></figure>

Step 4. Save changes

Close the "**Product Options**" and go to "**Discount rules**". Click on "**Save**".

<figure><img src="/files/7qg3RwPHs8Gm63H0bsRG" alt=""><figcaption></figcaption></figure>

## Common Questions About Single-Selection

<details>

<summary>What is Single Selection?</summary>

Single Selection is a feature that automatically applies the same variant choice across all units in a bulk purchase, simplifying the selection process for customers.

</details>

<details>

<summary>Can customers change the variant for individual products?</summary>

No, with Single Selection enabled, the variant selected applies to all units in the deal. Customers must choose one variant for the entire bulk order.

</details>

<details>

<summary>Is Single Selection available for all product types?</summary>

Yes, Single Selection works for products with multiple variants, such as size, color, or style, as long as all variants are consistent across the quantity break.

</details>

<details>

<summary>Can I customize or disable Single Selection for certain deals?</summary>

Depending on your store setup, you can customize or disable Single Selection for specific Quantity Breaks if you want to allow different variants per unit.

</details>

<details>

<summary>How does Single Selection benefit Bundle as Product deals?</summary>

Single Selection applies the same variant choice across all bundled products, simplifying the buying process. However, for it to work, all items in the bundle must have the same variant option available.

</details>

## Conclusion

Single Selection in Quantity Breaks simplifies the purchasing process by allowing one variant choice to apply to all units in a bulk order. This not only streamlines the customer experience but also encourages larger purchases. Additionally, it works well with Bundle as Product deals, ensuring a seamless selection process for bundled items. By optimizing this feature, stores can enhance efficiency and improve overall customer satisfaction.

***

<table data-card-size="large" data-view="cards"><thead><tr><th></th><th></th><th data-hidden data-type="content-ref"></th><th data-hidden></th><th data-hidden data-card-target data-type="content-ref"></th></tr></thead><tbody><tr><td><mark style="color:purple;"><strong>Get Bundles &#x26; Upsell</strong></mark> </td><td>Try free </td><td><a href="https://apps.shopify.com/product-kits-bundles-pickystory?surface_intra_position=1&#x26;surface_type=partners&#x26;surface_version=redesign">https://apps.shopify.com/product-kits-bundles-pickystory?surface_intra_position=1&#x26;surface_type=partners&#x26;surface_version=redesign</a></td><td><p>1. Single selection</p><p>2. Single item volume break</p><p>3. Quantity discount single product</p><p>4. Tiered pricing</p><p>5. Single selection volume pricing</p><p>6. Bundle single selection</p><p>7. Single unit discount</p><p>8. Single product bundle pricing</p><p>9. One product discount bundle</p><p>10. Single item bulk discount</p></td><td><a href="https://apps.shopify.com/product-kits-bundles-pickystory?surface_intra_position=1&#x26;surface_type=partners&#x26;surface_version=redesign">https://apps.shopify.com/product-kits-bundles-pickystory?surface_intra_position=1&#x26;surface_type=partners&#x26;surface_version=redesign</a></td></tr></tbody></table>


# Build Your Own Bundle Section

Allow shoppers to build custom bundles from assigned products. The bundle has a dedicated landing page


# How to Create a Build Your Own Bundle Section Scenario

Enables merchants to create custom bundles directly on their store pages with the “Build Your Own Bundle section” feature

{% hint style="info" %}
This feature is available to customers who installed the app **after November 14th, 2023**
{% endhint %}

## What is a “Build Your Own Bundle” Section?

A “**Build Your Own Bundle**” section enables customers to create personalized bundles directly on your store’s product or collection pages. With this feature, customers can mix and match products according to their preferences, offering a unique shopping experience tailored to their individual needs.

This feature differs from the “**Build Your Own Bundle Page**” option, which allows you to add a widget on a separate page rather than directly on product pages. The “**Build Your Own Bundle Section**” provides a more visually appealing experience as it is designed like a gallery, enhancing the way customers view and select products for their bundles.

## Steps to Create a Build Your Own Bundle Section

#### Step 1. Access the Scenarios Section

Go to the Scenarios section in your dashboard and click on “Create/Edit” to start setting up the bundle.

<figure><img src="/files/Rv3KcxJLCmQyev9fByeb" alt=""><figcaption></figcaption></figure>

#### Step 2. Create a New Bundle

Select the option to create a new bundle.&#x20;

<figure><img src="/files/SMvuD6B0EWHHV0yFBLJy" alt=""><figcaption></figcaption></figure>

You can also switch between different "Build your Bundle section" bundles

<figure><img src="/files/IF4aBXeVNZevSovNO8HY" alt=""><figcaption></figcaption></figure>

#### Step 3. Configure Bundle Sections and add products

Decide whether you want to create one or multiple sections for your bundle. This allows for flexibility in how products are grouped and presented.

Choose the products you want to include in the bundle. You can select multiple items to provide a range of options for customers.

<figure><img src="/files/3lGa0UxNmdzdiiw8W3da" alt=""><figcaption></figcaption></figure>

#### Step 4. Name Your Bundle and Add Visuals

Give your bundle builder a name and add an image and description. These details will help customers understand what the bundle includes and how it looks.

<figure><img src="/files/uAKpa6By1Zf969tMuNoW" alt=""><figcaption></figcaption></figure>

#### Step 5. Set Up Discounts

Define the discount rules for the bundle. Set the discount rates and save the new changes to ensure they apply correctly.

<figure><img src="/files/6pIF25p7TbtEIzIAG44q" alt=""><figcaption></figcaption></figure>

## Customization

#### Step 6. Customize the Design

Navigate to the Design tab to customize the appearance of the bundle builder. This is where you can adjust colors, fonts, and layout to match your store’s branding.

<figure><img src="/files/ry1M5lFjyhBmhZdjWW4w" alt=""><figcaption></figcaption></figure>

#### Step 7. Publish the Scenario

Once you are satisfied with the setup, click on “Publish.” This will make your bundle scenario available to customers.

<figure><img src="/files/GswUzgmACnPrs5oideE2" alt=""><figcaption></figcaption></figure>

#### Step 8.Add the Bundle to Your Store

Choose the appropriate template and click on “Add to store.” You will be redirected to Shopify’s editor to finalize placement.

<figure><img src="/files/YZEZqrPBGdl8xUnimbJP" alt=""><figcaption></figcaption></figure>

#### Step 9. Ensure the App Block is Visible

The Amplify app block should appear on the page automatically. If it does not, click on “Add block” under “Apps” and select “**Build Your Own Bundle**” by Amplify. Save your changes to update the store page.

<figure><img src="/files/DLgiOkk9H6GMUYVtxo2x" alt=""><figcaption></figcaption></figure>

<figure><img src="/files/FRt7vcgmOSgEPEomXm85" alt=""><figcaption></figcaption></figure>

#### Step 10. Save changes.&#x20;

Click Save

Once the App Block is on the page, you will see a confirmation in the app. The builder is now live in your store, allowing customers to create their custom bundles!

<figure><img src="/files/LKMSvSGcP20ySR9R3Um6" alt=""><figcaption></figcaption></figure>

<figure><img src="/files/NnzNWmIV5TXObdDzsZOr" alt=""><figcaption></figcaption></figure>

## Common Questions About Build Your Own Bundle Section

<details>

<summary>Can I customize the look and feel of the Build Your Own Bundle section?</summary>

Yes, you can fully customize the look and feel of the Build Your Own Bundle section. In the Design tab, you can adjust colors, fonts, and layout to match your store’s branding.

</details>

<details>

<summary>Can customers customize their bundle with options like sizes and colors?</summary>

Yes, customers can customize their bundles with various product options like sizes, colors, and styles, depending on what you have enabled for the products in the bundle. This enhances the shopping experience by allowing personalization.

</details>

<details>

<summary>What should I do if my Build Your Own Bundle isn’t displaying correctly?</summary>

If your Build Your Own Bundle isn’t displaying correctly, check that the app is properly installed, the scenario is published, and all settings are configured correctly. Also, ensure that your theme supports the Amplify app block and that you’ve added it to the appropriate section in your theme editor.

</details>

## Conclusion

By setting up a “Build Your Own Bundle” section, you can enhance customer engagement by allowing them to create personalized bundles directly on your store’s pages. This feature not only improves the shopping experience but also helps increase sales by offering custom, flexible purchasing options. If you prefer a more visually engaging presentation, consider using the “Build Your Own Bundle Page,” which functions as a gallery and provides a separate page for bundle creation.

***

<table data-card-size="large" data-view="cards"><thead><tr><th></th><th></th><th data-hidden data-card-target data-type="content-ref"></th><th data-hidden data-type="content-ref"></th><th data-hidden></th></tr></thead><tbody><tr><td><mark style="color:purple;"><strong>Get Bundles &#x26; Upsell</strong></mark> </td><td>Try free</td><td><a href="https://apps.shopify.com/product-kits-bundles-pickystory?surface_intra_position=1&#x26;surface_type=partners&#x26;surface_version=redesign">https://apps.shopify.com/product-kits-bundles-pickystory?surface_intra_position=1&#x26;surface_type=partners&#x26;surface_version=redesign</a></td><td><a href="https://apps.shopify.com/product-kits-bundles-pickystory?surface_intra_position=1&#x26;surface_type=partners&#x26;surface_version=redesign">https://apps.shopify.com/product-kits-bundles-pickystory?surface_intra_position=1&#x26;surface_type=partners&#x26;surface_version=redesign</a></td><td><p>1. Build your own bundle section</p><p>2. Custom bundle builder</p><p>3. Shopify bundle customization</p><p>4. Create a bundle section</p><p>5. Add bundle to store page</p><p>6. Amplify bundle builder</p><p>7. DIY bundle creation</p><p>8. Custom product bundles</p><p>9. Shopify app block</p><p>10. Add bundle block to Shopify, </p><p>enable app block     </p></td></tr></tbody></table>


# How to Add a Custom Field in a Build Your Own Bundle Section

Enhance your Build Your Own Bundle Section by adding custom fields to collect personalized information from your customers.

## What is a Custom Field in a Build Your Own Bundle Section?

A Custom Field in a Build Your Own Bundle Section allows you to gather additional information from your customers, such as personalized text or specific instructions. This feature improves the shopping experience by letting customers add unique details to their bundles, like names, messages, or special requests.

## Steps to Add a Custom Field in a Build Your Own Bundle Section

Follow these steps to add a custom field in your Build Your Own Bundle Section:

#### Step 1. Access Your Bundle in Amplify&#x20;

* Log in to your Shopify admin and open the Bundles & Upsell app. Navigate to the Scenarios section and select the Build Your Own Bundle Section where you want to add a custom field.

<figure><img src="/files/wTVjEQZcWhSpQ3KfvJRg" alt=""><figcaption></figcaption></figure>

#### Step 2. Add a Custom Section

• Within the bundle editing interface, click on Add Section and choose Custom Section. This will allow you to insert a new field where customers can enter personalized information.

<figure><img src="/files/qL1T3mcOzi4O5H4taabx" alt=""><figcaption></figcaption></figure>

#### Step 3. Choose the Type of Text Field

* Decide on the type of text field you want to offer: Short Text for brief inputs or Long Text for more detailed responses. This flexibility helps you collect the specific information you need from your customers.

<figure><img src="/files/PwBIBVpieRBRKlGNUV9l" alt=""><figcaption></figcaption></figure>

#### Step 4. Set Field Options

* Configure the custom field according to your needs:
* Mandatory Field: Choose whether the field is required or optional for customers to fill out.

<figure><img src="/files/HueGhHSEj0Q7svT1QAqW" alt=""><figcaption></figcaption></figure>

* Add Header: Enter a header or question that prompts customers to provide the desired input (e.g., “Enter the name to be engraved”).

<figure><img src="/files/rDXZXOiJgac4wzGAVp01" alt=""><figcaption></figcaption></figure>

#### Step 5. Save Your Changes

* After saving your changes, review the finalized Build Your Own Bundle section to ensure the custom fields are displayed correctly and functioning as intended.

<figure><img src="/files/edylmoHlr9anhNjTSysD" alt=""><figcaption></figcaption></figure>

#### Step 6. Review the Finalized Bundle

* After saving your changes, review the finalized Build Your Own Bundle section to ensure the custom fields are displayed correctly and functioning as intended.

<figure><img src="/files/uxhoUOo0ph7p0RO4eB6T" alt=""><figcaption></figcaption></figure>

## Common Questions About Adding Custom Fields

<details>

<summary>What types of custom fields can I add to a Build Your Own Bundle section?</summary>

You can add short text fields for brief responses or long text fields for more detailed inputs. These options allow you to collect specific information from customers, such as names, messages, or instructions.

</details>

<details>

<summary>Is it possible to add multiple custom fields to a bundle section?</summary>

Yes, you can add multiple custom fields to a bundle section by repeating the process of adding custom note sections. This allows you to gather various pieces of information from customers, enhancing the personalization of their shopping experience.

</details>

***

## Conclusion

By adding custom fields to your Build Your Own Bundle section, you can offer a more personalized shopping experience for your customers. This feature allows them to add unique details to their bundles, making each purchase more meaningful and tailored to their preferences.

***

<table data-card-size="large" data-view="cards"><thead><tr><th></th><th></th><th data-hidden data-type="content-ref"></th><th data-hidden></th><th data-hidden data-card-target data-type="content-ref"></th></tr></thead><tbody><tr><td><mark style="color:purple;"><strong>Get Bundles &#x26; Upsell</strong></mark></td><td>Try free</td><td><a href="https://apps.shopify.com/product-kits-bundles-pickystory?surface_intra_position=1&#x26;surface_type=partners&#x26;surface_version=redesign">https://apps.shopify.com/product-kits-bundles-pickystory?surface_intra_position=1&#x26;surface_type=partners&#x26;surface_version=redesign</a></td><td><p>1. Add custom field Shopify bundle</p><p>2. Custom field Build Your Own Bundle</p><p>3. Shopify bundle customization</p><p>4. Create custom input bundle Shopify</p><p>5. Build Your Own Bundle text field</p><p>6. Mandatory custom fields Shopify</p><p>7. Shopify product bundle options</p><p>8. Customizable bundle Shopify</p><p>9. Personalize Shopify product bundles</p><p>10. Add notes to Shopify bundle</p></td><td><a href="https://apps.shopify.com/product-kits-bundles-pickystory?surface_intra_position=1&#x26;surface_type=partners&#x26;surface_version=redesign">https://apps.shopify.com/product-kits-bundles-pickystory?surface_intra_position=1&#x26;surface_type=partners&#x26;surface_version=redesign</a></td></tr></tbody></table>


# How to Create Multiple Build Your Own Bundle Section Scenarios

## Overview of Multiple Build Your Own Bundle Sections

Creating multiple “Build Your Own Bundle” section scenarios allows Shopify merchants to provide customers with the ability to personalize their shopping experience by building custom product bundles. With the Amplify app, you can set up various scenarios tailored to different product collections or themes, enhancing your store’s versatility and increasing sales potential.

## Steps to Create Multiple Build Your Own Bundle Section Scenarios<br>

To create multiple “Build Your Own Bundle” section scenarios, follow the same steps as outlined in the article “[How to Create a Build Your Own Bundle Section Scenario.](/bundles-and-upsell/scenarios/build-your-own-bundle-section/how-to-create-a-build-your-own-bundle-section-scenario)”.

Once you have followed the steps in that article to create a new bundle section, you can repeat the process to add additional scenarios. Each new scenario can be configured with different products, discounts, and designs, allowing for a variety of custom bundle options in your store.<br>

## Managing Multiple Scenarios

To manage different “Build Your Own Bundle” scenarios, go to the Scenarios section in the Amplify app. Hover over “Edit” to view and access all your created sections, making it easy to update and manage each bundle scenario.

<figure><img src="/files/wTVjEQZcWhSpQ3KfvJRg" alt=""><figcaption></figcaption></figure>

## Common Questions About Multiple Bundle Scenarios

<details>

<summary>Can I customize each Build Your Own Bundle scenario differently?</summary>

Yes, each Build Your Own Bundle scenario can be customized individually. You can adjust product selection, discount settings, and design elements separately for each scenario to meet your specific needs.

</details>

<details>

<summary>What should I do if the bundle block does not appear on the page?</summary>

If the bundle block does not appear, first ensure that the scenario is published. If it’s still missing, verify that the Amplify app block has been added in the Shopify theme editor. You can also reach out to support for assistance if the issue persists.

</details>

<details>

<summary>Is it possible to edit or update multiple scenarios at once?</summary>

No, each scenario needs to be edited individually. Amplify currently does not support bulk editing of multiple scenarios at once, so you’ll need to update them one at a time.

</details>

## Conclusion

By creating multiple “Build Your Own Bundle” section scenarios, you can offer a diverse range of customizable bundles tailored to different products or customer preferences. This feature enhances the shopping experience by allowing customers to create unique bundles that fit their needs, increasing engagement and sales in your Shopify store.

***

<table data-card-size="large" data-view="cards"><thead><tr><th></th><th></th><th data-hidden data-type="content-ref"></th><th data-hidden></th><th data-hidden data-card-target data-type="content-ref"></th></tr></thead><tbody><tr><td><mark style="color:purple;"><strong>Get Bundles &#x26; Upsell</strong></mark></td><td>Try free</td><td><a href="https://apps.shopify.com/product-kits-bundles-pickystory">https://apps.shopify.com/product-kits-bundles-pickystory</a></td><td><p>1. Set up multiple bundle scenarios</p><p>2. Create diverse bundle sections</p><p>3. Manage multiple bundle deals</p><p>4. Customize Shopify bundle pages</p><p>5. Add sections to Shopify bundles</p><p>6. Amplify multiple bundles</p><p>8. Flexible bundle setup</p><p>9. Organize bundle scenarios</p></td><td><a href="https://apps.shopify.com/product-kits-bundles-pickystory?surface_intra_position=1&#x26;surface_type=partners&#x26;surface_version=redesign">https://apps.shopify.com/product-kits-bundles-pickystory?surface_intra_position=1&#x26;surface_type=partners&#x26;surface_version=redesign</a></td></tr></tbody></table>


# How to Add A Custom Section to Build Your Own Bundle Section Deals

## **What is a Custom Section?**

The **BYOBS Custom Section** is a powerful feature within the **Build Your Own Bundle (BYOBS)** experience that allows merchants to embed their own **custom HTML, logic, and designs** into the bundle flow. This feature enables merchants to personalize their bundle display, add interactive elements, and improve user engagement.

This feature is **only available to Amplify One users.** For access, please [**contact our sales team**](https://heyamplify.com/?open-demo-popup=true).

## **How It Works**

* The Custom Section allows merchants to **insert their own code** (HTML, CSS, JavaScript) into a designated section of the Build Your Own Bundle Section bundle.
* It is **not directly connected to the** [**JavaScript SDK**](/bundles-and-upsell/how-to-use-the-javascript-sdk-with-amplify-platform), but developers **can use the SDK within the Build Your Own Bundle Section** **custom section** to enhance its functionality.
* This section provides flexibility for merchants who want to design **unique bundle displays** that match their store's branding and functionality needs.

## **How to Enable and Use the Custom Section**

1. **Ensure that your store is on the Amplify One plan.** If not, [reach out to sales for an upgrade](https://heyamplify.com/?open-demo-popup=true).
2. **Go to the Amplify Bundles & Upsell app in your Shopify store.**
3. **Navigate to your Build Your Own Bundle Section** **deal settings.**
4. Within the bundle editing interface, click on **Add Section** and choose **Custom Section**. This will allow you to insert a new field where you can enter your custom cod&#x65;**.**

<figure><img src="/files/ggisaJKBFuGKV4KDCrLb" alt=""><figcaption></figcaption></figure>

5. **Insert your custom code** (HTML, CSS, JavaScript) to modify the appearance and behavior of your bundle.
6. **Save your changes**, and the updates will be reflected on the storefront.

## **Important Notes**

* This feature is **only available for Build Your Own Bundle (BYOBS)** and does not apply to other bundle types.
* Merchants should have **basic knowledge of HTML and CSS** or work with a developer for advanced customization.

## **Want to Use the BYOBS Custom Section?**

If you are an [**Amplify One customer**](https://heyamplify.com/pricing/) and want to leverage the BYOBS Custom Section, contact[ our sales team](https://heyamplify.com/?open-demo-popup=true) to discuss activation and customization possibilities.


# Complete the Bundle

Recommend complementary items in a popup when a selected product is added to the cart


# How to create a Complete the Bundle scenario

Boost your store’s average order value (AOV) by promoting popular product combinations with the “Complete the Bundle” feature.

{% hint style="info" %}
This feature is available to customers who installed the app **between October 19th, 2023 - November 11th, 2024.** Now this feature is available with the name "**Upsell Popup"**.&#x20;
{% endhint %}

## What is a “Complete the Bundle” Scenario?

A “**Complete the Bundle**” scenario is designed to promote popular product combinations, helping increase your store’s average order value (AOV). This feature allows you to showcase curated or automated product bundles directly on product pages, encouraging customers to purchase complementary items together. You have the flexibility to create custom bundles, use automated product combinations, or mix both to suit your store’s needs.

By default, “Complete the Bundle” displays on all product pages that are part of the bundle. If automated bundles are enabled, they will be shown on product pages where no custom bundles are available, ensuring continuous promotion of bundled products.<br>

## Steps to Create a Manual Complete the Bundle Scenario

If you'd like to create **a manual bundle** follow the next steps (for the automated option [click here](#steps-to-create-an-automated-complete-the-bundle-scenario))

#### Step 1. Access the Scenarios Section

Go to the Scenarios section in your dashboard and click on “[**Create**](#user-content-fn-1)[^1].”

<figure><img src="/files/0gYB3g9fSRJNOLlQuOQ7" alt=""><figcaption></figcaption></figure>

#### Step 2. Create a New Bundle

Select the option to create a new bundle specifically for your “Complete the Bundle” scenario.

<figure><img src="/files/fS6l0VXCsgZOPluMi4Gh" alt=""><figcaption></figcaption></figure>

#### Step 3. Add Products and Set Discounts

Select the products you want to include in the bundle. Focus on grouping complementary items to create an attractive offer that enhances the customer’s shopping experience.

<figure><img src="/files/RqAjLVwPOUcsYAJOGJz9" alt=""><figcaption></figcaption></figure>

#### Step 4. Set Discount Rates

Define the discount rates for the products in the bundle. You can configure these rates to make the bundle more appealing and competitive. Once you’ve set the discounts, save your changes to finalize the setup.

<figure><img src="/files/62On183bk7xS9P6AHAE4" alt=""><figcaption></figcaption></figure>

#### Step 5. Customize the Design

Navigate to the Design tab to adjust the appearance of the bundle. Ensure that it aligns with your store’s branding and enhances the product page experience.

<figure><img src="/files/6oYUlPkYcpGNi5dO0j2W" alt=""><figcaption></figcaption></figure>

#### Step 6. Publish the Scenario

Once you have finalized the setup, click “Publish.” \
\
Your manual “Complete the Bundle” scenario is now **live**, promoting selected product combinations on the relevant product pages!&#x20;

<figure><img src="/files/Rc8aowGp0E4UNOSXe5Tn" alt=""><figcaption></figcaption></figure>

## Steps to Create an Automated Complete the Bundle Scenario

If you want to leverage automated product recommendations, follow these steps:

#### Step 1. Enable Automated Bundles

<figure><img src="/files/jd6y7uQJG9mQcpzebsVJ" alt=""><figcaption></figcaption></figure>

#### Step 2. Publish the Scenario

After enabling the automated option, click “Publish.” \
\
The automated “Complete the Bundle” scenario will now display on product pages where no custom bundles are set, maximizing the chances of increasing sales through strategic product bundling!

<figure><img src="/files/Rc8aowGp0E4UNOSXe5Tn" alt=""><figcaption></figcaption></figure>

## Common Questions About Complete the Bundle

<details>

<summary>How do I create a Complete the Bundle scenario?</summary>

Go to the Scenarios section in the Amplify app, click Create, select Complete the Bundle, add products, customize the design, and publish the scenario.

</details>

<details>

<summary>What is the difference between manual and automated bundles?</summary>

Manual bundles require you to select the products manually, while automated bundles use algorithms to suggest products based on sales data and customer behavior.

</details>

<details>

<summary>Can I customize the appearance of the Complete the Bundle section?</summary>

Yes, you can fully customize the appearance in the Design tab of the scenario settings to match your store’s branding.

</details>

<details>

<summary>How are products selected for automated bundles?</summary>

Products for automated bundles are selected based on customer purchase patterns and sales data from your store.

</details>

<details>

<summary>Is it possible to display bundles on all product pages?</summary>

Yes, you can choose to display Complete the Bundle scenarios on all product pages by configuring the settings in the Amplify app.

</details>

## Conclusion

By setting up a “**Complete the Bundle**” scenario, you can effectively promote product combinations and increase the average order value in your store. Whether you choose to create custom bundles or utilize automated recommendations, this feature enhances the shopping experience by encouraging customers to purchase more items together.

***

<table data-card-size="large" data-view="cards"><thead><tr><th></th><th></th><th data-hidden data-card-target data-type="content-ref"></th><th data-hidden data-type="content-ref"></th><th data-hidden></th></tr></thead><tbody><tr><td><mark style="color:purple;">Get Bundles&#x26;Upsell</mark></td><td>Try free </td><td><a href="https://apps.shopify.com/product-kits-bundles-pickystory?surface_intra_position=1&#x26;surface_type=partners&#x26;surface_version=redesign">https://apps.shopify.com/product-kits-bundles-pickystory?surface_intra_position=1&#x26;surface_type=partners&#x26;surface_version=redesign</a></td><td><a href="https://apps.shopify.com/product-kits-bundles-pickystory?surface_intra_position=1&#x26;surface_type=partners&#x26;surface_version=redesign">https://apps.shopify.com/product-kits-bundles-pickystory?surface_intra_position=1&#x26;surface_type=partners&#x26;surface_version=redesign</a></td><td><p>1. Complete the Bundle</p><p>2. Shopify product bundling</p><p>3. Increase AOV with bundles</p><p>4. Custom bundle creation</p><p>5. Automated product bundles</p><p>6. Bundle promotion strategy</p><p>7. Manual vs. automated bundles</p><p>8. Frequently bought together</p><p>9. Product page bundle display</p><p>10. Create bundles in Shopify</p></td></tr></tbody></table>

[^1]: If you clicked "Create" before, it'll say "Edit".


# Upsell Popup


# How to create Upsell Popup Scenario

Set up the Upsell Popup feature to automatically recommend related products when a customer adds an item to their cart, based on customizable rules and conditions.

{% hint style="info" %}
*This feature is available to customers who installed the app **after November 11th, 2024.** If you installed the app before this date, you can* [*see this article*](https://support.heyamplify.com/bundles-and-upsell/scenarios/complete-the-bundle/how-to-create-a-complete-the-bundle-scenario) *for its previous version.* &#x20;
{% endhint %}

## **What is the Upsell Popup?**

The Upsell Popup scenario is designed to boost your store’s average order value by recommending additional products to customers when they add items to their cart. It uses predefined rules and conditions to display relevant products in a popup, making it easy for customers to add more items to their order. Conditions for product recommendations can be based on a specific product, product title, or product collection, ensuring that your suggestions are highly relevant.

## **Steps to Set Up the Upsell Popup**

#### **Step 1: Access the Upsell Popup Settings**

Click on **"Bundles"** in the sidebar and then click on "**Create**"/**"Edit"** under **"Upsell Popup"** scenario to begin the setup.

<figure><img src="/files/PhtLnv7qDkJmajL1SVBn" alt=""><figcaption></figcaption></figure>

#### **Step 2:** Create a new Rule for Recommendations

Click on **"New Rule"** to set up a product recommendation rule.

<figure><img src="/files/nUTAbKdlgDlrNIumWyJU" alt=""><figcaption></figcaption></figure>

#### Step 3: Add Conditions for Recommendations

Under the **Conditions** section, click on **"Add Condition".**

<figure><img src="/files/pp5JS6Ki6p1THxpiWEBO" alt=""><figcaption></figcaption></figure>

You can base conditions on:

* **Specific Product**: Recommend items when a particular product is added to the cart.
* **Product Title**: Use keywords in the product title to trigger recommendations.
* **Product Collection**: Set conditions based on product collections for broader matches.

<figure><img src="/files/Mxt7VKrkSKK1BeC4CDCp" alt=""><figcaption></figcaption></figure>

#### **Step 4: Customize the Product Recommendations**

Similarly to Step 3, add conditions for the products you want to recommend.

<figure><img src="/files/XjjkYNZGKPAbgTVz8sPP" alt=""><figcaption></figcaption></figure>

#### Step 5: Configure the rules' settings and Save

Click on "Settings" and set the discount type, the discount amount, whether a certain amount of products is needed for discount and the number of recommendations. Once you’ve completed setting up your rules and conditions, click on **"Save"**.

<figure><img src="/files/dfOBh7F4kDQaroEGAnqz" alt=""><figcaption></figcaption></figure>

## Customization

**Step 6: Customize the design of your Upsell Popup**

Click on the "Design" tab to customize texts, colors, and the behavior of your Upsell Popup. Once you are done, click on "Save" to apply the changes.

<figure><img src="/files/EHywg6rS9ykVh4vT700w" alt=""><figcaption></figcaption></figure>

<figure><img src="/files/58s1KwSgdX7GFzb8jvra" alt=""><figcaption></figcaption></figure>

## Common Questions about Upsell Popup

<details>

<summary><strong>Can I test the Upsell Popup before making it live?</strong></summary>

Yes, there is a **"Test"** button in the Setup tab, which lets you preview and verify how the Upsell Popup functions before it goes live.

</details>

<details>

<summary><strong>Can I use multiple conditions for the same rule?</strong></summary>

Absolutely. You can set up multiple conditions to make your recommendations more accurate. For example, you can use both product title and collection-based conditions within the same rule.

</details>

<details>

<summary>How many products can be shown in the Upsell Popup?</summary>

The number of products displayed in the popup can be customized. However, it’s recommended to keep the number manageable for an optimal customer experience.

</details>

<details>

<summary>Can I customize the design of the Upsell Popup?</summary>

Yes, the Upsell Popup design can be customized to match your store’s theme. You can adjust colors, text, and styles to maintain brand consistency in the "Design" tab.

</details>

<details>

<summary>What happens if a customer closes the Upsell Popup?</summary>

If a customer closes the popup, the recommendation will not be added to the cart. The popup is non-intrusive and designed to be easily dismissible.

</details>

## Conclusion

The Upsell Popup is a powerful tool to increase your store’s revenue by strategically recommending products based on customer behavior. By setting up conditions and customizing the recommendations, you can provide a seamless upselling experience that benefits both your store and your customers. If you have any questions or need further assistance with the Upsell Popup, our support team is here to help.

***

<table data-card-size="large" data-view="cards"><thead><tr><th></th><th></th><th data-hidden data-card-target data-type="content-ref"></th><th data-hidden data-type="content-ref"></th><th data-hidden></th></tr></thead><tbody><tr><td><mark style="color:purple;">Get Bundles&#x26;Upsell</mark></td><td>Try free </td><td><a href="https://apps.shopify.com/product-kits-bundles-pickystory?surface_intra_position=1&#x26;surface_type=partners&#x26;surface_version=redesign">https://apps.shopify.com/product-kits-bundles-pickystory?surface_intra_position=1&#x26;surface_type=partners&#x26;surface_version=redesign</a></td><td><a href="https://apps.shopify.com/product-kits-bundles-pickystory?surface_intra_position=1&#x26;surface_type=partners&#x26;surface_version=redesign">https://apps.shopify.com/product-kits-bundles-pickystory?surface_intra_position=1&#x26;surface_type=partners&#x26;surface_version=redesign</a></td><td><p>1. Upsell Recommendations</p><p>2. Product Upsell</p><p>3. Pop-up Offers</p><p>4. Add to Cart Trigger</p><p>5. Automated Product Suggestions</p><p>6. Upsell Conditions</p><p>7. Smart Upselling</p><p>8. Related Product Offers</p><p>9. Custom Pop-up Setup</p><p>10. Upsell Strategy</p></td></tr></tbody></table>


# Frequently Bought Together

Recommend items that are frequently bought together with the chosen product on its product page


# How to create a Frequently Bought Together scenario

Promote popular product combinations directly on product pages with the “Frequently Bought Together” feature to increase your store’s average order value (AOV).

This feature is available to customers who installed the app **after October 6th, 2023**

## What is a “Frequently Bought Together” Scenario?

A “**Frequently Bought Together**” scenario is designed to showcase popular product combinations on your store’s product pages, encouraging customers to purchase complementary items together. This feature helps increase the average order value (AOV) by suggesting additional products that other customers often buy together. You can choose to create custom bundles, enable automated product combinations, or mix both approaches depending on your strategy.

By default, frequently bought-together bundles will be shown on all product pages that are part of the bundle. If automated bundles are enabled, they will appear on product pages where no custom bundles are found, ensuring continuous promotion of bundled products.

## Steps to Create a Frequently Bought Together Scenario

#### Step 1. Access the Scenarios Section

Go to the Scenarios section in your dashboard and click on “Create.”

<figure><img src="/files/ATEcDQ8OUYcQtRfGgqkt" alt=""><figcaption></figcaption></figure>

#### Step 2. Create a New Bundle

Select the option to create a new bundle specifically for the “Frequently Bought Together” scenario. You can also refer to “How to enable Automated Frequently Bought Together bundles?” for additional setup options.

<figure><img src="/files/UBVDrxPU1nM21YNHiSYn" alt=""><figcaption></figcaption></figure>

#### Step 3. Add Products to the Bundle

Choose the products you want to include in the Frequently Bought Together bundle. This step allows you to select popular combinations that customers are likely to purchase together.

<figure><img src="/files/PxVrQnW8P6tfhd8rIN82" alt=""><figcaption></figcaption></figure>

#### Step 4. Set Up Discounts

Define discount rules for the bundle, setting appropriate discount rates to incentivize customers to buy the grouped products. Save the changes to ensure the discounts are applied correctly.

<figure><img src="/files/KzjTFPIQLcbjVN87ARcT" alt=""><figcaption></figcaption></figure>

## Customization

#### Step 5. Customize the Design

Navigate to the Design tab to customize the appearance of the Frequently Bought Together section. Adjust colors, fonts, and layout to ensure it align with your store’s branding and enhance the product page experience.

<figure><img src="/files/XO6dDCE8wsL3RBP4W3m4" alt=""><figcaption></figcaption></figure>

#### Step 6. Publish the Scenario

Once you are satisfied with the setup, click “Publish.” This will make your Frequently Bought Together scenario available on the product pages.

<figure><img src="/files/RFKy71GV426Ga6o9Bf4v" alt=""><figcaption></figcaption></figure>

#### Step 7. Add the Widget to Your Store

Choose the template of your product page and click on “Add to store.” You will be redirected to Shopify’s theme editor to finalize the placement of the frequently bought together widget.

<figure><img src="/files/8580lu6yccmZ75TjNvJQ" alt=""><figcaption></figcaption></figure>

#### Step 8. Ensure the App Block is Visible

The Bundles \* Upsell app block should automatically appear on the page. If it does not, click on “Add block” under “Apps” and select “Frequently Bought Together” by Amplify. Save your changes to update the store page.

<figure><img src="/files/ZqCskG7TcboW8qMTRt57" alt=""><figcaption></figcaption></figure>

<figure><img src="/files/MOc5LUzJESCc7sVckv5f" alt=""><figcaption></figcaption></figure>

#### Step 7. Save Changes and Confirm

After adding the widget, save your changes. Once the offer is live on the page, you will see a confirmation in the app indicating that the scenario is now live in your store! 🎉

<figure><img src="/files/hRgobSE40FIgV6sqGOpH" alt=""><figcaption></figcaption></figure>

<figure><img src="/files/0t3eYzZGxwBQYHMaiYbA" alt=""><figcaption></figcaption></figure>

## Common  Questions About Frequently Bought Together

<details>

<summary>Are the discounts for Frequently Bought Together bundles applied automatically at checkout?</summary>

Yes, the discounts set up for Frequently Bought Together bundles are applied automatically at checkout. Customers will see the discounted prices reflected in their cart when they add all the items from the bundle.

</details>

<details>

<summary>How do I track the performance of my Frequently Bought Together scenarios?</summary>

You can track the performance of your Frequently Bought Together scenarios by going to the Analytics tab in the Bundles & Upsell app. This section provides insights into how much revenue each scenario is generating and its overall impact on your store.

</details>

<details>

<summary>Can I display Frequently Bought Together bundles on specific product pages?</summary>

Yes, you can display Frequently Bought Together bundles on specific product pages. When setting up the scenario, choose the product pages where you want the bundle to appear, allowing you to target relevant products and maximize cross-selling opportunities.

</details>

<details>

<summary>Can I use different discounts for different product combinations?</summary>

Yes, you can set different discounts for various product combinations within the Frequently Bought Together feature. This allows you to offer varying levels of savings depending on the products included in each bundle.

</details>

## Conclusion

By creating a “Frequently Bought Together” scenario, you can effectively promote complementary product combinations and increase the average order value in your store. Whether you choose to create custom bundles or leverage automated product combinations, this feature enhances the shopping experience by encouraging customers to buy more items together.

***

<table data-card-size="large" data-view="cards"><thead><tr><th></th><th></th><th data-hidden data-type="content-ref"></th><th data-hidden></th><th data-hidden data-card-target data-type="content-ref"></th></tr></thead><tbody><tr><td><mark style="color:purple;"><strong>Get Bundles &#x26; Upsell</strong></mark></td><td>Try free</td><td><a href="https://apps.shopify.com/product-kits-bundles-pickystory?surface_intra_position=1&#x26;surface_type=partners&#x26;surface_version=redesign">https://apps.shopify.com/product-kits-bundles-pickystory?surface_intra_position=1&#x26;surface_type=partners&#x26;surface_version=redesign</a></td><td><p>1. Frequently bought together bundles</p><p>2. Shopify product bundling</p><p>3. Increase AOV with product bundles</p><p>4. Custom bundle creation</p><p>5. Automated product combinations</p><p>6. Product page bundle display</p><p>7. Create frequently bought together</p><p>8. Shopify bundle widget</p><p>9. Add bundle block to Shopify</p><p>10. Enable automated bundles</p></td><td><a href="https://apps.shopify.com/product-kits-bundles-pickystory?surface_intra_position=1&#x26;surface_type=partners&#x26;surface_version=redesign">https://apps.shopify.com/product-kits-bundles-pickystory?surface_intra_position=1&#x26;surface_type=partners&#x26;surface_version=redesign</a></td></tr></tbody></table>


# How to enable Automated Frequently Bought Together bundles

Learn how to activate Automated Frequently Bought Together bundles in your Shopify store to enhance cross-selling and boost your sales.

## What are Automated Frequently Bought Together Bundles?

Automated Frequently Bought Together bundles use data-driven algorithms to suggest product combinations that customers are likely to purchase together. This feature automatically generates product bundles based on historical sales data, making it easier for customers to discover and buy related products, thereby increasing your store’s average order value.

## Steps to Enable Automated Frequently Bought Together Bundles

Follow these steps to enable Automated Frequently Bought Together bundles in your Shopify store:

#### Step 1. Enable the Scenario

* Log in to the Amplify app and navigate to the Scenarios section. Click on “Edit” if you want to modify an existing scenario or “Create” to start a new one.

<figure><img src="/files/ATEcDQ8OUYcQtRfGgqkt" alt=""><figcaption></figcaption></figure>

#### Step 2. Enable Automated Bundles

* Before enabling automated bundles, you need to create at least one custom Frequently Bought Together bundle. This custom bundle serves as a basis for the automated suggestions.
* For instructions on creating a custom Frequently Bought Together bundle, refer to the article “How to Create a Frequently Bought Together Scenario?” and follow steps 2-5.
* Once a custom bundle is created, go back to the scenario settings and scroll to the bottom of the page. Click on the toggle to enable Automated Bundles.

<figure><img src="/files/xUbN24Qu4c6Fnt8LYrNS" alt=""><figcaption></figcaption></figure>

#### Step 3. Publish Your Automated Bundles

* After enabling the automated bundles, save your changes and publish the scenario. Your automated bundles are now live on your store! 🎉

<figure><img src="/files/RFKy71GV426Ga6o9Bf4v" alt=""><figcaption></figcaption></figure>

## Common Customer Questions About Automated Frequently Bought Together Bundles

<details>

<summary>What are Automated Frequently Bought Together bundles?</summary>

Automated Frequently Bought Together bundles are product combinations automatically generated by an AI engine based on historical sales data and customer behavior. These bundles suggest products that are often purchased together, helping increase cross-sell opportunities and boosting average order value.

</details>

<details>

<summary>Do I need a custom bundle to use Automated bundles?</summary>

Yes, you need to create at least one custom Frequently Bought Together bundle before you can enable Automated bundles. The custom bundle serves as a basis for the automated suggestions, allowing the app to understand which products are frequently bought together.

</details>

<details>

<summary>How are products selected for Automated Frequently Bought Together bundles?</summary>

Products for Automated Frequently Bought Together bundles are selected based on your store’s historical sales data and customer purchase patterns. Our AI engine uses this data to automatically suggest products that are commonly purchased together, enhancing the likelihood of additional sales.

</details>

<details>

<summary>Can I customize the appearance of Automated bundles on my store?</summary>

Yes, you can customize the appearance of Automated Frequently Bought Together bundles in your store. In the Bundles & Upsell app, go to the Frequently Bought Together scenario -> Design tab within the scenario settings and modify the appearance, including fonts, colors, and layout, to match your store’s branding.

</details>

## Conclusion

Enabling Automated Frequently Bought Together bundles in your Shopify store is a great way to enhance the shopping experience and increase sales. By automatically suggesting relevant products based on customer behavior and purchase history, you can encourage customers to add more items to their carts and boost your average order value.

***

<table data-card-size="large" data-view="cards"><thead><tr><th></th><th></th><th data-hidden data-type="content-ref"></th><th data-hidden></th><th data-hidden data-card-target data-type="content-ref"></th></tr></thead><tbody><tr><td><mark style="color:purple;"><strong>Get Bundles &#x26; Upsell</strong></mark></td><td>Try free</td><td><a href="https://apps.shopify.com/product-kits-bundles-pickystory?surface_intra_position=1&#x26;surface_type=partners&#x26;surface_version=redesign">https://apps.shopify.com/product-kits-bundles-pickystory?surface_intra_position=1&#x26;surface_type=partners&#x26;surface_version=redesign</a></td><td><p>1. Enable Automated Frequently Bought Together bundles</p><p>2. Shopify automated product bundles</p><p>3. Frequently Bought Together automation</p><p>4. Amplify automated bundles</p><p>5. Setup automated bundles Shopify</p><p>6. Create automated product suggestions</p><p>7. Boost sales with Automated bundles</p><p>8. Shopify AI product recommendations</p><p>9. Automate cross-selling Shopify</p><p>10. Frequently Bought Together feature Shopify</p></td><td><a href="https://apps.shopify.com/product-kits-bundles-pickystory?surface_intra_position=1&#x26;surface_type=partners&#x26;surface_version=redesign">https://apps.shopify.com/product-kits-bundles-pickystory?surface_intra_position=1&#x26;surface_type=partners&#x26;surface_version=redesign</a></td></tr></tbody></table>


# How to Create a Frequently Bought Together Scenario (For Old Themes)

Learn how to publish a Frequently Bought Together (FBT) widget in older Shopify themes by manually adding a code snippet to your theme’s product page.

## What is a Frequently Bought Together (FBT) Widget?

A Frequently Bought Together widget is a feature that suggests related products on a product page based on what customers typically purchase together. This cross-selling tool can help increase average order value by encouraging customers to add more items to their cart.

## Steps to Create a Frequently Bought Together Scenario for Older Shopify Themes

To integrate an FBT widget into your older Shopify theme, follow these steps to manually add the necessary code to your theme’s product.liquid file:

#### Step 1. Create an FBT Deal

&#x20;Log in to the Amplify app, go to the Scenarios section, and select Frequently Bought Together to create a new FBT deal. Add the products you want to include in the bundle and customize the settings according to your preferences.

<figure><img src="/files/ATEcDQ8OUYcQtRfGgqkt" alt=""><figcaption></figcaption></figure>

#### Step 2. Insert a Code Snippet

After publishing your FBT widget, the Amplify app will provide a snippet of code. This code needs to be inserted into your theme’s product.liquid file to display the widget on your product pages.

Click “Copy code” in the Amplify app, then click “Add to store” to proceed. This will automatically open the product.liquid file in your Shopify theme editor.

<figure><img src="/files/PcxNEquhiJlBusVB9XYs" alt=""><figcaption></figcaption></figure>

#### Step 3. Add the Code to Your Product.liquid File

Locate the specific spot in the product.liquid file where you want the FBT widget to appear. The placement is crucial as it determines where the widget will be displayed on the product page.

Paste the copied code into the desired location within the product.liquid file and click “Save” to apply the changes.

<figure><img src="/files/WIu40Rh7SOOlB3eHYHMM" alt=""><figcaption></figcaption></figure>

#### Step 4. Confirm the Integration

Return to the Amplify app. If the code was added correctly, you should see a confirmation or preview indicating successful integration. Check to ensure everything appears as expected.

<figure><img src="/files/eTsi0KqfpslvoF2vk18h" alt=""><figcaption></figcaption></figure>

#### Step 5. Review the FBT Widget on Your Product Pages

Visit your store’s product pages to see the FBT widget in action. Make sure the widget is displaying correctly and that the suggested products are relevant.

<figure><img src="/files/YfvEepBEPtftAj7t9j5x" alt=""><figcaption></figcaption></figure>

## Common Questions About FBT Widgets for Older Themes

<details>

<summary>Where should I place the FBT code snippet in my product.liquid file?</summary>

Place the FBT code snippet in the product.liquid file at the location where you want the widget to display on the product page. The placement is important for ensuring the widget appears in the desired spot.

</details>

<details>

<summary>What should I do if the FBT widget doesn’t appear after adding the code?</summary>

If the FBT widget doesn’t appear, double-check that the code snippet was copied correctly and pasted into the right spot in the product.liquid file. Also, make sure to save your changes in the Shopify theme editor. If nothing has helped, please reach out to support, our team will gladly assist

</details>

<details>

<summary>Can I customize the appearance of the FBT widget for older themes?</summary>

Yes, you can customize the appearance of the FBT widget by editing the settings in the Amplify app or adjusting the CSS in your Shopify theme to match your store’s branding.

</details>

<details>

<summary>Is it possible to remove or reposition the FBT widget once it’s added?</summary>

Yes, you can remove or reposition the FBT widget by editing the product.liquid file in your Shopify theme. Simply delete the code snippet or move it to a different location within the file.

</details>

## Conclusion

By manually adding the FBT widget code to your older Shopify theme, you can enhance your product pages with targeted product recommendations that increase cross-selling opportunities. Follow these steps to successfully integrate the widget and boost your store’s average order value.

***

<table data-card-size="large" data-view="cards"><thead><tr><th></th><th></th><th data-hidden data-type="content-ref"></th><th data-hidden></th><th data-hidden data-card-target data-type="content-ref"></th></tr></thead><tbody><tr><td><mark style="color:purple;"><strong>Get Bundles &#x26; Upsell</strong></mark> </td><td>Try free</td><td><a href="https://apps.shopify.com/product-kits-bundles-pickystory?surface_intra_position=1&#x26;surface_type=partners&#x26;surface_version=redesign">https://apps.shopify.com/product-kits-bundles-pickystory?surface_intra_position=1&#x26;surface_type=partners&#x26;surface_version=redesign</a></td><td><p>1. Add FBT widget Shopify</p><p>2. Frequently Bought Together old Shopify theme</p><p>3. Insert code Shopify product page</p><p>4. Manually add FBT widget Shopify</p><p>5. Shopify product.liquid FBT widget</p><p>6. Create Frequently Bought Together Shopify</p><p>7. FBT widget integration Shopify</p><p>8. Shopify theme product page customization</p><p>9. Cross-selling Shopify older themes</p><p>10. Shopify product recommendations widget</p></td><td><a href="https://apps.shopify.com/product-kits-bundles-pickystory?surface_intra_position=1&#x26;surface_type=partners&#x26;surface_version=redesign">https://apps.shopify.com/product-kits-bundles-pickystory?surface_intra_position=1&#x26;surface_type=partners&#x26;surface_version=redesign</a></td></tr></tbody></table>


# Buy X Get Y


# How to create a Buy X Get Y (BOGO) Scenario

Learn how to create a Buy X Get Y Scenario

## What is **Buy X Get Y (BOGO)** Scenario?

The **Buy X Get Y (BOGO)** scenario is a powerful promotional feature available inside the **Bundles & Upsell app** by Amplify. It allows merchants to create special offers where customers can purchase a specific product (Product X) and automatically receive another product (Product Y) as a free gift, added directly to the cart without extra steps.

***

## Steps to create a **Buy X Get Y (BOGO)** offer

#### Step 1: **Access the Scenarios Section**

Click on **Bundles & Upsell** and on **"Buy X Get Y",** click "**Create**".

<figure><img src="/files/cIKGjZg1UggqjZAxkwgK" alt=""><figcaption></figcaption></figure>

#### **Step 2: Create a New Rule**

Select the option to "**Add rule**".

<figure><img src="/files/6RLCGaNVlc6A0LYNB6bm" alt=""><figcaption></figcaption></figure>

#### **Step 3.1: Select the product customers need to purchase (Product X)**

* On the left side of the drawer, click "**Select products**".
* Choose the product(s) that will be the condition for the free gift.

<figure><img src="/files/5e0krs901O6U6nFOAvD7" alt=""><figcaption></figcaption></figure>

<figure><img src="/files/HyXmVi5GRdBekTsy1Zrj" alt=""><figcaption></figcaption></figure>

#### Step 3.2: Select the free gift (Product Y)

* On the right side of the drawer, click **Select Product**.
* Choose the product that will be added as a free gift.

<figure><img src="/files/e241TLPsn37PDemlU1FU" alt=""><figcaption></figcaption></figure>

<figure><img src="/files/iiqh6SaoJTSskt2sgzps" alt=""><figcaption></figcaption></figure>

#### Step 4: **Save the scenario**

Once you’ve selected the trigger product and the free gift, click "**Save"** to save the rule.

<figure><img src="/files/73ZKIWOCCr26FZP2Dgk1" alt=""><figcaption></figcaption></figure>

***

## Buy X Get Y Customization

#### Step 4: Customize the Buy X Get Y widget

* In the scenario editor, click on the **Design** tab.
* Customize the widget as needed:
  * Change the "**Max gift limit warning"**.
  * Toggle the "**Plus icon"** on or off.
  * Edit the "**Title"**, choose to "**Display Comparet-at price**" and edit the "**Main & Highlight Colors**".

<figure><img src="/files/GH0MlMCNeAM4DvNSv3ib" alt=""><figcaption></figcaption></figure>

#### Step 6: Save changes

When done, click "**Save"** to apply your changes.

<figure><img src="/files/fAdCfw5wbF1hZtE5zblY" alt=""><figcaption></figcaption></figure>

***

## How to publish the widget

#### Step 7: Activate the widget

When you're ready to display the widget on your live store, click the **three-dot menu** (•••) in the top right corner of the scenario editor and select "**Active**".

<figure><img src="/files/vtT5HZ4Yy8eBZtgCwhU6" alt=""><figcaption></figcaption></figure>

#### Step 8: Choose where to show the widget

A popup will appear. Select the **product page template** where the offer should appear. This should match the product(s) you set in the scenario. Then, click "**Add to Store**".

<figure><img src="/files/9sajwx9L0morOigAfZRL" alt=""><figcaption></figcaption></figure>

#### Step 9: Place the App Block in the theme editor

Shopify’s theme editor will open. The "**Buy X Get Y**" App block will be automatically added to the product template.\
You can drag and reposition it anywhere on the page layout to best match your store design.

<figure><img src="/files/ZObX1xQ6bd6Tv3JwTnnt" alt=""><figcaption></figcaption></figure>

#### Step 10: Save your theme changes

After placing or adjusting the App Block, click **Save** in the top right corner of the Shopify theme editor.

<figure><img src="/files/HZvKSvHXvQRbHSyudYes" alt=""><figcaption></figcaption></figure>

#### Step 11: Confirm the widget is published

Return to the "**Bundles & Upsell**" app. If the App Block was added successfully, you’ll see a confirmation message that the widget is active and detected.

<figure><img src="/files/xGn0q7WzaPPNnCHNp6Li" alt=""><figcaption></figcaption></figure>

:tada:***Congratulations, the Buy X Get Y is now live on your store*** :tada:

***

<details>

<summary>Can I create multiple Buy X Get Y offers for different products?</summary>

Yes, you can create as many scenarios as you like, each linking a different Product X and Product Y.

</details>

<details>

<summary><strong>Will the free Product Y be automatically added to the cart?</strong></summary>

Yes, when a customer adds Product X to their cart, Product Y will be automatically included.

</details>

<details>

<summary>Can customers see the offer on the product page?</summary>

Yes, the widget will display the offer on the product page, provided the App Block is properly added.

</details>

<details>

<summary>Can I customize the look and text of the widget?</summary>

Yes, you can edit texts from the **Design** tab in the scenario settings. For deeper styling, custom CSS can be used.

</details>

***

### Conclusion

The **Buy X Get Y** scenario in Bundles & Upsell is an easy-to-set-up, highly effective promotional tool that boosts AOV (Average Order Value) and enhances the shopping experience. By displaying the offer directly on the product page and handling the gift addition automatically, merchants can create seamless and enticing promotions that convert.

***

<table data-card-size="large" data-column-title-hidden data-view="cards" data-full-width="false"><thead><tr><th></th><th></th><th data-hidden></th><th data-hidden data-card-target data-type="content-ref"></th><th data-hidden data-card-cover data-type="files"></th></tr></thead><tbody><tr><td><mark style="color:purple;"><strong>Get Bundles &#x26; Upsell</strong></mark> </td><td>Try free </td><td> </td><td><a href="https://apps.shopify.com/product-kits-bundles-pickystory?surface_intra_position=1&#x26;surface_type=partners&#x26;surface_version=redesign">https://apps.shopify.com/product-kits-bundles-pickystory?surface_intra_position=1&#x26;surface_type=partners&#x26;surface_version=redesign</a></td><td></td></tr></tbody></table>


# Analytics


# Analytics: How to Track Performance in Your Store

Gain valuable insights into how Amplify is driving sales and impacting your store’s performance with our comprehensive analytics feature.

## Overview of Amplify Analytics

Amplify’s analytics tool allows you to track the number and percentage of sales attributed to Amplify in your store. By leveraging the Amplify API, the analytics feature provides detailed reports on how Amplify scenarios contribute to your overall revenue, helping you understand the effectiveness of your upselling and bundling strategies.

## How to Access Your Amplify Analytics

#### 1. Open Amplify and Navigate to the Analytics Tab

To view your store’s analytics, simply open the Amplify  app and go to the “Analytics” tab. Here, you can access a range of reports and insights about your store’s performance.

## Key Metrics and Insights Available in Amplify Analytics

#### 1. Store Performance Overview

This section provides a snapshot of your total store revenue and highlights the portion contributed by Amplify . It helps you quickly assess the impact of Amplify's tools on your store’s overall sales and profitability.

<figure><img src="/files/ZiojAP9QTPQkFmWj7dQe" alt=""><figcaption></figcaption></figure>

#### 2. Revenue by Scenario

Analyze the effectiveness of different Amplify scenarios with a detailed breakdown of revenue generated by each scenario. This report helps you identify which strategies are most successful in driving sales, allowing you to optimize your upselling and bundling tactics.

<figure><img src="/files/2AY0tXToH9vWdPGYsHW0" alt=""><figcaption></figcaption></figure>

#### 3. Orders with Amplify&#x20;

Get a clear view of all orders that include revenue attributed to Amplify. This section shows both the total order amount and the contribution from Amplify, giving you a direct measure of the impact on your sales.

<figure><img src="/files/Dw31ireiQwIzyvuHXXyf" alt=""><figcaption></figcaption></figure>

#### 4. Interactive Insights

Dive deeper into your analytics with interactive features. Click on any scenario in the “Revenue by Scenario” section to see a detailed performance breakdown. You can also explore individual orders to view complete order details and understand which items were influenced by Amplify, enabling a comprehensive analysis of your sales data.

<figure><img src="/files/CoNa1bQP26JoADw7OmBy" alt=""><figcaption></figcaption></figure>

#### 5. Date Range Selection

Customize your analysis by selecting a specific date range. This feature allows you to examine sales data from different periods, making it easy to track performance trends and measure the success of your Amplify strategies over time.

<figure><img src="/files/SBKvcTZr5GiCop5kFhm4" alt=""><figcaption></figcaption></figure>

***

## Common Question about How to Track Performance in your Store

<details>

<summary>What is Analytics, and why is it important?</summary>

Analytics refers to the process of collecting, analyzing, and interpreting data to make informed business decisions. It helps businesses track performance, understand customer behavior, and optimize strategies for growth.

</details>

<details>

<summary><strong>What types of data can I track with Analytics?</strong></summary>

With Analytics, you can track key metrics related to your application, including bundle sales, revenue generated per scenario and orders that include one of our scenarios or features. It provides insights into how bundles perform, customer purchasing behaviors, and overall business performance.

</details>

<details>

<summary>How can I use Analytics to improve my sales?</summary>

By analyzing customer preferences, purchase patterns, and high-performing products, you can adjust pricing, promotions, and inventory strategies to maximize sales and customer retention.

</details>

***

## Conclusion

By utilizing Amplify's analytics, you can clearly understand how our tools drive sales and contribute to your store’s success. These insights empower you to refine your strategies, optimize your product offerings, and ultimately boost your store’s revenue.

***

<table data-card-size="large" data-view="cards"><thead><tr><th></th><th></th><th data-hidden data-type="content-ref"></th><th data-hidden></th><th data-hidden data-card-target data-type="content-ref"></th></tr></thead><tbody><tr><td><mark style="color:purple;"><strong>Get Bundles &#x26; Upsell</strong></mark></td><td>Try free</td><td><a href="https://apps.shopify.com/product-kits-bundles-pickystory?surface_intra_position=1&#x26;surface_type=partners&#x26;surface_version=redesign">https://apps.shopify.com/product-kits-bundles-pickystory?surface_intra_position=1&#x26;surface_type=partners&#x26;surface_version=redesign</a></td><td><p>1. Track Amplify performance</p><p>2. Amplify sales analytics</p><p>3. Analyze store revenue with Amplify</p><p>4. Amplify revenue tracking</p><p>5. Shopify Amplify analytics</p><p>6. Amplify API sales data</p><p>7. Monitor Amplify orders</p><p>8. Amplify scenario analysis</p><p>9. Amplify impact on sales</p><p>10. Evaluate Amplify contributions</p></td><td><a href="https://apps.shopify.com/product-kits-bundles-pickystory?surface_intra_position=1&#x26;surface_type=partners&#x26;surface_version=redesign">https://apps.shopify.com/product-kits-bundles-pickystory?surface_intra_position=1&#x26;surface_type=partners&#x26;surface_version=redesign</a></td></tr></tbody></table>


# How to Calculate Conversion Rate for Amplify

Understanding your conversion rate is crucial for optimizing revenue generated through the Amplify app. By calculating the conversion rate from “Add to Cart” to “Purchase,” you can better assess the effectiveness of your Amplify deals and make data-driven decisions to enhance your store’s performance.

## Why Calculate the Conversion Rate?

Calculating the conversion rate helps you understand how well your Amplify scenarios are converting interest into actual sales. A higher conversion rate indicates that customers who engage with your Amplify offers are more likely to complete a purchase, which can inform adjustments to improve sales and customer satisfaction.

## How to Calculate the Conversion Rate for Amplify

To calculate the conversion rate for the Amplify app, use the following formula:

#### Conversion Rate Formula:

<figure><img src="/files/lFihzg7VI6fG11yB6V6C" alt=""><figcaption></figcaption></figure>

### Example Calculation

#### Assumptions:

* Total number of Add to Carts (from Amplify): 4,352
* Total number of Purchases (from Amplify): 537

#### Calculation:

<figure><img src="/files/hVQz6I3Qwk2hz3JPopqA" alt=""><figcaption></figcaption></figure>

This means that out of all the customers who added a Amplify product to their cart, approximately 12.34% completed a purchase. By monitoring this metric regularly, you can gain insights into how well your Amplify deals are performing and make necessary adjustments to optimize revenue.

## Tips for Improving Conversion Rate

* Analyze Low-Performing Scenarios: Identify which Amplify deals have lower conversion rates and adjust them by testing different products, discounts, or messaging.
* Optimize User Experience: Ensure that the add-to-cart and checkout processes are smooth and user-friendly to minimize drop-offs.
* Leverage Analytics: Use Amplify's analytics tools to track and analyze your conversion rates, providing a clearer picture of customer behavior and deal performance.

## Conclusion

Calculating and monitoring your conversion rate for Amplify deals is essential for optimizing revenue and enhancing the effectiveness of your sales strategies. Regular analysis allows you to make informed decisions that can lead to higher conversion rates and improved overall performance.

***

<table data-card-size="large" data-view="cards"><thead><tr><th></th><th></th><th data-hidden data-type="content-ref"></th><th data-hidden></th><th data-hidden data-card-target data-type="content-ref"></th></tr></thead><tbody><tr><td><mark style="color:purple;"><strong>Get Bundles &#x26; Upsell</strong></mark></td><td>Try free</td><td><a href="https://apps.shopify.com/product-kits-bundles-pickystory?surface_intra_position=1&#x26;surface_type=partners&#x26;surface_version=redesign">https://apps.shopify.com/product-kits-bundles-pickystory?surface_intra_position=1&#x26;surface_type=partners&#x26;surface_version=redesign</a></td><td><p>1. Calculate Amplify conversion rate</p><p>2. Conversion rate formula Shopify</p><p>3. Track Amplify sales performance</p><p>4. Optimize Amplify revenue</p><p>5. Add to cart to purchase rate</p><p>6. Amplify deal conversion</p><p>7. Improve Shopify conversion rate</p><p>8. Analyze Amplify performance</p><p>9. Amplify purchase rate</p><p>10. Monitor sales conversion Shopify</p></td><td><a href="https://apps.shopify.com/product-kits-bundles-pickystory?surface_intra_position=1&#x26;surface_type=partners&#x26;surface_version=redesign">https://apps.shopify.com/product-kits-bundles-pickystory?surface_intra_position=1&#x26;surface_type=partners&#x26;surface_version=redesign</a></td></tr></tbody></table>


# How to Calculate Return on Investment (ROI) for Amplify

Understanding the Return on Investment (ROI) is essential for evaluating the profitability of using the Amplify app in your store. By calculating ROI, you can measure how effectively Amplify contributes to your revenue and decide whether your current plan provides a good return.

## Why Calculate ROI?

Calculating ROI helps you determine the financial benefits of using Amplify  relative to its costs. This metric allows you to assess whether the app’s impact on your sales justifies the subscription expense, providing insights that can guide your budgeting and strategic decisions.

### How to Calculate ROI for Amplify

To calculate the ROI for the Amplify app, use the following formula:

#### ROI Formula:

$$
\text{ROI} = \left( \frac{\text{Revenue Generated from Amplify}}{\text{Amplify App Cost}} \right)
$$

### Example Calculation (Monthly ROI)

#### Assumptions:

* Revenue generated from Amplify: $2,400 per month
* Amplify app cost: $7.99 per month

#### Calculation:

$$
\text{ROI} = \left( \frac{2400}{7.99} \right) \approx 300.52%
$$

This example indicates a very high ROI, showing that the revenue generated from Amplify far exceeds the cost of the app. A high ROI percentage suggests that Amplify is a valuable tool for driving sales and increasing profitability in your store.

## Tips for Maximizing ROI

* Evaluate Plan Options: Ensure you are on the right Amplify plan that aligns with your business needs and sales volume. Upgrading or downgrading based on performance can optimize costs and returns.
* Optimize Scenarios: Regularly analyze which Amplify scenarios are performing best and focus on those that generate the most revenue.
* Monitor Performance: Use Amplify's analytics to track revenue contributions from different deals and adjust your strategies accordingly.

## Conclusion

Calculating ROI for the Amplify app is crucial for understanding its financial impact on your store. By regularly evaluating your ROI, you can ensure that you are maximizing the benefits of Amplify and making informed decisions to enhance your store’s profitability.

***

<table data-card-size="large" data-view="cards"><thead><tr><th></th><th></th><th data-hidden data-type="content-ref"></th><th data-hidden></th><th data-hidden data-card-target data-type="content-ref"></th></tr></thead><tbody><tr><td><mark style="color:purple;"><strong>Get Bundles &#x26; Upsell</strong></mark></td><td>Try free</td><td><a href="https://apps.shopify.com/product-kits-bundles-pickystory?surface_intra_position=1&#x26;surface_type=partners&#x26;surface_version=redesign">https://apps.shopify.com/product-kits-bundles-pickystory?surface_intra_position=1&#x26;surface_type=partners&#x26;surface_version=redesign</a></td><td><p>1. Calculate Amplify ROI</p><p>2. Amplify return on investment</p><p>3. ROI formula Shopify app</p><p>4. Track Amplify profitability</p><p>5. Optimize ROI for Shopify apps</p><p>6. Amplify revenue calculation</p><p>7. Evaluate Shopify app ROI</p><p>8. Measure Amplify performance</p><p>9. Shopify app investment return</p><p>10. Analyze Amplify cost-effectiveness</p></td><td><a href="https://apps.shopify.com/product-kits-bundles-pickystory?surface_intra_position=1&#x26;surface_type=partners&#x26;surface_version=redesign">https://apps.shopify.com/product-kits-bundles-pickystory?surface_intra_position=1&#x26;surface_type=partners&#x26;surface_version=redesign</a></td></tr></tbody></table>


# How to Calculate the Average Number of Add-to-Carts Needed for a Sale in Amplify

Understanding how many times customers add products to their cart before making a purchase can provide valuable insights into customer behavior and help optimize your store’s performance. By calculating the average number of Add to Carts needed for a sale, you can better assess the effectiveness of your Amplify scenarios and make informed decisions to enhance conversion rates.

## Why Calculate the Average Number of Add-to-Carts Needed for a Sale?

Calculating this metric helps you understand customer purchasing behavior and how effectively your Amplify deals convert interest into sales. A lower average suggests that customers are quickly moving from adding items to their cart to completing a purchase, which indicates a smooth shopping experience and effective product bundling or upselling strategies.

## How to Calculate the Average Number of Add-to-Carts Needed for a Sale

To calculate the average number of Add to Carts needed for a sale in the Amplify app, use the following formula:

Formula:

$$
\text{Average Number of Add to Carts per Sale} = \frac{\text{Total Number of Add to Carts (Amplify only)}}{\text{Total Number of Purchases (Amplify only)}}
$$

### Example Calculation

#### Assumptions:

* Total number of Add to Carts (from Amplify): 4,352
* Total number of Purchases (from Amplify): 537

#### Calculation:

$$
\text{Average Number of Add to Carts per Sale} = \frac{4352}{537} \approx 8.1
$$

This calculation indicates that, on average, it takes about 8.1 Add to Carts from Amplify to generate one purchase. Monitoring this metric helps you gauge the effectiveness of your Amplify strategies and identify areas for improvement.

## Tips for Optimizing Add-to-Cart Conversions

* Analyze Scenario Performance: Identify which Amplify scenarios lead to higher Add to Cart rates but lower conversions, and make adjustments to improve performance.
* Streamline the Checkout Process: Ensure that the checkout process is easy and quick, minimizing drop-offs after customers add products to their cart.
* Enhance Product Descriptions and Images: Provide clear, compelling product descriptions and high-quality images to encourage customers to complete their purchases after adding items to their cart.

## Conclusion

Calculating the average number of Add to Carts needed for a sale in the Amplify app is essential for optimizing your store’s performance. By understanding this metric, you can make data-driven decisions to enhance your sales strategy, improve customer experience, and increase conversion rates.

***

<table data-card-size="large" data-view="cards"><thead><tr><th></th><th></th><th data-hidden data-type="content-ref"></th><th data-hidden></th><th data-hidden data-card-target data-type="content-ref"></th></tr></thead><tbody><tr><td><mark style="color:purple;"><strong>Get Bundles &#x26; Upsell</strong></mark></td><td>Try free</td><td><a href="https://apps.shopify.com/product-kits-bundles-pickystory?surface_intra_position=1&#x26;surface_type=partners&#x26;surface_version=redesign">https://apps.shopify.com/product-kits-bundles-pickystory?surface_intra_position=1&#x26;surface_type=partners&#x26;surface_version=redesign</a></td><td><p>1. Calculate add to cart average</p><p>2. Amplify add to cart analysis</p><p>3. Average carts per sale Shopify</p><p>4. Track add to cart conversions</p><p>5. Optimize Amplify sales rate</p><p>6. Shopify cart to purchase ratio</p><p>7. Analyze Amplify add to carts</p><p>8. Improve Shopify cart conversions</p><p>9. Amplify conversion optimization</p><p>10. Measure add to cart effectiveness</p></td><td><a href="https://apps.shopify.com/product-kits-bundles-pickystory?surface_intra_position=1&#x26;surface_type=partners&#x26;surface_version=redesign">https://apps.shopify.com/product-kits-bundles-pickystory?surface_intra_position=1&#x26;surface_type=partners&#x26;surface_version=redesign</a></td></tr></tbody></table>


# Settings


# Global Settings Guide

Amplify offers a comprehensive suite of settings to help you customize and optimize your Shopify store’s performance. This guide will walk you through the various settings available in the Global Settings section of the Amplify app, allowing you to tailor the appearance and functionality of your store according to your needs.

## Brand Assets

The Brand Assets section allows you to define your store’s visual style by setting colors and fonts. This customization ensures that all Amplify widgets match your brand’s aesthetics, creating a seamless shopping experience for your customers.

* Main Background & Font: Set the primary background color and font color for your widgets.
* Highlight Font & Background: Choose colors for highlighted text and backgrounds to draw attention to specific elements.
* Amplify Branding: Option to remove Amplify branding from all widgets to maintain a consistent look with your brand.

<figure><img src="/files/XpBgkKu1jeiHVGUVLDUW" alt=""><figcaption></figcaption></figure>

## Product Look

The Product Look section is where you can customize the appearance of product-related elements on your store.

* Font Size and Weight: Adjust the font size and weight for product names to ensure they are legible and align with your store’s design preferences.

<figure><img src="/files/LaKRrkuYRKHUkm93Hydi" alt=""><figcaption></figcaption></figure>

## Interface Elements

This section allows you to make detailed adjustments to the UI components of your store.

* Header & Subheader Style: Customize the font size and weight for headers and subheaders to ensure consistency with your brand’s style.
* CTA Button: Adjust the font size and weight for call-to-action buttons, making them more prominent and engaging.

<figure><img src="/files/332QOWSJLwym0SE1GKuf" alt=""><figcaption></figcaption></figure>

## Custom CSS

The Custom CSS section is for users who want to add custom styles to their store beyond the standard options. Here, you can input custom CSS code to further customize the look and feel of Amplify widgets and components. For more information on Custom CSS, see "[Customizing your store with Custom CSS](/bundles-and-upsell/other/settings/customizing-your-store-with-custom-css)".

* &#x20;Custom Styling: Add CSS rules to modify the appearance of various elements like buttons, fonts, and backgrounds to match your unique brand style

<figure><img src="/files/xLHFDzl91tNubtLIDij4" alt=""><figcaption></figcaption></figure>

## Localization

The Localization settings allow you to customize translations and currency settings, ensuring your store is accessible and understandable to a global audience.

* Translation: Customize the text for common terms and actions (e.g., “Add to Cart,” “Out of Stock,” “Bundle & Save button text”) to match your store’s tone and language preferences.<br>

<figure><img src="/files/dqoGOD84ZimkZVdsbElI" alt=""><figcaption></figcaption></figure>

## Cart and Checkout

The **Cart and Checkout** section lets you define the behavior and appearance of the cart and checkout processes.

* **Display Bundle Note on Child Products:** Enable this option to show a note for each child item in the checkout process, making it clear which bundle they belong to. This note also appears in order pages and invoices on Shopify.
* **Bundle Note Prefix:** Customize the prefix displayed before the bundle name to indicate it is part of a bundle (e.g., “Part of”).
* **Bundle Note Description:** Define how the bundle name and group ID will be displayed in checkout. You can use variables like `${bundle_name}` and `${purchased_bundle_id}` to dynamically include relevant details.
* **Cart Redirection:** Choose whether customers are redirected to the cart page or directly to checkout when they add a bundle to the cart. You can also disable redirection if you prefer a different flow (Like opening the cart drawer).
* **Discount Label:** Configure the discount code that will be applied to all products included in **Amplify scenarios**, making it clear to customers what deals they are receiving.

<figure><img src="/files/JjQzpqZyNKC3rMW9tueI" alt=""><figcaption></figcaption></figure>

## Sync Products

This button allows you to manually sync products between your Shopify store and the Amplify app, ensuring that all changes made in your Shopify store are reflected in Amplify.

* Last Synced Information: This shows the last time the products were synced, helping you keep track of your updates.

<figure><img src="/files/W86OsRHWY3HyPG7xI6ri" alt=""><figcaption></figcaption></figure>

## Conclusion

By utilizing the Global Settings in the Amplify app, you can create a cohesive and branded shopping experience that aligns with your store’s design and business goals. These settings offer flexibility and control, allowing you to fine-tune the appearance and functionality of your store to best meet your customers’ needs.

***

<table data-card-size="large" data-view="cards"><thead><tr><th></th><th></th><th data-hidden data-type="content-ref"></th><th data-hidden></th><th data-hidden data-card-target data-type="content-ref"></th></tr></thead><tbody><tr><td><mark style="color:purple;"><strong>Get Bundles &#x26; Upsell</strong></mark></td><td>Try free</td><td><a href="https://apps.shopify.com/product-kits-bundles-pickystory?surface_intra_position=1&#x26;surface_type=partners&#x26;surface_version=redesign">https://apps.shopify.com/product-kits-bundles-pickystory?surface_intra_position=1&#x26;surface_type=partners&#x26;surface_version=redesign</a></td><td><p>1. Amplify global settings</p><p>2. Customize Shopify store appearance</p><p>3. Shopify Amplify branding</p><p>4. Adjust product look Amplify</p><p>5. Amplify interface customization</p><p>6. Shopify custom CSS Amplify</p><p>7. Amplify localization settings</p><p>8. Sync products with Amplify</p><p>9. Amplify cart and checkout</p><p>10. Optimize Amplify settings  </p><p>                       11. Powered by </p><p>12. Powered by Amplify</p><p> 13. Powered </p><p>14. Branding</p><p>      <br><br></p></td><td><a href="https://apps.shopify.com/product-kits-bundles-pickystory?surface_intra_position=1&#x26;surface_type=partners&#x26;surface_version=redesign">https://apps.shopify.com/product-kits-bundles-pickystory?surface_intra_position=1&#x26;surface_type=partners&#x26;surface_version=redesign</a></td></tr></tbody></table>


# Customizing Your Store with Custom CSS

This guide will help you customize elements of your Shopify store by adding custom CSS within the **Bundles & Upsell** settings. Follow the steps below to apply your unique style.

## **Steps to Add Custom CSS**

#### Step 1. Go to settings

When in **Bundles & Upsell**, navigate to Settings and then click on Custom CSS.

<figure><img src="/files/F8U3H8CeC8IlXuOBa3ll" alt=""><figcaption></figcaption></figure>

#### Step 2. Add Your Custom CSS

Paste or write your CSS code in the Custom CSS box. (Screenshot with example)

<figure><img src="/files/xSodOdFcoTVfFzYgDoCA" alt=""><figcaption></figcaption></figure>

#### Step 3. Publish Your Changes

Click on Publish on the top right, to Save your changes.

<figure><img src="/files/aJdmSLhbeEJIKL4IDLKD" alt=""><figcaption></figcaption></figure>

***

## **Custom CSS classes**

### Amplify General class names for Widgets

Root component class for all widgets

```css
.picky-widget
```

> Add global `picky-widget` class before each CSS rule, for example:

```css
/* Set red color for cart title */
.picky-widget .picky-cart__title { color: red; }
/* Set 1.5rem font-size for cart line-item */
.picky-widget .picky-cart-item__title { font-size: 1.5rem; }
```

***

#### Global components

Product title: `.picky-title`

Buttons: `.picky-button`

Error message: `.picky-error-message`

Powered by PickyStory: `.picky-powered-by`

Header: `.picky-header` `.picky-header__title` `.picky-header__discount` `.picky-header__description`

***

#### Product card

All product card components: `.picky-product-cart`

Price wrapper: `.picky-product-card__prices-wrapper`

Product image: `.picky-product-card__image`

Product title: `.picky-product-card__title`

Price wrapper: `.picky-product-card__prices-wrapper`

Final(**discounted**) product price: `.picky-product-card__price`

Original(**compare-at**) product price: `.picky-product-card__compare-at-price`

Quantity input: `.picky-quantity`

Quantity value: `.picky-quantity__counter`

Decrease quantity button: `.picky-quantity__decrease-button`

Increase quantity button: `.picky-quantity__increase-button`

ATC button: `.picky-product-card__button`

### Scenario Specific Classes

```css
/* Bundle As Product */
.picky-bnd-pdp {}
.picky-bnd-pdp__content {}
.picky-product-card {}
.picky-product-card__title {}
.picky-option__wrapper {}
.picky-bnd-pdp__footer {}
.picky-bnd-pdp__button {}

/* Build Your Own Bundle */
.picky-byob-bundle {}
.picky-byob-inline {}
.picky-byob-pdp {}
.picky-bundle__content {}
.picky-byob-bundle__item {}
.picky-byob-item {}
.picky-byob-item__selected-variant {}
.picky-byob-item__title {}
.picky-byob-item__price {}
.picky-byob-item__remove-button {}
.picky-summary {}
.picky-summary__header {}
.picky-summary__title {}
.picky-summary__content {}
.picky-summary__footer {}
.picky-byob-inline__button {}

/* Quantity Breaks */
.picky-qb-bundle {}
.picky-qb-bundle__content {}
.picky-qb-bundle__title {}
.picky-qb-bundle__footer {}
.picky-qb-bundle__qb-offer-item {}
.picky-qb-offer-item__title {}
.picky-qb-offer-item__prices-wrapper {}
.picky-qb-offer-item__price {}
.picky-qb-offer-item__compare-at-price {}

/* Frequently Bought Together */
.picky-fbt-inline {}
.picky-fbt-inline__content {}
.picky-fbt-inline__item {}
.picky-fbt-inline__footer {}
.picky-fbt-inline__button {}

/* Upsell Popup */
.picky-upsell-bundle {}
.picky-upsell-bundle__content {}
.picky-reacted-product {}
.picky-reacted-product__title {}
.picky-reacted-product__selected-variant {}
.picky-product-card__prices-wrapper {}
.picky-upsell-bundle__item {}
.picky-upsell-bundle__footer {}
.picky-upsell-bundle__button {}
```

***

## Common questions about Custom CSS

<details>

<summary><strong>What type of changes can I make using custom CSS?</strong></summary>

You can modify colors, fonts, sizes, margins, padding, and other styling elements.

</details>

<details>

<summary><strong>Can I revert to the default styling?</strong></summary>

Yes, removing your custom CSS will revert the styling back to its default.

</details>

<details>

<summary><strong>How do I preview the changes made by custom CSS?</strong></summary>

When you open the Custom CSS tab, a preview screen appears on the right side. After inserting CSS styles, you can see their effects in the preview. \
\
To perform a more thorough check, we recommend publishing the changes and reviewing the display on the live storefront.

</details>

<details>

<summary><strong>What happens if I add incorrect CSS?</strong></summary>

Incorrect CSS might break some styles or have no effect at all; however, removing or correcting the code should restore the original appearance.

</details>

<details>

<summary><strong>Is there a limit to how much CSS I can add?</strong></summary>

There’s generally no strict limit, but overly complex or large CSS files may slow down your store’s performance.

</details>

***

## **Conclusion**

By adding custom CSS in the **Bundles & Upsell** app, you can easily enhance the appearance of your bundle offers, ensuring they align with your store’s branding. Whether it's changing button styles or adjusting text formatting, these simple tweaks can make a big difference in customer engagement. For more complex design needs, our support team is ready to assist you in tailoring your bundles to perfection. [Click here for information on How to Contact Support.](/bundles-and-upsell/how-to-contact-support)

***

<table data-card-size="large" data-column-title-hidden data-view="cards" data-full-width="false"><thead><tr><th></th><th></th><th data-hidden></th><th data-hidden></th><th data-hidden data-card-target data-type="content-ref"></th><th data-hidden data-card-cover data-type="files"></th></tr></thead><tbody><tr><td><mark style="color:purple;"><strong>Get Bundles &#x26; Upsell</strong></mark> </td><td>Try free </td><td> </td><td><p>1. Custom CSS</p><p>2. Add custom code</p><p>3. Modify store layout</p><p>4. Custom fonts</p><p>5. Edit product page </p><p>6. Custom styling</p><p>7. Apply CSS</p><p>8. CSS snippets </p><p>9. Advanced customization</p><p>10. Store design   </p></td><td><a href="https://apps.shopify.com/product-kits-bundles-pickystory?surface_intra_position=1&#x26;surface_type=partners&#x26;surface_version=redesign">https://apps.shopify.com/product-kits-bundles-pickystory?surface_intra_position=1&#x26;surface_type=partners&#x26;surface_version=redesign</a></td><td></td></tr></tbody></table>


# How to Share App Function Logs

## **Why Should You Share Logs with Support?**

When encountering issues with **Bundles & Upsell**, sharing logs helps us identify the root cause. Logs contain important data that can speed up troubleshooting.

### Sharing this Information Will Allow Us To:

* Pinpoint the source of errors.
* Assess performance problems.
* Offer faster and more accurate resolutions.

## Steps to Share Logs

#### **Step 1.** Go to Shopify Admin and open Settings:

<figure><img src="/files/WP68OmE365P4rjYVj3X2" alt=""><figcaption></figcaption></figure>

#### **Step 2**. Go to "**Apps and sales channels"** and click on "**Bundles & Upsell"**.

<figure><img src="/files/RBuTATFxv5wC0uv6PooK" alt=""><figcaption></figcaption></figure>

#### **Step 3**. Scroll down to "Share function logs" and click on "**Share Logs**".

<figure><img src="/files/TCfHgQgHew4HrBh42v5N" alt=""><figcaption></figcaption></figure>

#### **Step 4**. Click on "**Share Logs**" to share the application's activity from the last 24 hours.

<figure><img src="/files/3yEoQuVs0jfRmyyTQh9d" alt=""><figcaption></figcaption></figure>

## Common Questions about Sharing App Function Logs

<details>

<summary><strong>Why should I share logs with support?</strong></summary>

Logs help diagnose issues, track performance, and resolve problems faster.

</details>

<details>

<summary><strong>Are my logs secure?</strong></summary>

Yes, logs are used strictly for troubleshooting and will not be shared outside our support team.

</details>

<details>

<summary><strong>Do I need to share logs every time there's an issue?</strong></summary>

Sharing logs is highly recommended for faster resolution, especially for complex issues.

</details>

## Conclusion

Sharing logs with our support team is a crucial step in resolving app-related issues quickly and effectively. By following the steps outlined in this article, you help us gather valuable information that accelerates troubleshooting and ensures a smooth resolution process. If you ever encounter difficulties accessing or sending logs, our team is here to assist you.

<table data-card-size="large" data-view="cards"><thead><tr><th></th><th></th><th data-hidden data-type="content-ref"></th><th data-hidden></th><th data-hidden data-card-target data-type="content-ref"></th></tr></thead><tbody><tr><td><mark style="color:purple;"><strong>Get Bundles &#x26; Upsell</strong></mark></td><td>Try free</td><td><a href="https://apps.shopify.com/product-kits-bundles-pickystory?surface_intra_position=1&#x26;surface_type=partners&#x26;surface_version=redesign">https://apps.shopify.com/product-kits-bundles-pickystory?surface_intra_position=1&#x26;surface_type=partners&#x26;surface_version=redesign</a></td><td><p>1. Error report</p><p>2. App logs</p><p>3. Download logs</p><p>4. Shopify error logs</p><p>5. Support logs</p><p>6. Error details</p><p>7. System logs</p><p>8. Performance logs</p><p>9. Logs for support</p><p>10. Send logs  </p><p>                      </p><p>      <br><br></p></td><td><a href="https://apps.shopify.com/product-kits-bundles-pickystory?surface_intra_position=1&#x26;surface_type=partners&#x26;surface_version=redesign">https://apps.shopify.com/product-kits-bundles-pickystory?surface_intra_position=1&#x26;surface_type=partners&#x26;surface_version=redesign</a></td></tr></tbody></table>


# How to uninstall Bundles & Upsell

Uninstalling **Bundles & Upsell** from Shopify is simple and can be done from your Shopify admin dashboard. The process involves navigating to **Settings**, selecting the app, and uninstalling it.

## Steps to Uninstall Bundles & Upsell from Shopify

#### **1. Log in to Shopify Admin**:

Start by logging into your Shopify store through Shopify Admin.

#### **2. Go to Settings**:

On the bottom left of your Shopify admin dashboard, click on **Settings** to access the settings menu.

<figure><img src="/files/fRc1UyVLxbrcbdXDh6T9" alt=""><figcaption></figcaption></figure>

#### **3.** Select Apps and Sales Channels:

In the settings menu, select **Apps and sales channels**. This will list all the apps installed on your store.

<figure><img src="/files/5mDztgfORTrR4TrhslDX" alt=""><figcaption></figcaption></figure>

#### 4. **Find Bundles & Upsell App**:

Scroll through the list or use the search bar to locate the **Bundles & Upsell** app.

<figure><img src="/files/Ch1Lhutj5PL4MQCYRboI" alt=""><figcaption></figcaption></figure>

#### 5. **Uninstall the App**:

To the right of the app, click the three dots (**⋮**), then choose **Uninstall** from the drop-down menu. Confirm the uninstallation when prompted.

<figure><img src="/files/Klb8QiRYDFwU7YfMAWh9" alt=""><figcaption></figcaption></figure>

***

## Common Questions About uninstalling Bundles & Upsell

<details>

<summary><strong>Will uninstalling Bundles &#x26; Upsell delete my app data?</strong></summary>

Yes, once uninstalled, any data stored within the app may be lost, so back up important information if necessary.

</details>

<details>

<summary><strong>Can I reinstall the Bundles &#x26; Upsell app later?</strong></summary>

Yes, the app can be reinstalled anytime via the Shopify App Store.

</details>

<details>

<summary><strong>What should I do if there is leftover app code?</strong></summary>

Some apps may leave behind code in your theme. After uninstalling, you can go to **Online Store** > **Themes** > **Edit Code** to remove any references to Bundles & Upsell.

</details>

<details>

<summary><strong>Can I get help from Shopify support with uninstalling?</strong></summary>

Shopify support can guide you through the uninstallation process, but the app developer may provide more specific assistance regarding any residual code or issues.

</details>

<details>

<summary><strong>Will uninstalling the app affect my current product bundles?</strong></summary>

Yes, if your product bundles were created through the Bundles & Upsell app, uninstalling the app may remove these features from your store. Review your product listings before uninstalling.

</details>

## Conclusion

By following these simple steps, you can successfully uninstall the **Bundles & Upsell** app from your Shopify store. Make sure to test your store afterward to ensure everything continues to function smoothly.

***

<table data-card-size="large" data-column-title-hidden data-view="cards" data-full-width="false"><thead><tr><th></th><th></th><th data-hidden></th><th data-hidden></th><th data-hidden data-card-target data-type="content-ref"></th><th data-hidden data-card-cover data-type="files"></th></tr></thead><tbody><tr><td><mark style="color:purple;"><strong>Get Bundles &#x26; Upsell</strong></mark> </td><td>Try free </td><td> </td><td><p>1. Uninstall app</p><p>2. How to delete the app</p><p>3. App removal guide</p><p>4. Uninstall bundle app</p><p>5. Delete app </p><p>6. Uninstall instructions</p><p>7. Unsubscribe</p><p>8. Cancel Subscription </p><p>9. Deactivate app</p><p>10. Remove app   </p></td><td><a href="https://apps.shopify.com/product-kits-bundles-pickystory?surface_intra_position=1&#x26;surface_type=partners&#x26;surface_version=redesign">https://apps.shopify.com/product-kits-bundles-pickystory?surface_intra_position=1&#x26;surface_type=partners&#x26;surface_version=redesign</a></td><td></td></tr></tbody></table>


# How to use Color Swatches with Amplify Bundles

## What is "Color Swatches with Amplify Bundles"

Color swatches allow customers to visually select product variations based on color, making the shopping experience more intuitive and engaging. When used with the **Amplify Bundles**, color swatches help customers seamlessly choose their preferred product combinations.

This feature is managed through **Shopify's Category Metafields**, which store product attributes such as color options. If configured in Shopify for regular products, color swatches will automatically appear on your product pages and in the Amplify bundle widgets.

## Steps to Configure Color Swatches in Shopify

Follow these steps to set up color swatches for your bundle and upsell scenarios:

#### 1. **Assign A Category to Each Product**

To ensure your products support color swatches, you must assign them to a Category that supports native Shopify color swatches.&#x20;

* Go to **Shopify Admin** > **Products**.
* Select the product you want to configure with color swatches.
* Scroll down to the **Category** section and assign an appropriate category that supports "Color" **category metafield** (e.g., "Apparel" or "Accessories").

<figure><img src="/files/Okx3g8qI6OkiVUls0l4q" alt=""><figcaption></figcaption></figure>

***

#### 2. **Add Color Options to Metafields**

Once a category is assigned, you can define available colors.

* In the **Category** **Metafields** section of the product, look for a field related to color.
* Add the available colors as predefined options (e.g., **Red, Blue, Green**).

<figure><img src="/files/WVYibcDYOqzaeWMpq4Km" alt=""><figcaption></figcaption></figure>

***

#### 3. **Link Variants to the Color Metafield**

To ensure customers can select colors seamlessly:

* Go to **Variants**.
* Check that each variant has a corresponding color option configured.
* If a product has multiple colors, they should be automatically pulled by the metafields.

<figure><img src="/files/rnY85F21i9u7fGN1kTvV" alt=""><figcaption></figcaption></figure>

***

#### 4. **Save and Test the Bundle on the Storefront**

After making these changes:

* Click **Save** to apply the changes.
* Preview the product page to check if color swatches appear.
* If everything is set up correctly, customers will see color swatches when selecting a product.

<figure><img src="/files/glEobboh3PH4LgKrVdlc" alt=""><figcaption></figcaption></figure>

***

## Commonly asked questions about how to use Color Swatches

<details>

<summary>Can I use color swatches with all Amplify scenarios?</summary>

Color swatches are currently supported in the following Amplify scenarios: Bundle As Product, Build Your Own Bundle Page, and Upsell Popup.

</details>

<details>

<summary>What should I do if I set up everything on Shopify, but the Color Swatches don’t appear in my Amplify bundles?</summary>

If color swatches don’t show up, go to the **Amplify app**, navigate to **Settings**, and click **Sync Products**. This will update the metafields and refresh the color swatches on your Amplify bundle widgets.&#x20;

</details>

<details>

<summary>Do I need to manually add color swatches for every bundle?</summary>

No, if your products are assigned to a category with color metafields, after you configure them in Shopify, the swatches should be applied automatically based on the available variants in your bundles.

</details>

<details>

<summary>What happens if I add a new color to a product after setting up the bundle?</summary>

If you add new colors to a product, and they don't appear in the bundle automatically; go to the **Amplify app > Settings > Sync Products** to refresh the product data.

</details>

<details>

<summary>Are color swatches supported for all categories?</summary>

Shopify's native color swatches are supported by only the categories that has "Color" category metafield. If your currently selected product category doesn't have this metafield, you can select a different category that has it and configure your product options with swatches.&#x20;

</details>

***

### Conclusion

Using **color swatches with Amplify bundles** improves the shopping experience by allowing customers to easily select product variations. By setting up **Shopify metafields**, assigning product categories, and linking variants, color options will automatically be displayed in your bundle widgets.

With color swatches enabled, your bundles become more interactive and visually appealing, making it easier for customers to choose the perfect product combinations! 🚀

***

<table data-card-size="large" data-column-title-hidden data-view="cards" data-full-width="false"><thead><tr><th></th><th></th><th data-hidden></th><th data-hidden></th><th data-hidden data-card-target data-type="content-ref"></th><th data-hidden data-card-cover data-type="files"></th></tr></thead><tbody><tr><td><mark style="color:purple;"><strong>Get Bundles &#x26; Upsell</strong></mark> </td><td>Try free </td><td> </td><td><p>1. Color Swatches Shopify</p><p>2. Product Variants Shopify</p><p>3. Shopify Metafields</p><p>4. Bundle as Product Color Options</p><p>5. Shopify Variant Swatches</p><p>6. Customize Bundle Page</p><p>7. Enable Color Selection Shopify</p><p>8. Product Customization Shopify</p></td><td><a href="https://apps.shopify.com/product-kits-bundles-pickystory?surface_intra_position=1&#x26;surface_type=partners&#x26;surface_version=redesign">https://apps.shopify.com/product-kits-bundles-pickystory?surface_intra_position=1&#x26;surface_type=partners&#x26;surface_version=redesign</a></td><td></td></tr></tbody></table>


# Integrations


# How Does the Amplify and ShipAid Integration Work?

Learn how to enable ShipAid in Cart & Checkout and enhance your store’s shipping options with Amplify's seamless integration.

## What is the Amplify and ShipAid Integration?

The Amplify and ShipAid integration allows Shopify merchants to offer additional shipping protection options directly within the Cart. By integrating ShipAid, you can provide customers with added peace of mind for their orders, ensuring that they have the option to add shipping insurance during the checkout process.

## Steps to Enable ShipAid in Cart

Follow these steps to enable the ShipAid integration in Cart & Checkout:

#### Step 1. Navigate to Cart

* Log in to your Amplify app. From the left-hand menu, select “Cart & Checkout” and then choose “Cart”.

#### Step 2. Enable ShipAid Integration

• Scroll to the bottom of the Cart settings page until you find the ShipAid integration option. Toggle the integration to enable it. This will activate the ShipAid feature within the Cart.

#### Step 3. Confirm the Integration

• After enabling the integration, ShipAid will be available as an option in Cart & Checkout. You can verify the integration by navigating back to the Cart & Checkout settings and checking if the toggle remains active.

#### Step 4. Add ShipAid to Orders

• Once ShipAid is enabled, customers will see an option to add shipping insurance directly within the Cart during checkout. They can click “Add” to include ShipAid protection on any order, providing additional security and reassurance.

<br>

## Common Questions About Amplify and ShipAid Integration

<details>

<summary>How do I enable ShipAid in the Cart?</summary>

To enable ShipAid in the Cart, go to the Cart & Checkout settings in the Amplify app, select Cart, and toggle the ShipAid integration at the bottom of the page. This will activate ShipAid for your store

</details>

<details>

<summary>Can I offer shipping protection through Cart &#x26; Checkout?</summary>

Yes, with the Amplify and ShipAid integration, you can offer shipping protection directly through the Cart. Customers can choose to add shipping insurance during checkout, providing extra security for their orders.

</details>

<details>

<summary>Is there a way to confirm if ShipAid is enabled in my store?</summary>

You can confirm if ShipAid is enabled by returning to the Cart & Checkout settings in the Amplify app and ensuring that the ShipAid toggle is active. Additionally, you should see the ShipAid option available in the Cart during checkout.

</details>

<details>

<summary>How can customers add ShipAid to their orders?</summary>

Once ShipAid is enabled, customers can add shipping insurance to their orders by selecting the “Add” option in the Cart during checkout. This feature allows them to easily include shipping protection for added peace of mind.

</details>

<details>

<summary>Does enabling ShipAid affect my checkout process?</summary>

Enabling ShipAid integrates additional shipping protection options into your checkout process without complicating it. It provides a seamless way for customers to add insurance to their orders directly from the Cart.

</details>

## Conclusion

The integration of ShipAid with Cart & Checkout allows you to offer shipping protection options directly at checkout, enhancing the customer experience by providing added security for their purchases. Follow these simple steps to enable ShipAid and start offering this valuable service to your customers today.

***

<table data-card-size="large" data-view="cards"><thead><tr><th></th><th></th><th data-hidden data-type="content-ref"></th><th data-hidden></th><th data-hidden data-card-target data-type="content-ref"></th></tr></thead><tbody><tr><td><mark style="color:purple;"><strong>Get Bundles &#x26; Upsell</strong></mark></td><td>Try free</td><td><a href="https://apps.shopify.com/product-kits-bundles-pickystory?surface_intra_position=1&#x26;surface_type=partners&#x26;surface_version=redesign">https://apps.shopify.com/product-kits-bundles-pickystory?surface_intra_position=1&#x26;surface_type=partners&#x26;surface_version=redesign</a></td><td><p>1. Enable ShipAid in PickyCart</p><p>2. Amplify ShipAid integration</p><p>3. Add shipping protection Shopify</p><p>4. PickyCart shipping insurance</p><p>5. Shopify ShipAid setup</p><p>6. Shipping protection PickyCart</p><p>7. Activate ShipAid Shopify</p><p>8. Integrate ShipAid with PickyCart</p><p>9. Shopify cart shipping options</p><p>10. ShipAid insurance Shopify</p></td><td><a href="https://apps.shopify.com/product-kits-bundles-pickystory?surface_intra_position=1&#x26;surface_type=partners&#x26;surface_version=redesign">https://apps.shopify.com/product-kits-bundles-pickystory?surface_intra_position=1&#x26;surface_type=partners&#x26;surface_version=redesign</a></td></tr></tbody></table>


# Billing


# Understanding Bundles & Upsell Pricing Plans

## Monthly Billing Based on Extra Revenue:

After installing Bundles & Upsell, you begin with a 30-day free trial. During this period, you can fully explore all the features Amplify offers and start generating revenue at no cost.

[If you continue using our app](#user-content-fn-1)[^1] after the free trial ends, you will be charged monthly based on the extra revenue generated through Bundles & Upsell in the previous billing cycle. This extra revenue includes all sales made through Bundles & Upsell widgets, scenarios, or product recommendations that were finalized at checkout.

For example, if your store generates $4,900 in extra revenue with Bundles & Upsell during the first month, your charge will be $199.50. This fee is calculated based on the extra revenue made with Bundles & Upsell during the initial 30-day period and it is updated each month according to the extra revenue made in the current billing period.

For more information, please refer to our [pricing page](https://heyamplify.com/pricing/).

## How Is Extra Revenue Calculated?

“Extra revenue generated through Bundles & Upsell” is determined by the sales completed via Bundles & Upsell features such as widgets, scenarios, or product recommendations. Please note that refunded or canceled orders are not deducted from this revenue calculation. The focus is on finalized transactions that directly enhance your store’s earnings.

### Trial Period and Uninstallation Policy

If you’re unsure about how Bundles & Upsell fits your business needs, you can take advantage of the 30-day free trial. If you decide the app isn’t right for you, please make sure to uninstall it from your Shopify Admin before the free trial ends to avoid any charges.

## Need Help or Have Questions?

If you have any questions or need assistance with setup, our support team is available to help from **Monday - Friday, 2 AM - 6 PM EST**. Feel free to reach out for any support you may need.

***

<table data-card-size="large" data-view="cards"><thead><tr><th></th><th></th><th data-hidden></th><th data-hidden data-type="content-ref"></th><th data-hidden data-card-target data-type="content-ref"></th></tr></thead><tbody><tr><td><mark style="color:purple;"><strong>Get Bundles &#x26; Upsell</strong></mark></td><td>Try free</td><td><p>1. Amplify pricing plans</p><p>2. Shopify Amplify cost</p><p>3. Amplify free trial</p><p>4. Revenue-based pricing Shopify</p><p>5. Amplify subscription rates</p><p>6. Amplify billing structure</p><p>7. Amplify monthly fees</p><p>8. Shopify app pricing tiers</p><p>9. Amplify plan comparison</p><p>10. Optimize Shopify revenue with Amplify</p></td><td><a href="https://apps.shopify.com/product-kits-bundles-pickystory?surface_intra_position=1&#x26;surface_type=partners&#x26;surface_version=redesign">https://apps.shopify.com/product-kits-bundles-pickystory?surface_intra_position=1&#x26;surface_type=partners&#x26;surface_version=redesign</a></td><td><a href="https://apps.shopify.com/product-kits-bundles-pickystory?surface_intra_position=1&#x26;surface_type=partners&#x26;surface_version=redesign">https://apps.shopify.com/product-kits-bundles-pickystory?surface_intra_position=1&#x26;surface_type=partners&#x26;surface_version=redesign</a></td></tr></tbody></table>

[^1]: If the app remains installed in your store


# Cart & Checkout

Create a superior shopping experience with an intelligent cart featuring AI and custom cart upsells, post-purchase offers, rewards, and gifts. The cart is fully integrated with all Shopify themes and can be added to your store with a single click.

<table data-view="cards"><thead><tr><th></th><th data-hidden data-type="files"></th><th data-hidden data-type="content-ref"></th><th data-hidden data-card-cover data-type="image">Cover image</th><th data-hidden data-card-target data-type="content-ref"></th></tr></thead><tbody><tr><td>Cart </td><td></td><td><a href="/pages/qr04AGpZ7APz8iONfuY1">/pages/qr04AGpZ7APz8iONfuY1</a></td><td><a href="/files/yL2KzVkdAEW0XmEzAIHO">/files/yL2KzVkdAEW0XmEzAIHO</a></td><td><a href="/pages/qr04AGpZ7APz8iONfuY1">/pages/qr04AGpZ7APz8iONfuY1</a></td></tr><tr><td>Spend  X Get Y    </td><td></td><td><a href="/pages/IEc9KlK0w8wFdORawZPM">/pages/IEc9KlK0w8wFdORawZPM</a></td><td><a href="/files/lAF0B91Jc4QBBsIWwQOs">/files/lAF0B91Jc4QBBsIWwQOs</a></td><td><a href="/pages/IEc9KlK0w8wFdORawZPM">/pages/IEc9KlK0w8wFdORawZPM</a></td></tr><tr><td>Post-purchase</td><td></td><td><a href="/pages/1vCV4bKBskrTdvTQAoyN">/pages/1vCV4bKBskrTdvTQAoyN</a></td><td><a href="/files/Bj7oAXngq7aReRwbjdCA">/files/Bj7oAXngq7aReRwbjdCA</a></td><td><a href="/pages/1vCV4bKBskrTdvTQAoyN">/pages/1vCV4bKBskrTdvTQAoyN</a></td></tr><tr><td>Checkout Upsell</td><td></td><td></td><td><a href="/files/drHxFHRCiyYUel7WnW00">/files/drHxFHRCiyYUel7WnW00</a></td><td><a href="/pages/FXXGDAPrjPbjTqarrvZY">/pages/FXXGDAPrjPbjTqarrvZY</a></td></tr></tbody></table>

***

<table data-view="cards"><thead><tr><th></th><th data-hidden data-type="content-ref"></th><th data-hidden data-type="files"></th><th data-hidden data-card-cover data-type="files"></th><th data-hidden data-card-target data-type="content-ref"></th></tr></thead><tbody><tr><td>Analytics</td><td><a href="/pages/UpFI0XBptVIvzeqpDHlc">/pages/UpFI0XBptVIvzeqpDHlc</a></td><td></td><td><a href="/files/RS89Ia2l7j3mJ4imwAkt">/files/RS89Ia2l7j3mJ4imwAkt</a></td><td><a href="/pages/UpFI0XBptVIvzeqpDHlc">/pages/UpFI0XBptVIvzeqpDHlc</a></td></tr><tr><td>Settings</td><td><a href="/pages/ooPfT56zOcS4omSdfrY2">/pages/ooPfT56zOcS4omSdfrY2</a></td><td></td><td><a href="/files/sptK64uAyDIzKM6BtGjm">/files/sptK64uAyDIzKM6BtGjm</a></td><td><a href="/pages/ooPfT56zOcS4omSdfrY2">/pages/ooPfT56zOcS4omSdfrY2</a></td></tr><tr><td>Integrations</td><td><a href="/pages/0UTDbB9XqFbro8Q03Zy3">/pages/0UTDbB9XqFbro8Q03Zy3</a></td><td></td><td><a href="/files/q6B99l7aoAmG66OFevrI">/files/q6B99l7aoAmG66OFevrI</a></td><td><a href="/pages/0UTDbB9XqFbro8Q03Zy3">/pages/0UTDbB9XqFbro8Q03Zy3</a></td></tr><tr><td>Billing</td><td><a href="/pages/gw5t7wjzuOkNLAcx2QN7">/pages/gw5t7wjzuOkNLAcx2QN7</a></td><td></td><td><a href="/files/5l2eFP2WatlzpPS5Dod6">/files/5l2eFP2WatlzpPS5Dod6</a></td><td><a href="/pages/gw5t7wjzuOkNLAcx2QN7">/pages/gw5t7wjzuOkNLAcx2QN7</a></td></tr></tbody></table>


# How to Contact Support

Whether you have questions, need assistance, or are looking for guidance, there are two easy ways to reach us. While both options ensure that your inquiries are addressed promptly, we recommend contacting us from inside the app for a more seamless and efficient experience.

## 1. Contacting Us from Inside the App (Recommended)

If you're logged into your store within the app, contacting us is quick and straightforward. Here’s how:

* Look for the chat icon at the bottom-right corner of your dashboard.
* Click on the chat icon to open a conversation with our support team.
* Send us a message! We’re available from **Monday - Friday, 2 AM - 6 PM EST**, to assist you.

Using the in-app chat allows us to identify your store and its configurations right away, ensuring we can provide tailored support faster.

<figure><img src="/files/9wG2Jj1bjEsfigbJWdcb" alt=""><figcaption></figcaption></figure>

## 2. Contacting Us via Our Website

You can also reach out to us directly from our website, whether you're browsing the homepage, pricing page, or any other section. Here’s how:

* Visit our [website](https://heyamplify.com/).
* Look for the **chat widget** at the bottom-right corner of the screen.
* Open the widget, and a support chat will appear. Enter your message, and our team will respond promptly.

This method is perfect for general inquiries or if you haven’t logged into your store yet.

<figure><img src="/files/Gp9g9SYpOCsnNN77MSmD" alt=""><figcaption></figcaption></figure>

## 3. Contacting Us via Email

If you prefer, you can reach us via email at [**hello@heyamplify.com**](mailto:hello@heyamplify.com). When sending us an email, please include your store's handle or URL. This helps us quickly identify your store and provide you with the most accurate support.

We aim to respond to all emails promptly, so feel free to reach out for any assistance or inquiries.

***

## Conclusion

No matter which method you choose, our team is ready to help! For the fastest and most personalized support, we recommend reaching out to us from inside the app. However, if you're exploring our website, our chat widget is always available to assist with your questions.

***

<table data-card-size="large" data-view="cards"><thead><tr><th></th><th></th><th data-hidden data-card-target data-type="content-ref"></th><th data-hidden></th></tr></thead><tbody><tr><td><mark style="color:purple;"><strong>Get Cart &#x26; Checkout</strong></mark></td><td>Try free</td><td><a href="https://apps.shopify.com/slide-cart-drawer-pickystory">https://apps.shopify.com/slide-cart-drawer-pickystory</a></td><td><p>1. Enable Slideout Cart Shopify</p><p>2. AI product recommendations cart Shopify</p><p>3. Slideout Cart discount display Shopify</p><p>4. Customize Shopify cart page</p><p>5. Shopify cart order customization</p><p>6. Shopify cart redirect settings</p><p>7. Amplify Slideout Cart integration</p><p>8. Shopify cart page customization</p><p>9. Enable discount codes in cart</p><p>10. Optimize Shopify checkout with Slideout Cart</p></td></tr></tbody></table>


# Cart


# Amplify | Power Slide Cart: Learn About Its Features and How It Can Boost Your Store

## What is the Amplify | Power Slide Cart?

The Amplify | Power Slide Cart is a powerful feature that offers AI-based product recommendations based on your store’s sales history and the products that a customer already has in their cart. This dynamic cart enhances the shopping experience and increases the average order value.

## Key Features of the Cart & Checkout Product

### 1. AI-Based Product Recommendations

The Power Slide Cart analyzes customer behavior and your existing sales history to recommend complementary products. This feature helps increase cross-selling and upselling opportunities, boosting your store’s revenue.

<figure><img src="/files/ETiDqBCRQA6rskjjDzpY" alt=""><figcaption></figcaption></figure>

### 2. Order Customization

Shoppers can add notes to their orders and apply discount codes directly within the cart. This functionality enhances the customer experience by allowing them to personalize their purchases.

### 3. Visible Discounts

Unlike the standard Shopify setup where discounts are applied only at checkout, the Cart feature displays discounted values directly in the cart. This visibility reassures customers that they are receiving their expected discounts, reducing cart abandonment rates and increasing conversion rates.

<figure><img src="/files/M1SC8tc7ykb5rWBXPn6m" alt=""><figcaption></figcaption></figure>

## How to Enable the Cart Feature in Cart & Checkout

Enabling the Cart feature within the Cart & Checkout product is simple. Follow these steps to activate it:

#### Step 1. Navigate to Cart & Checkout Settings

Log in to your Shopify admin panel and go to the Amplify app. In the left-hand menu, select “Cart & Checkout” and then choose “Cart.”

<figure><img src="/files/FBP77fTMr7M1zaz1kTqo" alt=""><figcaption></figcaption></figure>

#### Step 2. Enable the Cart Feature

In the Cart section, click on “Publish” to activate the Cart feature in your store. This action will immediately enable the feature, allowing customers to start using it.

<figure><img src="/files/6lWMxTsQ56JO3MsuXHwc" alt=""><figcaption></figcaption></figure>

#### Step 3. Customize Your Settings

After enabling the Cart feature, you can customize various settings, such as redirect options and discount display, to better fit your store’s needs and optimize the customer experience.

<figure><img src="/files/nRrColAsqNH7FMPlC4fo" alt=""><figcaption></figcaption></figure>

<br>

## Common Questions About Cart & Checkout

<details>

<summary>How do I enable the Cart feature in Cart &#x26; Checkout?</summary>

To enable the Cart feature, go to the Cart & Checkout section in the Amplify app, click on Cart, and then toggle the option to Publish. This will activate the Amplify | Power Slide Cart for your store.

</details>

<details>

<summary>Can I customize the discount display in the Cart?</summary>

Yes, you can customize the discount display in the Cart. The Amplify | Power Slide Cart shows the discounted value directly in the cart, allowing customers to see their savings before checkout. This feature can be adjusted in the Design settings of the Cart & Checkout section.

</details>

<details>

<summary>How do AI-based product recommendations work in the Cart?</summary>

The Cart uses AI-based algorithms to analyze your store’s sales data and customer behavior. It recommends complementary products based on the items already in the customer’s cart, helping to increase cross-sell and upsell opportunities.

</details>

<details>

<summary>Can I redirect customers to a specific page after they add a product to the cart?</summary>

Yes, it is possible to redirect customers to the cart page after they add a product. If you would like assistance with enabling this feature, please contact our support team for further guidance.

</details>

## Conclusion

The Cart & Checkout product, with its AI-based product recommendations and customizable cart features, is a powerful tool for Shopify stores. By enabling this product, you can increase average order value, reduce cart abandonment, and optimize the checkout process for your customers.

<table data-card-size="large" data-view="cards"><thead><tr><th></th><th></th><th data-hidden data-card-target data-type="content-ref"></th><th data-hidden data-type="content-ref"></th><th data-hidden></th></tr></thead><tbody><tr><td><mark style="color:purple;"><strong>Get Cart &#x26; Checkout</strong></mark></td><td>Try free</td><td><a href="https://apps.shopify.com/slide-cart-drawer-pickystory">https://apps.shopify.com/slide-cart-drawer-pickystory</a></td><td><a href="https://apps.shopify.com/slide-cart-drawer-pickystory#modal-show=WriteReviewModal">https://apps.shopify.com/slide-cart-drawer-pickystory#modal-show=WriteReviewModal</a></td><td><p>1. Enable Slideout Cart Shopify</p><p>2. AI product recommendations cart Shopify</p><p>3. Slideout Cart discount display Shopify</p><p>4. Customize Shopify cart page</p><p>5. Shopify cart order customization</p><p>6. Shopify cart redirect settings</p><p>7. Amplify Slideout Cart integration</p><p>8. Shopify cart page customization</p><p>9. Enable discount codes in cart</p><p>10. Optimize Shopify checkout with Slideout Cart</p></td></tr></tbody></table>


# How to Customize the Text in the Power Slide Cart

Learn how to modify the text displayed in the Amplify | Power Slid to align with your store’s branding and preferences. This guide will show you how to edit text elements within the Power Slide Cart.

## Steps to Customize Text in the Slideout Cart

#### Step 1. Navigate to Amplify | Power Slide Cart Settings

Log in to the Amplify app, go to the Cart & Checkout section, and select Cart. Then, click on the Design tab to access customization options.

<figure><img src="/files/nRrColAsqNH7FMPlC4fo" alt=""><figcaption></figcaption></figure>

#### Step 2. Edit Text Labels

• On the left side of the screen, you will see all the text labels available for customization in the Amplify | Power Slide Cart. These labels include headings, buttons, and messages that customers see while interacting with the cart.

#### Step 3. Save Your Changes

• Once you’ve made your desired changes, don’t forget to click the Publish button located in the top-right corner of the page. This will apply the changes to your store’s Amplify | Power Slide Cart.

<figure><img src="/files/6lWMxTsQ56JO3MsuXHwc" alt=""><figcaption></figcaption></figure>

## Common Questions About Text Customization in the Slide Cart

<details>

<summary>Can I customize all text labels in the Amplify | Power Slide Cart?</summary>

Yes, most text labels, including buttons, headings, and informational text, can be customized within the Design tab of the Amplify | Power Slide Cart settings.

</details>

<details>

<summary>Do I need to publish changes after customizing text?</summary>

Yes, after customizing any text elements, make sure to click the Publish button at the top-right corner to save and apply your changes.

</details>

## Conclusion

Customizing the text in the Amplify | Power Slide Cart allows you to align it with your brand’s tone and style, improving the customer experience. Follow these steps to easily adjust the text in your store’s Amplify | Power Slide Cart.

***

<table data-card-size="large" data-view="cards"><thead><tr><th></th><th></th><th data-hidden></th><th data-hidden data-card-target data-type="content-ref"></th></tr></thead><tbody><tr><td><mark style="color:purple;"><strong>Get Cart &#x26; Checkout</strong></mark></td><td>Try free</td><td><p>1. Customize Slideout Cart text</p><p>2. Edit Shopify cart text labels</p><p>3. Slideout Cart text customization</p><p>4. Amplify cart text settings</p><p>5. Change text in Shopify cart</p><p>6. Shopify cart design settings</p><p>7. Customize buttons in Slideout Cart</p><p>8. Shopify cart text editor</p><p>9. Edit Slideout Cart language</p><p>10. Amplify Slideout Cart text changes</p></td><td><a href="https://apps.shopify.com/slide-cart-drawer-pickystory">https://apps.shopify.com/slide-cart-drawer-pickystory</a></td></tr></tbody></table>


# How to Insert Custom HTML or Scripts into the Slide Cart

Learn how to enhance the functionality of your Slideout Cart by adding custom HTML elements or scripts. This feature allows you to display custom notices, buttons, or integrate third-party scripts.

## &#x20;Examples of Using the Custom HTML Feature

* Display a general notice about shipping terms or discounts.
* Load third-party scripts for analytics, tracking, or additional functionality.
* Enhance cart functionality with custom buttons or other HTML elements.

## Steps to Add Custom HTML or Scripts to the Slide Cart

#### Step 1. Navigate to Slide Cart Integrations

In the Amplify app, go to the Cart & Checkout section and select Cart. Then, click on the Integrations tab to access the Custom HTML feature.

<figure><img src="/files/ThxGuqhPtOCNf56O0IWR" alt=""><figcaption></figcaption></figure>

#### Step 2. Insert Custom HTML or Scripts

In the integrations section, you can insert any well-formed HTML elements, including text, buttons, notices, or even scripts and styles. This allows you to display custom content directly in the subtotal section of the Slide Cart.

<figure><img src="/files/u0Rnd3Zoil22eZjKD6Oh" alt=""><figcaption></figcaption></figure>

#### Step 3. Save Your Changes

Once you’ve inserted your HTML or scripts, click Save to apply the changes to your Slide Cart.

<figure><img src="/files/RAB6LD9JBNtPPOrz0Sq5" alt=""><figcaption></figcaption></figure>

## Common Questions About Adding Custom HTML to the Slide Cart

<details>

<summary>Can I load third-party scripts in the Slide Cart?</summary>

Yes, you can load third-party scripts in the Slide Cart using the Custom HTML feature in the Integrations section. This allows you to enhance functionality with additional tools like analytics or tracking scripts.

</details>

<details>

<summary>Where does the custom HTML content appear in the Slide Cart?</summary>

The custom HTML content will appear in the subtotal section of the Slide Cart, allowing you to communicate key information or add functionality near the checkout process.

</details>

## Conclusion

The Custom HTML feature in the Slide Cart allows you to personalize and extend the functionality of your cart by adding custom notices, buttons, or third-party scripts. Follow these steps to easily insert your custom HTML into the Slide Cart.

***

<table data-card-size="large" data-view="cards"><thead><tr><th></th><th></th><th data-hidden></th><th data-hidden data-card-target data-type="content-ref"></th></tr></thead><tbody><tr><td><mark style="color:purple;"><strong>Get Cart &#x26; Checkout</strong></mark></td><td>Try free</td><td><p>1. Insert custom HTML Slideout Cart</p><p>2. Add script Shopify Slideout Cart</p><p>3. Customize Shopify cart with HTML</p><p>4. Amplify Slideout Cart integrations</p><p>5. Add buttons to Shopify cart</p><p>6. Insert notices in Shopify cart</p><p>7. Shopify cart custom scripts</p><p>8. Add third-party scripts to cart</p><p>9. Slideout Cart HTML customization</p><p>10. Shopify custom cart enhancements</p></td><td><a href="https://apps.shopify.com/slide-cart-drawer-pickystory">https://apps.shopify.com/slide-cart-drawer-pickystory</a></td></tr></tbody></table>


# Spend X Get Y

Set a cart value goal and offer free shipping,  gift, and discount rewards


# How to create a Spend X Get Y scenario

Encourage customers to increase their cart value by offering rewards when they meet specific spending thresholds with the “Spend X Get Y” scenario.

## What is a “Spend X Get Y” Scenario?

A “Spend X Get Y” scenario is a promotional strategy that incentivizes customers to spend more by offering rewards once they reach a predefined spending goal. This scenario allows you to set different rewards based on the cart value, such as free shipping, complimentary gifts, or discounts, thereby encouraging higher purchases. You can also configure different rewards for different countries, tailoring offers to specific markets.

{% hint style="warning" %}
This feature is available when using **“Amplify | Power Slide Cart”**, so make sure the Cart is enabled before setting up this scenario.
{% endhint %}

## Steps to Create a Spend X Get Y Scenario

#### Step 1. Open the Scenarios

Navigate to the “Scenarios” section of the platform and click on "Edit" or "Create" under the Spend X Get Y Scenario to begin the setup.

<figure><img src="/files/7DBg1o6OwZOK1gRkrREI" alt=""><figcaption></figcaption></figure>

#### Step 2. Configure Your Rewards

Within the scenario editing interface, select “Country” to choose the specific countries where the Spend X Get Y rewards will apply. Click on the “+” icon to create different setups for various countries if needed.

<figure><img src="/files/I71WKSWYDtyZQ1e5rYNN" alt=""><figcaption></figcaption></figure>

#### Step 3. Add a New Tier

Click on the “New Tier” button to start adding a new tier to your Spend X Get Y setup. On the left side of the tier setup panel, specify the monetary amount customers need to spend to qualify for the reward.&#x20;

<figure><img src="/files/9XhYIe9qVjXeioU2HUux" alt=""><figcaption></figcaption></figure>

On the right side, select the specific reward that customers will receive upon reaching the spending threshold. Available options may include free shipping, a complimentary gift, or a discount on their order.

<figure><img src="/files/cJorsxEr050mWEbnTS4S" alt=""><figcaption></figcaption></figure>

For the “Free Shipping” option, select the specific shipping profile for the free shipping to apply, or use “**Amplify | Power Slide Cart**” global free shipping profile.

<figure><img src="/files/LKF6vAHScnOZeVlD5kA2" alt=""><figcaption></figcaption></figure>

## Customization

#### Step 4. Customize the Scenario

Navigate to the “Design” tab within the editing interface to access customization options. Modify labels associated with the reward, general instructions, and color settings for the progress bar to align with your brand or campaign aesthetics.
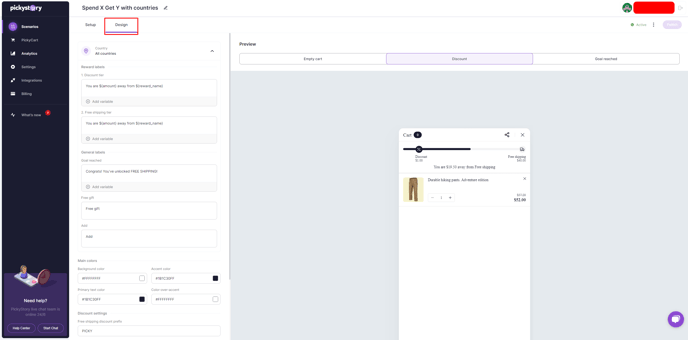
<figure><img src="/files/JVW2fposv3sCYXxGb1py" alt=""><figcaption></figcaption></figure>

#### Step 5. Publish scenario

Once all desired adjustments have been made, click on the “Publish” button to activate the updated scenario. Your Spend X Get Y scenario is now live, and customers can engage with it!

<figure><img src="/files/GAqYm1brQieLuAWZJ5Ql" alt=""><figcaption></figcaption></figure>

## Creating Multiple Tiers

To include multiple tiers within the Spend X Get Y scenario, repeat steps 2 and 3 for each additional tier you want to add. This allows you to create tiered incentive structures with varying spending thresholds and corresponding rewards, offering more complex promotions to drive higher cart values.

<figure><img src="/files/Hdshk3HpMwnZ1neMyDJA" alt=""><figcaption></figcaption></figure>

## Common Questions About Spend X Get Y

<details>

<summary>How do I set up a Spend X Get Y scenario in Shopify?</summary>

To set up a Spend X Get Y scenario in Shopify using Amplify, go to the Scenarios section in the Amplify app, click on Create, and choose Spend X Get Y. Configure the spending threshold and select the type of reward you want to offer, such as free shipping, a free gift, or a discount. Save and publish the scenario to activate it on your store.

</details>

<details>

<summary>Can I create different rewards for different countries?</summary>

Yes, you can create different rewards for different countries in a Spend X Get Y scenario. In the Amplify app, navigate to the Spend X Get Y scenario settings and use the Country option to specify different rewards based on the customer’s location.

</details>

<details>

<summary>What types of rewards can I offer in a Spend X Get Y scenario?</summary>

In a Spend X Get Y scenario, you can offer a variety of rewards including free shipping, a free gift, or an order discount. These rewards are applied when customers reach the specified spending threshold, encouraging them to add more to their cart to qualify.

</details>

<details>

<summary>How do I configure multiple spending thresholds and rewards?</summary>

To configure multiple spending thresholds and rewards, go to the Spend X Get Y scenario settings in the Amplify app and click Add New Tier. Set different spending amounts and assign corresponding rewards for each tier, allowing you to create a tiered incentive structure that motivates customers to increase their spending.

</details>

<details>

<summary>Is it possible to customize the display of rewards and progress bars?</summary>

Yes, you can customize the display of rewards and progress bars in the Spend X Get Y scenario. In the Amplify app, navigate to the Design tab within the scenario settings to modify the appearance, including colors, labels, and styles, ensuring they match your store’s branding and enhance the shopping experience.

</details>

## Conclusion

By setting up a “Spend X Get Y” scenario, you can effectively encourage higher cart values and enhance customer engagement through targeted promotions. Whether you offer free shipping, discounts, or gifts, this flexible promotional tool helps increase sales by rewarding customers as they spend more in your store.

***

<table data-card-size="large" data-view="cards"><thead><tr><th></th><th></th><th data-hidden data-type="content-ref"></th><th data-hidden></th><th data-hidden data-card-target data-type="content-ref"></th></tr></thead><tbody><tr><td><mark style="color:purple;"><strong>Get Cart &#x26; Checkout</strong></mark></td><td>Try free</td><td><a href="https://apps.shopify.com/product-kits-bundles-pickystory?surface_intra_position=1&#x26;surface_type=partners&#x26;surface_version=redesign">https://apps.shopify.com/product-kits-bundles-pickystory?surface_intra_position=1&#x26;surface_type=partners&#x26;surface_version=redesign</a></td><td><p>1. Spend X get Y</p><p>2. Amplify Spend X Get Y scenario</p><p>3. Shopify discount setup</p><p>4. Create tiered rewards</p><p>5. Slide Cart Drawer rewards</p><p>6. Conditional discount offers</p><p>7. Custom rewards by country</p><p>8. Free shipping incentive</p><p>9. Shopify tiered promotions</p><p>10. Configure spending thresholds</p></td><td><a href="https://apps.shopify.com/slide-cart-drawer-pickystory">https://apps.shopify.com/slide-cart-drawer-pickystory</a></td></tr></tbody></table>


# How to customize discount code prefix for Spend X Get Y

Learn how to customize discount code prefixes for Spend X, Get Y offers, enabling a more personalized and identifiable code structure for your promotions.

## Why customize the discount code prefix?

Customizing discount code prefixes helps you create unique, branded codes for specific promotions, making it easier to track campaigns, improve customer engagement, and enhance your brand’s recognition. It's particularly useful when managing multiple discount offers and ensuring each code is distinct and memorable.

### Steps to Customize Discount Code Prefix for Spend X, Get Y:

#### **1. Open Scenarios**

Navigate to the “Scenarios” section of the platform and click on "Edit" under the Spend X Get Y Scenario.

<figure><img src="/files/qRabo2mHMugMx13jjgeI" alt=""><figcaption></figcaption></figure>

#### **2. Go to Design Tab**

Click on the **Design Tab** to access customization options for your discount codes.

<figure><img src="/files/CekVN1zCSmbVwppJOeYU" alt=""><figcaption></figcaption></figure>

#### **3. Customize Prefix Codes**

Enter your desired prefix under discount settings, for each of the rewards "Free Shipping" "Free Gift" and "Order Discount" to personalize your codes.

<figure><img src="/files/FAw6oBK9qmYGslTvM04s" alt=""><figcaption></figcaption></figure>

#### **4. Publish the Changes**

Click **Publish** to apply the changes and activate your custom prefix for the discount codes.

<figure><img src="/files/I2apK3meNGbmxYeYcixi" alt=""><figcaption></figcaption></figure>

## Common Questions about customizing Discount Code prefix

<details>

<summary><strong>What is a discount code prefix?</strong></summary>

A discount code prefix is the initial part of a discount code, often used to label or identify specific promotions (e.g., “WINTER\_50OFF”).

</details>

<details>

<summary><strong>Can I change the prefix after the campaign is published?</strong></summary>

Yes, you can update the prefix at any time by going back to the Design Tab and republishing the changes.

</details>

<details>

<summary><strong>Can I use the same prefix for multiple campaigns?</strong></summary>

Yes, but using unique prefixes for each campaign helps differentiate and track performance more easily.

</details>

<details>

<summary><strong>Do I need to test the codes after customization?</strong></summary>

It’s always a good idea to test the discount codes before launching a campaign to ensure they work as expected.

</details>

<details>

<summary><strong>Will customizing the prefix affect existing discount codes?</strong></summary>

Changing the prefix will only affect new codes generated after the change. Existing codes will remain as they are.

</details>

## Conclusion

Customizing discount code prefixes for Spend X, Get Y offers is a powerful way to enhance your promotions. By following these simple steps, you can create more personalized and branded discount codes, making it easier to track campaigns, engage customers, and ensure a smooth shopping experience. Custom prefixes also help improve brand recognition and ensure that your offers stand out.

***

<table data-card-size="large" data-view="cards"><thead><tr><th></th><th></th><th data-hidden data-type="content-ref"></th><th data-hidden></th><th data-hidden data-card-target data-type="content-ref"></th></tr></thead><tbody><tr><td><mark style="color:purple;"><strong>Get Cart &#x26; Checkout</strong></mark></td><td>Try free</td><td><a href="https://apps.shopify.com/product-kits-bundles-pickystory?surface_intra_position=1&#x26;surface_type=partners&#x26;surface_version=redesign">https://apps.shopify.com/product-kits-bundles-pickystory?surface_intra_position=1&#x26;surface_type=partners&#x26;surface_version=redesign</a></td><td><p>1. <strong>Customize discount codes</strong></p><p>2. Spend X Get Y discount</p><p>3. Discount code prefix</p><p>4. Prefix code customization</p><p>5. Personalized discount codes</p><p>6. Discount code branding</p><p>7. Ecommerce discount strategies</p><p>8. Trackable discount codes</p><p>9. Custom prefix for promo codes</p><p>10. Campaign-specific discount codes</p></td><td><a href="https://apps.shopify.com/slide-cart-drawer-pickystory">https://apps.shopify.com/slide-cart-drawer-pickystory</a></td></tr></tbody></table>


# Post-Purchase Offer

Display personalized upsell offer based on the shopper's current order


# How to Create a Post-Purchase Scenario

Boost your store’s order value by offering a highly relevant product right after checkout with Amplify's Post-Purchase scenario.

## What is a Post-Purchase Scenario?

A “**Post-Purchase Scenario**” allows you to present customers with additional offers immediately after they complete their checkout. This strategy can help increase your average order value by encouraging customers to add another item to their purchase. The post-purchase offer is seamlessly integrated into the checkout process, providing a smooth and convenient shopping experience for customers.\ <br>

## Steps to Create a Post-Purchase Scenario:

#### Step 1. Set Amplify as Your Post-Purchase Page

In your Shopify admin, navigate to Settings -> Checkout. Under the post-purchase page options, select Amplify as your Post-purchase page to enable the feature.

<figure><img src="/files/FoH1SkpZNMKJlRaUPq3U" alt=""><figcaption></figcaption></figure>

#### Step 2. Create a Post-Purchase Scenario

Open the Amplify app and go to Scenarios. Click on Create under the Post-purchase scenario section to start setting up your offer.

<figure><img src="/files/NP9BhrNknbzAmqnTZteU" alt=""><figcaption></figcaption></figure>

#### Step 3. Choose Your Discount Type and Value

Select the type of discount you want to offer (e.g., percentage off, fixed amount off) and specify the discount value. This step allows you to decide the best incentive for encouraging additional purchases.

<figure><img src="/files/oFEtEgvOfLwu2RROyAb2" alt=""><figcaption></figcaption></figure>

#### Step 4. Configure the Post-Purchase Offer

Navigate to the Design tab to configure your post-purchase scenario. Here, you can enable or disable a timer and set the duration for how long the post-purchase offer will be available. Customize the call-to-action text to align with your brand messaging and make the offer more compelling.

<figure><img src="/files/oyKS7iutlTdcerImkfTn" alt=""><figcaption></figcaption></figure>

Choose the Call-to-action text.

<figure><img src="/files/haAWR82ieHIQ9jvbifTf" alt=""><figcaption></figcaption></figure>

#### Step 5. Publish the Scenario

Once you have configured the scenario and are satisfied with the settings, click Publish to make the post-purchase offer live in your store.

<figure><img src="/files/TmcXKm3z3ALOy4qWuNTz" alt=""><figcaption></figcaption></figure>

Your post-purchase offer is now active and ready to engage customers after they complete their checkout, helping you boost your order value!

<figure><img src="https://25037085.fs1.hubspotusercontent-eu1.net/hub/25037085/hubfs/post-purchase.png?width=688&#x26;height=442&#x26;name=post-purchase.png" alt=""><figcaption></figcaption></figure>

## Common Questions About Post-Purchase Scenarios

<details>

<summary>How do I set up a post-purchase offer in Shopify?</summary>

To set up a post-purchase offer, go to the Scenarios section in the Amplify app, select Create, choose Post-Purchase Scenario, and configure the offer. Then, save and publish it.

</details>

<details>

<summary>Can I customize the discount type and value for post-purchase offers?</summary>

Yes, you can customize both the discount type (percentage or fixed) and the value while setting up the post-purchase scenario.

</details>

<details>

<summary>How do I enable or disable the post-purchase timer?</summary>

Go to the Design tab in the post-purchase scenario settings and toggle the timer on or off, then set the desired duration.

</details>

<details>

<summary>Is it possible to change the call-to-action text for post-purchase scenarios?</summary>

Yes, you can modify the call-to-action text in the Design tab under the post-purchase scenario settings.

</details>

<details>

<summary>How do I make sure the post-purchase offer is live on my store?</summary>

Ensure the scenario is saved and published in the Amplify app, and verify by completing a test purchase to check if the offer appears after checkout.

</details>

## Conclusion

By setting up a post-purchase scenario, you can effectively increase your store’s order value by offering relevant products immediately after checkout. This feature allows you to provide a smooth and enticing shopping experience, encouraging customers to add more to their purchases and boosting your overall sales.

***

<table data-card-size="large" data-view="cards"><thead><tr><th></th><th></th><th data-hidden></th><th data-hidden data-card-target data-type="content-ref"></th></tr></thead><tbody><tr><td><mark style="color:purple;"><strong>Get Cart &#x26; Checkout</strong></mark></td><td>Try free</td><td><p>1. Post-purchase scenario</p><p>2. Shopify post-purchase offer</p><p>3. Post-purchase upsell</p><p>4. Set up post-purchase discount</p><p>5. Enable post-purchase page</p><p>6. Amplify post-purchase</p><p>7. Configure post-purchase settings</p><p>8. Post-checkout offer</p><p>9. Custom post-purchase call-to-action</p><p>10. Shopify post-purchase configuration</p></td><td><a href="https://apps.shopify.com/slide-cart-drawer-pickystory">https://apps.shopify.com/slide-cart-drawer-pickystory</a></td></tr></tbody></table>


# Checkout Upsell


# How to create a Checkout Upsell scenario

Enable a dynamic widget at checkout that shows matched offers based on the products in the cart - using rules to decide which products to display and when to display them.

## What is Checkout Upsell?

Checkout Upsell is a feature in the "Amplify | Power Slide Cart" app that allows you to display a widget on the checkout page showing targeted product recommendations. These product suggestions are triggered by a **rule engine**: when a customer has specific products in the cart, the rule engine matches them to a defined rule and then displays the relevant upsell products. This helps increase average order value (AOV), improve conversion rates, and make sure the customer sees complementary or relevant add‑ons at the moment of checkout.

{% hint style="warning" %}
**Due to Shopify’s checkout extension rules, this feature is only available to Shopify Plus users.**
{% endhint %}

## Steps to create a Checkout Upsell

1. **Go to Checkout Upsell**

From the Amplify app, navigate to “Cart & Checkout” > "Scenarios"  > "Checkout Upsell"

<figure><img src="/files/BOeTnLQwBME6w8AdKwZs" alt=""><figcaption></figcaption></figure>

2. **Create a rule**

Click on "New rule" to create the conditions from which the products shown at checkout will be selected&#x20;

<figure><img src="/files/jBLdMk5ziJbLmFtF8z3p" alt=""><figcaption></figcaption></figure>

3. **Conditions**

* Add a trigger condition for "When" a product is in the cart

<figure><img src="/files/4PTDM9OnGrQCV6eTaQbn" alt=""><figcaption></figcaption></figure>

* Add a result condition for "Then", which products will appear in the upsell

<figure><img src="/files/XTAZbcowkUKxRJX9KWdx" alt=""><figcaption></figcaption></figure>

* You can select conditions by specifying products, product titles, and product collections

<figure><img src="/files/uJiCJQD2TJtmE7mHGyQv" alt=""><figcaption></figcaption></figure>

4. **Discount**&#x20;

Click on "Settings" to configure the discount you want to offer for the Checkout Upsell

<figure><img src="/files/br9HrbpHxA1cc9oMEZ6D" alt=""><figcaption></figcaption></figure>

5. **Amount of products and widget title**

From the Design tab, configure the Title you want to show and the maximum number of products that will be featured

<figure><img src="/files/C4qe7gcs3mOtKTcQ22e2" alt=""><figcaption></figcaption></figure>

### How to add the Checkout Upsell to the Checkout page

1. **Add the widget to the checkout page**

Before you enable the Scenario, you need to add the widget to the checkout page.&#x20;

* From Shopify Admin, click on "Settings"

<figure><img src="/files/WpRF0jb9y6EXlmOuMXxC" alt=""><figcaption></figcaption></figure>

2. Click on "Checkout" and then "Customize" to be redirected to the theme editor for the Checkout page

<figure><img src="/files/KV3DIpdirw7m7Dzr1D04" alt=""><figcaption></figcaption></figure>

3. In the "Order summary" section, click on "Add block" and then select "Checkout Upsell"

<figure><img src="/files/atxfeiQHcs38u0INJ3t5" alt=""><figcaption></figcaption></figure>

4. Once the App block appears at the top of the "Order summary" section, drag and drop it to reposition it.

<figure><img src="/files/m5AicPeVKsm2ekezjcGN" alt=""><figcaption></figcaption></figure>

5. Once you are happy with the location of the widget, click on "Save" in the top right corner

<figure><img src="/files/fWaYD7TDJZ8PF055rwLT" alt=""><figcaption></figcaption></figure>

6. **Activate the Scenario**

Once the widget is added to the checkout page, go back to the application and Activate the Checkout Upsell Scenario

<figure><img src="/files/MY2geoeDMO9NMEZf2AMz" alt=""><figcaption></figcaption></figure>

:tada:Congratulations! Checkout Upsell is now visible in your store!

***

## Common Questions About Checkout Upsell

<details>

<summary>Can I show multiple upsell products under the same rule?</summary>

Yes - you can select more than one product to display when the rule triggers. You can also choose the number of shown products from the Design menu.

</details>

<details>

<summary>Can I offer a discounted price on the upsell product?</summary>

Yes - you can set a discount for the upsell product as part of the offer.

</details>

<details>

<summary>Will this work on mobile checkout?</summary>

Yes - the widget is designed to appear in the checkout flow under both desktop and mobile views.

</details>

***

## Conclusion

The Checkout Upsell feature in Amplify gives you a powerful way to boost revenue at one of the most critical moments of the shopping experience - right when the customer is about to complete their purchase. \
\
By leveraging a rule engine to match relevant offers and displaying them as a widget on the checkout page, you can suggest complementary products, increase average order value, and optimise your conversion flow. Follow the steps above to set it up, test it thoroughly, track performance, and iterate on your offers for continued growth.

***

<table data-card-size="large" data-view="cards"><thead><tr><th></th><th></th><th data-hidden></th><th data-hidden data-card-target data-type="content-ref"></th></tr></thead><tbody><tr><td><mark style="color:purple;"><strong>Get Cart &#x26; Checkout</strong></mark></td><td>Try free</td><td><p>1. Post-purchase scenario</p><p>2. Shopify post-purchase offer</p><p>3. Post-purchase upsell</p><p>4. Set up post-purchase discount</p><p>5. Enable post-purchase page</p><p>6. Amplify post-purchase</p><p>7. Configure post-purchase settings</p><p>8. Post-checkout offer</p><p>9. Custom post-purchase call-to-action</p><p>10. Shopify post-purchase configuration</p></td><td><a href="https://apps.shopify.com/slide-cart-drawer-pickystory">https://apps.shopify.com/slide-cart-drawer-pickystory</a></td></tr></tbody></table>


# Analytics


# Analytics: How to Track Performance in Your Store

Gain valuable insights into how Amplify is driving sales and impacting your store’s performance with our comprehensive analytics feature.

## Overview of Amplify Analytics

Amplify’s analytics tool allows you to track the number and percentage of sales attributed to Amplify in your store. By leveraging the Amplify API, the analytics feature provides detailed reports on how Amplify scenarios contribute to your overall revenue, helping you understand the effectiveness of your upselling and bundling strategies.

## How to Access Your Amplify Analytics

#### 1. Open Amplify and Navigate to the Analytics Tab

To view your store’s analytics, simply open the Amplify app and go to the “Analytics” tab. Here, you can access a range of reports and insights about your store’s performance.

## Key Metrics and Insights Available in Amplify Analytics

#### 1. Store Performance Overview

This section provides a snapshot of your total store revenue and highlights the portion contributed by Amplify. It helps you quickly assess the impact of Amplify's tools on your store’s overall sales and profitability.

<figure><img src="/files/1mKIggIUX4S9k6hCHCOW" alt=""><figcaption></figcaption></figure>

#### 2. Revenue by Scenario

Analyze the effectiveness of different Amplify scenarios with a detailed breakdown of revenue generated by each scenario. This report helps you identify which strategies are most successful in driving sales, allowing you to optimize your upselling and bundling tactics.

<figure><img src="/files/U6E6VngXM28P99tZF8Wo" alt=""><figcaption></figcaption></figure>

3\. Orders with Amplify

Get a clear view of all orders that include revenue attributed to Amplify. This section shows both the total order amount and the contribution from Amplify, giving you a direct measure of the impact on your sales.

<figure><img src="/files/hEqZSro20VKNqneE774z" alt=""><figcaption></figcaption></figure>

4\. Interactive Insights

Dive deeper into your analytics with interactive features. Click on any scenario in the “Revenue by Scenario” section to see a detailed performance breakdown. You can also explore individual orders to view complete order details and understand which items were influenced by Amplify, enabling a comprehensive analysis of your sales data.

<figure><img src="/files/KFokTnTy0c5KosTsc0w3" alt=""><figcaption></figcaption></figure>

5\. Date Range Selection

Customize your analysis by selecting a specific date range. This feature allows you to examine sales data from different periods, making it easy to track performance trends and measure the success of your Amplify strategies over time.

<figure><img src="/files/hSB8zdTQ3hKinGvyawjK" alt=""><figcaption></figcaption></figure>

## Conclusion

By utilizing Amplify's analytics, you can gain a clear understanding of how our tools are driving sales and contributing to your store’s success. These insights empower you to refine your strategies, optimize your product offerings, and ultimately boost your store’s revenue.

***

<table data-view="cards"><thead><tr><th></th><th></th><th data-hidden data-card-target data-type="content-ref"></th><th data-hidden data-type="content-ref"></th><th data-hidden></th></tr></thead><tbody><tr><td><mark style="color:purple;"><strong>Get Cart &#x26; Checkout</strong></mark></td><td>Try free</td><td><a href="https://apps.shopify.com/slide-cart-drawer-pickystory">https://apps.shopify.com/slide-cart-drawer-pickystory</a></td><td></td><td><p>1. Track Amplify performance</p><p>2. Amplify sales analytics</p><p>3. Analyze store revenue with Amplify</p><p>4. Amplify revenue tracking</p><p>5. Shopify Amplify analytics</p><p>6. Amplify API sales data</p><p>7. Monitor Amplify orders</p><p>8. Amplify scenario analysis</p><p>9. Amplify impact on sales</p><p>10. Evaluate Amplify contributions</p></td></tr></tbody></table>


# How to Calculate Conversion Rate for Amplify

Understanding your conversion rate is crucial for optimizing revenue generated through the Amplify app. By calculating the conversion rate from “Add to Cart” to “Purchase,” you can better assess the effectiveness of your Amplify deals and make data-driven decisions to enhance your store’s performance.

## Why Calculate the Conversion Rate?

Calculating the conversion rate helps you understand how well your Amplify scenarios are converting interest into actual sales. A higher conversion rate indicates that customers who engage with your Amplify offers are more likely to complete a purchase, which can inform adjustments to improve sales and customer satisfaction.

## How to Calculate the Conversion Rate for Amplify

To calculate the conversion rate for the Amplify app, use the following formula:

#### Conversion Rate Formula:

<figure><img src="/files/jEx7QTolT7fBihUBmq3M" alt=""><figcaption></figcaption></figure>

### Example Calculation

#### Assumptions:

* Total number of Add to Carts (from Amplify): 4,352
* Total number of Purchases (from Amplify): 537

#### Calculation:

<figure><img src="/files/1EOZt2pdA8oznQ7kyuCX" alt=""><figcaption></figcaption></figure>

This means that out of all the customers who added a Amplify product to their cart, approximately 12.34% completed a purchase. By monitoring this metric regularly, you can gain insights into how well your Amplify deals are performing and make necessary adjustments to optimize revenue.

## Tips for Improving Conversion Rate

* Analyze Low-Performing Scenarios: Identify which Amplify deals have lower conversion rates and adjust them by testing different products, discounts, or messaging.
* Optimize User Experience: Ensure that the add-to-cart and checkout processes are smooth and user-friendly to minimize drop-offs.
* Leverage Analytics: Use Amplify's analytics tools to track and analyze your conversion rates, providing a clearer picture of customer behavior and deal performance.

## Conclusion

Calculating and monitoring your conversion rate for Amplify deals is essential for optimizing revenue and enhancing the effectiveness of your sales strategies. Regular analysis allows you to make informed decisions that can lead to higher conversion rates and improved overall performance.

***

<table data-view="cards"><thead><tr><th></th><th></th><th data-hidden></th><th data-hidden data-type="content-ref"></th><th data-hidden data-card-target data-type="content-ref"></th></tr></thead><tbody><tr><td><mark style="color:purple;"><strong>Get Cart &#x26; Checkout</strong></mark></td><td>Try free</td><td><p>1. Calculate Amplify conversion rate</p><p>2. Conversion rate formula Shopify</p><p>3. Track Amplify sales performance</p><p>4. Optimize Amplify revenue</p><p>5. Add to cart to purchase rate</p><p>6. Amplify deal conversion</p><p>7. Improve Shopify conversion rate</p><p>8. Analyze Amplify performance</p><p>9. Amplify purchase rate</p><p>10. Monitor sales conversion Shopify</p></td><td></td><td><a href="https://apps.shopify.com/slide-cart-drawer-pickystory">https://apps.shopify.com/slide-cart-drawer-pickystory</a></td></tr></tbody></table>


# How to Calculate Return on Investment (ROI) for Amplify

Understanding the Return on Investment (ROI) is essential for evaluating the profitability of using the Amplify app in your store. By calculating ROI, you can measure how effectively Amplify contributes to your revenue and decide whether your current plan provides a good return.

## Why Calculate ROI?

Calculating ROI helps you determine the financial benefits of using Amplify relative to its costs. This metric allows you to assess whether the app’s impact on your sales justifies the subscription expense, providing insights that can guide your budgeting and strategic decisions.

### How to Calculate ROI for Amplify

To calculate the ROI for the Amplify app, use the following formula:

#### ROI Formula:

####

$$
\text{ROI} = \left( \frac{\text{Revenue Generated from Amplify}}{\text{Amplify App Cost}} \right)
$$

### Example Calculation (Monthly ROI)

#### Assumptions:

* Revenue generated from Amplify: $2,400 per month
* Amplify app cost: $7.99 per month

#### Calculation:

$$
\text{ROI} = \left( \frac{2400}{7.99} \right) \approx 300.52%
$$

This example indicates a very high ROI, showing that the revenue generated from Amplify far exceeds the cost of the app. A high ROI percentage suggests that Amplify is a valuable tool for driving sales and increasing profitability in your store.

## Tips for Maximizing ROI

* Evaluate Plan Options: Ensure you are on the right Amplify plan that aligns with your business needs and sales volume. Upgrading or downgrading based on performance can optimize costs and returns.
* Optimize Scenarios: Regularly analyze which Amplify scenarios are performing best and focus on those that generate the most revenue.
* Monitor Performance: Use Amplify's analytics to track revenue contributions from different deals and adjust your strategies accordingly.

## Conclusion

Calculating ROI for the Amplify app is crucial for understanding its financial impact on your store. By regularly evaluating your ROI, you can ensure that you are maximizing the benefits of Amplify and making informed decisions to enhance your store’s profitability.

***

<table data-card-size="large" data-view="cards"><thead><tr><th></th><th></th><th data-hidden></th><th data-hidden data-type="content-ref"></th><th data-hidden data-card-target data-type="content-ref"></th></tr></thead><tbody><tr><td><mark style="color:purple;"><strong>Get Cart &#x26; Checkout</strong></mark></td><td>Try free</td><td><p>1. Calculate Amplify ROI</p><p>2. Amplify return on investment</p><p>3. ROI formula Shopify app</p><p>4. Track Amplify profitability</p><p>5. Optimize ROI for Shopify apps</p><p>6. Amplify revenue calculation</p><p>7. Evaluate Shopify app ROI</p><p>8. Measure Amplify performance</p><p>9. Shopify app investment return</p><p>10. Analyze Amplify cost-effectiveness</p></td><td></td><td><a href="https://apps.shopify.com/slide-cart-drawer-pickystory">https://apps.shopify.com/slide-cart-drawer-pickystory</a></td></tr></tbody></table>


# How to Calculate the Average Number of Add-to-Carts Needed for a Sale in Amplify

Understanding how many times customers add products to their cart before making a purchase can provide valuable insights into customer behavior and help optimize your store’s performance. By calculating the average number of Add to Carts needed for a sale, you can better assess the effectiveness of your Amplify scenarios and make informed decisions to enhance conversion rates.

## Why Calculate the Average Number of Add-to-Carts Needed for a Sale?

Calculating this metric helps you understand customer purchasing behavior and how effectively your Amplify deals convert interest into sales. A lower average suggests that customers are quickly moving from adding items to their cart to completing a purchase, which indicates a smooth shopping experience and effective product bundling or upselling strategies.

## How to Calculate the Average Number of Add-to-Carts Needed for a Sale

To calculate the average number of Add to Carts needed for a sale in the Amplify app, use the following formula:

Formula:

$$
\text{Average Number of Add to Carts per Sale} = \frac{\text{Total Number of Add to Carts (Amplify only)}}{\text{Total Number of Purchases (Amplify only)}}
$$

### Example Calculation

#### Assumptions:

* Total number of Add to Carts (from Amplify): 4,352
* Total number of Purchases (from Amplify): 537

#### Calculation:

$$
\text{Average Number of Add to Carts per Sale} = \frac{4352}{537} \approx 8.1
$$

This calculation indicates that, on average, it takes about 8.1 Add to Carts from Amplify to generate one purchase. Monitoring this metric helps you gauge the effectiveness of your Amplify strategies and identify areas for improvement.

## Tips for Optimizing Add-to-Cart Conversions

* Analyze Scenario Performance: Identify which Amplify scenarios lead to higher Add to Cart rates but lower conversions, and make adjustments to improve performance.
* Streamline the Checkout Process: Ensure that the checkout process is easy and quick, minimizing drop-offs after customers add products to their cart.
* Enhance Product Descriptions and Images: Provide clear, compelling product descriptions and high-quality images to encourage customers to complete their purchases after adding items to their cart.

## Conclusion

Calculating the average number of Add to Carts needed for a sale in the Amplify app is essential for optimizing your store’s performance. By understanding this metric, you can make data-driven decisions to enhance your sales strategy, improve customer experience, and increase conversion rates.

***

<table data-card-size="large" data-view="cards"><thead><tr><th></th><th></th><th data-hidden></th><th data-hidden data-type="content-ref"></th><th data-hidden data-card-target data-type="content-ref"></th></tr></thead><tbody><tr><td><mark style="color:purple;"><strong>Get Cart &#x26; Checkout</strong></mark></td><td>Try free</td><td><p>1. Calculate add to cart average</p><p>2. Amplify add to cart analysis</p><p>3. Average carts per sale Shopify</p><p>4. Track add to cart conversions</p><p>5. Optimize Amplify sales rate</p><p>6. Shopify cart to purchase ratio</p><p>7. Analyze Amplify add to carts</p><p>8. Improve Shopify cart conversions</p><p>9. Amplify conversion optimization</p><p>10. Measure add to cart effectiveness</p></td><td></td><td><a href="https://apps.shopify.com/slide-cart-drawer-pickystory">https://apps.shopify.com/slide-cart-drawer-pickystory</a></td></tr></tbody></table>


# Settings


# Global Settings Guide

Amplify offers a comprehensive suite of settings to help you customize and optimize your Shopify store’s performance. This guide will walk you through the various settings available in the Global Settings section of the Amplify app, allowing you to tailor the appearance and functionality of your store according to your needs.

## Brand Assets

The Brand Assets section allows you to define your store’s visual style by setting colors and fonts. This customization ensures that all Amplify widgets match your brand’s aesthetics, creating a seamless shopping experience for your customers.

* Main Background & Font: Set the primary background color and font color for your widgets.
* Highlight Font & Background: Choose colors for highlighted text and backgrounds to draw attention to specific elements.
* Amplify Branding: Option to remove Amplify branding from all widgets to maintain a consistent look with your brand.

<figure><img src="/files/jaQjWLp62SSVhn5ZAsHH" alt=""><figcaption></figcaption></figure>

## Product Look

The Product Look section is where you can customize the appearance of product-related elements on your store.

* Font Size and Weight: Adjust the font size and weight for product names to ensure they are legible and align with your store’s design preferences.

<figure><img src="/files/iauQar1vWzp37IH4vxaY" alt=""><figcaption></figcaption></figure>

## Interface Elements

This section allows you to make detailed adjustments to the UI components of your store.

* Header & Subheader Style: Customize the font size and weight for headers and subheaders to ensure consistency with your brand’s style.
* CTA Button: Adjust the font size and weight for call-to-action buttons, making them more prominent and engaging.

<figure><img src="/files/wYceRBySJ6W9MPVcdDaT" alt=""><figcaption></figcaption></figure>

## Custom CSS

The Custom CSS section is for users who want to add custom styles to their store beyond the standard options. Here, you can input custom CSS code to further customize the look and feel of Amplify widgets and components.

* &#x20;Custom Styling: Add CSS rules to modify the appearance of various elements like buttons, fonts, and backgrounds to match your unique brand style

<figure><img src="/files/aruzcdODDcD9C9DdOMO5" alt=""><figcaption></figcaption></figure>

## Localization

The Localization settings allow you to customize translations and currency settings, ensuring your store is accessible and understandable to a global audience.

* Translation: Customize the text for common terms and actions (e.g., “Add to Cart,” “Out of Stock,” “Bundle & Save button text”) to match your store’s tone and language preferences.

<figure><img src="/files/MQMQigARKpLgjY1dyjfj" alt=""><figcaption></figcaption></figure>

## Cart and Checkout <a href="#cart-and-checkout" id="cart-and-checkout"></a>

The **Cart and Checkout** section lets you define the behavior and appearance of the cart and checkout processes.

* **Display Bundle Note on Child Products:** Enable this option to show a note for each child item in the checkout process, making it clear which bundle they belong to. This note also appears in order pages and invoices on Shopify.
* **Bundle Note Prefix:** Customize the prefix displayed before the bundle name to indicate it is part of a bundle (e.g., “Part of”).
* **Bundle Note Description:** Define how the bundle name and group ID will be displayed in checkout. You can use variables like `${bundle_name}` and `${purchased_bundle_id}` to dynamically include relevant details.
* **Cart Redirection:** Choose whether customers are redirected to the cart page or directly to checkout when they add a bundle to the cart. You can also disable redirection if you prefer a different flow (Like opening the cart drawer).
* **Discount Label:** Configure the discount code that will be applied to all products included in **Amplify scenarios**, making it clear to customers what deals they are receiving.

<figure><img src="/files/NOLGIFbeGOLkvQQDV81T" alt=""><figcaption></figcaption></figure>

## Sync Products

This button allows you to manually sync products between your Shopify store and the Amplify app, ensuring that all changes made in your Shopify store are reflected in Amplify.

* Last Synced Information: This shows the last time the products were synced, helping you keep track of your updates.

<figure><img src="/files/6ghlQgcgp8uDxllNZTyD" alt=""><figcaption></figcaption></figure>

## Conclusion

By utilizing the Global Settings in the Amplify app, you can create a cohesive and branded shopping experience that aligns with your store’s design and business goals. These settings offer flexibility and control, allowing you to fine-tune the appearance and functionality of your store to best meet your customers’ needs.

***

<table data-card-size="large" data-view="cards"><thead><tr><th></th><th></th><th data-hidden></th><th data-hidden data-type="content-ref"></th><th data-hidden data-card-target data-type="content-ref"></th></tr></thead><tbody><tr><td><mark style="color:purple;"><strong>Get Cart &#x26; Checkout</strong></mark></td><td>Try free</td><td><p>1. Amplify global settings</p><p>2. Customize Shopify store appearance</p><p>3. Shopify Amplify branding</p><p>4. Adjust product look Amplify</p><p>5. Amplify interface customization</p><p>6. Shopify custom CSS Amplify</p><p>7. Amplify localization settings</p><p>8. Sync products with Amplify</p><p>9. Amplify cart and checkout</p><p>10. Optimize Amplify settings </p><p>11. Powered by </p><p>12. Powered by Amplify</p><p> 13. Powered </p><p>14. Branding</p></td><td></td><td><a href="https://apps.shopify.com/slide-cart-drawer-pickystory">https://apps.shopify.com/slide-cart-drawer-pickystory</a></td></tr></tbody></table>


# Customizing Your Cart with Custom CSS

This guide will help you customize elements of your Shopify store by adding custom CSS within the **Amplify | Power Slide Cart** settings. Follow the steps below to apply your unique style.

## **Steps to Add Custom CSS**

#### Step 1. Go to settings

When in **Amplify | Power Slide Cart**, navigate to Settings and then click on Custom CSS.

<figure><img src="/files/7abQZKMMepUuKHPB16IZ" alt=""><figcaption></figcaption></figure>

#### Step 2. Add Your Custom CSS

Paste or write your CSS code in the Custom CSS box. (Screenshot with example)

<figure><img src="/files/bJWeSzUOHJFimRvcN2du" alt=""><figcaption></figcaption></figure>

#### Step 3. Publish Your Changes

Click on Publish on the top right, to Save your changes.

<figure><img src="/files/HZUvqpYEHOY6G2milsm0" alt=""><figcaption></figcaption></figure>

***

## Amplify class names for Widgets

#### Root component class for all classes

```css
.picky-widget
```

> Add global `picky-widget` class before each CSS rule, for example:

```css
/* Set red color for cart title */
.picky-widget .picky-cart__title { color: red; }
/* Set 1.5rem font-size for cart line-item */
.picky-widget .picky-cart-item__title { font-size: 1.5rem; }
```

***

#### Global components

Product title: `.picky-title`

Buttons: `.picky-button`

Error message: `.picky-error-message`

Powered by PickyStory: `.picky-powered-by`

Header: `.picky-header` `.picky-header__title` `.picky-header__discount` `.picky-header__description`

***

#### Product card

All product card components: `.picky-product-cart`

Price wrapper: `.picky-product-card__prices-wrapper`

Product image: `.picky-product-card__image`

Product title: `.picky-product-card__title`

Price wrapper: `.picky-product-card__prices-wrapper`

Final(**discounted**) product price: `.picky-product-card__price`

Original(**compare-at**) product price: `.picky-product-card__compare-at-price`

Quantity input: `.picky-quantity`

Quantity value: `.picky-quantity__counter`

Decrease quantity button: `.picky-quantity__decrease-button`

Increase quantity button: `.picky-quantity__increase-button`

ATC button: `.picky-product-card__button`

***

### Cart Specific Classes

#### Cart

Main widget component: `.picky-cart`

Content (*has background, borders, shadow*): `.picky-cart__content`

Scrolled wrapper of line items in the cart: `.picky-cart__scrolled-wrapper`

Header wrapper with title, counter, share and close buttons: `.picky-cart__header`

Title: `.picky-cart__title`

Counter: `.picky-cart__counter`

“Share” button: `.picky-cart__share-button`

“Close cart” button: `.picky-cart__close`

Footer wrapper with buttons, totals and discounts: `.picky-cart__footer`

“Enter discount code” button: `.picky-add-discount-field__button`

“Enter discount code” label: `.picky-add-discount-field__label`

“Add note” button: `.picky-add-note-field__button`

“Add note” label: `.picky-add-note-field__label`

Wrapper for all cart discounts in the footer: `.picky-discount__wrapper`

Discount item: `.picky-cart__discount`

Discount code: `.picky-discount__code`

Cart total wrapper: `.picky-totals__prices-wrapper`

Cart total title: `.picky-totals__title`

Cart total final(**discounted**) price: `.picky-totals__price`

Cart total original(**compare-at**) price: `.picky-totals__compare-at-price`

Checkout button: `.picky-cart__button`

***

#### Cart item

Main cart-item component: `.picky-cart-item`

Discount item: `.picky-cart-item__discount`

Discount code: `.picky-discount__code`

Remove item button: `.picky-cart-item__remove-button`

Item title: `.picky-cart-item__title`

Item selected variant title: `.picky-cart-item__selected-variant`

Cart item child title: `.picky-child-item__title`

Cart item child selected variant: `.picky-child-item__selected-variant`

***

#### SXGY

Main component: `.picky-sxgy`

Content wrapper: `.picky-sxgy__content`

Component title: `.picky-sxgy__title`

Progress bar: `.picky-progress-bar`

Colored line in progress bar: `.picky-progress-bar__line`

Goal item: `.picky-sxgy-item`

Icon for goal item: `.picky-sxgy-item__icon`

Label for goal item: `.picky-sxgy-item__label`

Price for goal item: `.picky-sxgy-item__price`

***

#### Select your “Free” gift

Main component: `.picky-free-gift-selector`

Content wrapper: `.picky-free-gift-selector__content`

Component title: `.picky-free-gift-selector__title`

***

#### Recommendations

Main component: `.picky-recommendations`

Content wrapper: `.picky-recommendations__content`

Recommendation title: `.picky-recommendations__title`

Recommendation product: `.picky-recommended-card`

ATC Recommendation button: `.picky-recommended-card__button`

***

## Common questions about Custom CSS

<details>

<summary><strong>What type of changes can I make using custom CSS?</strong></summary>

You can modify colors, fonts, sizes, margins, padding, and other styling elements.

</details>

<details>

<summary><strong>Can I revert to the default styling?</strong></summary>

Yes, removing your custom CSS will revert the styling back to its default.

</details>

<details>

<summary><strong>How do I preview the changes made by custom CSS?</strong></summary>

When you open the Custom CSS tab, a preview screen appears on the right side. After inserting CSS styles, you can see their effects in the preview.

To perform a more thorough check, we recommend publishing the changes and reviewing the display on the live storefront.

</details>

<details>

<summary><strong>What happens if I add incorrect CSS?</strong></summary>

Incorrect CSS might break some styles; however, removing or correcting the code should restore the original appearance.

</details>

<details>

<summary><strong>Is there a limit to how much CSS I can add?</strong></summary>

There’s generally no strict limit, but overly complex or large CSS files may slow down your store’s performance.

</details>

## **Conclusion**

Customizing the **Amplify | Power Slide Cart** with CSS allows you to refine how your cart looks and functions, making it a seamless part of your store's design. Whether you want to change colors, adjust layouts, or personalize the overall style, custom CSS gives you full control. Implementing these changes helps improve the user experience, making your cart a more engaging and branded part of your online store. For more complex design needs, our support team is ready to assist you in tailoring your cart drawer to perfection. [Click here for information on How to Contact Support.](/cart-and-checkout/how-to-contact-support)

***

<table data-card-size="large" data-view="cards"><thead><tr><th></th><th></th><th data-hidden data-card-target data-type="content-ref"></th><th data-hidden data-type="content-ref"></th><th data-hidden></th></tr></thead><tbody><tr><td><mark style="color:purple;"><strong>Get Cart &#x26; Checkout</strong></mark></td><td>Try free</td><td><a href="https://apps.shopify.com/slide-cart-drawer-pickystory">https://apps.shopify.com/slide-cart-drawer-pickystory</a></td><td><a href="https://apps.shopify.com/slide-cart-drawer-pickystory#modal-show=WriteReviewModal">https://apps.shopify.com/slide-cart-drawer-pickystory#modal-show=WriteReviewModal</a></td><td><p>1. Uninstall app</p><p>2. How to delete the app</p><p>3. App removal guide</p><p>4. Uninstall cart app</p><p>5. Delete tool </p><p>6. Uninstall instructions</p><p>7. Unsubscribe</p><p>8. Cancel Subscription </p><p>9. Deactivate app</p><p>10. Remove app   </p></td></tr></tbody></table>


# How to Share App Function Logs

## **Why Should You Share Logs with Support?**

When encountering issues with **Amplify | Power Slide Cart**, sharing logs helps us identify the root cause. Logs contain important data that can speed up troubleshooting.

### Sharing this Information Will Allow Us To:

* Pinpoint the source of errors.
* Assess performance problems.
* Offer faster and more accurate resolutions.

## Steps to Share Logs

#### **Step 1.** Go to Shopify Admin and open Settings:

<figure><img src="/files/QeoUKm6g8YtMKiz1KFVq" alt=""><figcaption></figcaption></figure>

#### **Step 2**. Go to "**Apps and sales channels"** and click on “Amplify | Power Slide Cart”.

<figure><img src="/files/cp1S1N7Gj3sAC9cQmUg1" alt=""><figcaption></figcaption></figure>

#### **Step 3**. Scroll down to "Share function logs" and click on "**Share Logs**".

<figure><img src="/files/WHxhpxTqcP6WFDJKGeT0" alt=""><figcaption></figcaption></figure>

#### **Step 4**. Click on "**Share Logs**" to share the application's activity from the last 24 hours.

<figure><img src="/files/65n7YbLZQuwUOLX8SAjW" alt=""><figcaption></figcaption></figure>

## Common Questions about Sharing App Function Logs

<details>

<summary><strong>Why should I share logs with support?</strong></summary>

Logs help diagnose issues, track performance, and resolve problems faster.

</details>

<details>

<summary><strong>Are my logs secure?</strong></summary>

Yes, logs are used strictly for troubleshooting and will not be shared outside our support team.

</details>

<details>

<summary><strong>Do I need to share logs every time there's an issue?</strong></summary>

Sharing logs is highly recommended for faster resolution, especially for complex issues.

</details>

## Conclusion

Sharing logs with our support team is a crucial step in resolving app-related issues quickly and effectively. By following the steps outlined in this article, you help us gather valuable information that accelerates troubleshooting and ensures a smooth resolution process. If you ever encounter difficulties accessing or sending logs, our team is here to assist you.

<table data-card-size="large" data-view="cards"><thead><tr><th></th><th></th><th data-hidden data-card-target data-type="content-ref"></th><th data-hidden data-type="content-ref"></th><th data-hidden></th></tr></thead><tbody><tr><td><mark style="color:purple;"><strong>Get Cart &#x26; Checkout</strong></mark></td><td>Try free</td><td><a href="https://apps.shopify.com/slide-cart-drawer-pickystory">https://apps.shopify.com/slide-cart-drawer-pickystory</a></td><td><a href="https://apps.shopify.com/slide-cart-drawer-pickystory#modal-show=WriteReviewModal">https://apps.shopify.com/slide-cart-drawer-pickystory#modal-show=WriteReviewModal</a></td><td><p>1. Error report</p><p>2. App logs</p><p>3. Shopify error logs</p><p>4. Support logs</p><p>5. Error details </p><p>6. System logs</p><p>7. Performance logs</p><p>8. Logs for support </p><p>9. Shopify logs</p><p>10. Send logs   </p></td></tr></tbody></table>


# How to Uninstall Amplify | Power Slide Cart

Uninstalling **Cart & Checkout** from your Shopify store is a simple process that can be done directly from the **Settings** section in your Shopify Admin. You just need to go to **Apps and Sales Channels** and uninstall the app from there.

***

## Steps to Uninstall Cart & Checkout from Shopify

#### 1. **Log in to Shopify Admin**:

Start by logging into your Shopify store via Shopify Admin.

#### 2. **Go to Settings**:

In your Shopify admin dashboard, click on **Settings** located at the bottom left.

<figure><img src="/files/QoHf4EbgHEsoXXC2P5B0" alt=""><figcaption></figcaption></figure>

#### 3. **Select Apps and Sales Channels**:

Inside the settings menu, click on **Apps and sales channels**. Here, you’ll find a list of all apps installed in your store.

<figure><img src="/files/yBb3XVWxbPun9ZJrSrIV" alt=""><figcaption></figcaption></figure>

#### 4. **Find** Amplify | Power Slide Cart:

Scroll through the list or use the search bar to locate the **Cart & Checkout** app.

<figure><img src="/files/IYQkO9cxMRRAXweNWJ2w" alt=""><figcaption></figcaption></figure>

#### 5. **Uninstall the App**:

Click the three dots (**⋮**) to the right of the app and select **Uninstall** from the drop-down menu. Confirm the action when prompted.

<figure><img src="/files/oIey2sg2XeptY383Ijqk" alt=""><figcaption></figcaption></figure>

***

## Common Questions About Cart & Checkout

<details>

<summary><strong>Will uninstalling Cart &#x26; Checkout remove my data?</strong></summary>

Yes, uninstalling the app may delete its associated data. Make sure to back up any critical data before proceeding.

</details>

<details>

<summary><strong>Can I reinstall Cart &#x26; Checkout later?</strong></summary>

Yes, you can always reinstall the **Cart & Checkout** app by visiting the Shopify App Store and adding it back to your store.

</details>

<details>

<summary><strong>Will uninstalling Cart &#x26; Checkout affect my checkout process?</strong></summary>

Uninstalling **Cart & Checkout** will not directly impact the main checkout flow of your Shopify store, but if you were using the **Post Purchase** upsell features, those will no longer be available.

</details>

<details>

<summary><strong>Can I pause the app instead of uninstalling it?</strong></summary>

Currently, there is no option to pause the **Cart & Checkout** app or its subscription. If you no longer need the app, the only option is to uninstall it. You can always reinstall the app later if needed.

</details>

<details>

<summary><strong>Do I need to inform the Cart &#x26; Checkout team before uninstalling?</strong></summary>

No, you don't need to notify the app developers before uninstalling. However, if you're facing specific issues with the app, reaching out to their support team before uninstalling might help resolve the problem.

</details>

***

## Conclusion

By following these steps, you can quickly uninstall the **Amplify | Power Slide Cart** app from your Shopify store. Once uninstalled, it's always good to test your checkout process to ensure everything works smoothly.

<table data-card-size="large" data-view="cards"><thead><tr><th></th><th></th><th data-hidden data-card-target data-type="content-ref"></th><th data-hidden data-type="content-ref"></th><th data-hidden></th></tr></thead><tbody><tr><td><mark style="color:purple;"><strong>Get Cart &#x26; Checkout</strong></mark></td><td>Try free</td><td><a href="https://apps.shopify.com/slide-cart-drawer-pickystory">https://apps.shopify.com/slide-cart-drawer-pickystory</a></td><td><a href="https://apps.shopify.com/slide-cart-drawer-pickystory#modal-show=WriteReviewModal">https://apps.shopify.com/slide-cart-drawer-pickystory#modal-show=WriteReviewModal</a></td><td><p>1. Uninstall app</p><p>2. How to delete the app</p><p>3. App removal guide</p><p>4. Uninstall cart app</p><p>5. Delete tool </p><p>6. Uninstall instructions</p><p>7. Unsubscribe</p><p>8. Cancel Subscription </p><p>9. Deactivate app</p><p>10. Remove app   </p></td></tr></tbody></table>


# Integrations


# How Does the Amplify | Power Slide Cart and ShipAid Integration Work?

Learn how to enable ShipAid in Amplify | Power Slide Cart and enhance your store’s shipping options with Amplify's seamless integration.

## What is the Amplify and ShipAid Integration?

The Amplify and ShipAid integration allows Shopify merchants to offer additional shipping protection options directly within the **"Amplify | Power Slide Cart"**. By integrating ShipAid, you can provide customers with added peace of mind for their orders, ensuring that they have the option to add shipping insurance during the checkout process.

## Steps to Enable ShipAid in Amplify | Power Slide Cart

Follow these steps to enable the ShipAid integration in **"Amplify | Power Slide Cart"**:

#### Step 1. Navigate to Cart

* Log in to your Amplify app. From the left-hand menu, select “Cart & Checkout” and then choose “Cart”.

#### Step 2. Enable ShipAid Integration

• Scroll to the bottom of the Cart settings page until you find the ShipAid integration option. Toggle the integration to enable it. This will activate the ShipAid feature within the cart.

#### Step 3. Confirm the Integration

• After enabling the integration, ShipAid will be available as an option in **“Cart & Checkout”**. You can verify the integration by navigating back to the **“Cart & Checkout”** settings and checking if the toggle remains active.

#### Step 4. Add ShipAid to Orders

• Once ShipAid is enabled, customers will see an option to add shipping insurance directly within the cart during checkout. They can click “Add” to include ShipAid protection on any order, providing additional security and reassurance.

## Common Questions About Amplify and ShipAid Integration

<details>

<summary>How do I enable ShipAid in <strong>“Amplify | Power Slide Cart”</strong>?</summary>

To enable ShipAid in the cart, go to the Cart & Checkout settings in the **“Amplify | Power Slide Cart”**, select Cart, and toggle the ShipAid integration at the bottom of the page. This will activate ShipAid for your store

</details>

<details>

<summary>Can I offer shipping protection through <strong>“Amplify | Power Slide Cart”</strong>?</summary>

Yes, with the **“Amplify | Power Slide Cart”** and ShipAid integration, you can offer shipping protection directly through the Cart. Customers can choose to add shipping insurance during checkout, providing extra security for their orders.

</details>

<details>

<summary>Is there a way to confirm if ShipAid is enabled in my store?</summary>

You can confirm if ShipAid is enabled by returning to the **“Cart & Checkout”** settings in the **“Amplify | Power Slide Cart”** and ensuring that the ShipAid toggle is active. Additionally, you should see the ShipAid option available in the Cart during checkout.

</details>

<details>

<summary>How can customers add ShipAid to their orders?</summary>

Once ShipAid is enabled, customers can add shipping insurance to their orders by selecting the “Add” option in the Cart during checkout. This feature allows them to easily include shipping protection for added peace of mind.

</details>

<details>

<summary>Does enabling ShipAid affect my checkout process?</summary>

Enabling ShipAid integrates additional shipping protection options into your checkout process without complicating it. It provides a seamless way for customers to add insurance to their orders directly from the Cart.

</details>

## Conclusion

The integration of ShipAid with **“Amplify | Power Slide Cart”** allows you to offer shipping protection options directly at checkout, enhancing the customer experience by providing added security for their purchases. Follow these simple steps to enable ShipAid and start offering this valuable service to your customers today.

***

<table data-card-size="large" data-view="cards"><thead><tr><th></th><th></th><th data-hidden></th><th data-hidden data-type="content-ref"></th><th data-hidden data-card-target data-type="content-ref"></th></tr></thead><tbody><tr><td><mark style="color:purple;"><strong>Get Cart &#x26; Checkout</strong></mark></td><td>Try free</td><td><p>1. Enable ShipAid in PickyCart</p><p>2. Amplify ShipAid integration</p><p>3. Add shipping protection Shopify</p><p>4. PickyCart shipping insurance</p><p>5. Shopify ShipAid setup</p><p>6. Shipping protection PickyCart</p><p>7. Activate ShipAid Shopify</p><p>8. Integrate ShipAid with PickyCart</p><p>9. Shopify cart shipping options</p><p>10. ShipAid insurance Shopify</p></td><td></td><td><a href="https://apps.shopify.com/slide-cart-drawer-pickystory">https://apps.shopify.com/slide-cart-drawer-pickystory</a></td></tr></tbody></table>


# Billing


# Understanding Cart & Checkout Pricing Plans

## Monthly Billing Based on Extra Revenue

Upon installing **Cart & Checkout**, you’ll receive a **30-day free trial**. This trial period allows you to fully explore and implement all the features that **Cart & Checkout** offers, helping you optimize your cart and checkout processes to generate more revenue—at no cost to you.

[If you continue using our app](#user-content-fn-1)[^1] after the free trial ends, you will be charged monthly based on the **extra revenue** generated by **Cart & Checkout** during the previous billing cycle. Extra revenue refers to the sales made through **Cart & Checkout app** features, such as enhanced cart flows, streamlined checkout options, and personalized product recommendations that lead to completed sales.

For example, if **Cart & Checkout** helps your store generate an additional $1,900 in extra revenue during the first month, your charge would be $49.5. This fee is directly proportional to the extra revenue your store earns using the app’s features in that 30-day period. Each month, this fee is updated based on the extra revenue made with Cart & Checkout during the current billing period.

## How Is Extra Revenue Calculated?

“Extra revenue generated through Cart & Checkout” refers to sales finalized through the use of **Cart & Checkout** features, including optimized cart and checkout processes or tailored product recommendations. Please note that canceled or refunded orders are not deducted from this revenue calculation, as the focus is solely on completed sales that contribute to your store’s overall success.

### Trial Period and Uninstallation Policy

We understand that the importance of finding the right fit for your business. That’s why we offer a **30-day free trial** to give you time to assess **Amplify | Power Slide Car's** impact. If you decide the app isn’t right for you, simply uninstall it from your Shopify Admin before the trial period ends to avoid any charges.

## Need Help or Have Questions?

If you have any questions or need assistance with setup, our dedicated support team is here, from **Monday - Friday, 2 AM - 6 PM EST** to help. Don’t hesitate to reach out for guidance or support at any time.

***

<table data-card-size="large" data-view="cards"><thead><tr><th></th><th></th><th data-hidden></th><th data-hidden data-type="content-ref"></th><th data-hidden data-card-target data-type="content-ref"></th></tr></thead><tbody><tr><td><mark style="color:purple;"><strong>Get Cart &#x26; Checkout</strong></mark></td><td>Try free</td><td><p>1. Amplify pricing plans</p><p>2. Shopify Amplify cost</p><p>3. Amplify free trial</p><p>4. Revenue-based pricing Shopify</p><p>5. Amplify subscription rates</p><p>6. Amplify billing structure</p><p>7. Amplify monthly fees</p><p>8. Shopify app pricing tiers</p><p>9. Amplify plan comparison</p><p>10. Optimize Shopify revenue with Amplify</p></td><td></td><td><a href="https://apps.shopify.com/slide-cart-drawer-pickystory">https://apps.shopify.com/slide-cart-drawer-pickystory</a></td></tr></tbody></table>

[^1]: If the app remains installed in your store


# Subscriptions

Create and manage recurring payments with flexible subscription plans, including customizable billing cycles and contract terms. Subscriptions integrate seamlessly with your store, providing easy management of subscription options, contract adjustments, billing, and a customer portal for subscribers.

<table data-view="cards"><thead><tr><th></th><th data-hidden data-type="content-ref"></th><th data-hidden data-card-target data-type="content-ref"></th><th data-hidden data-card-cover data-type="files"></th></tr></thead><tbody><tr><td>Product Subscriptions</td><td><a href="/pages/KPw5bhGguQCyUyM0nMXu">/pages/KPw5bhGguQCyUyM0nMXu</a></td><td><a href="/pages/KPw5bhGguQCyUyM0nMXu">/pages/KPw5bhGguQCyUyM0nMXu</a></td><td><a href="/files/3aqoPzgBr0qkKD4JbtF8">/files/3aqoPzgBr0qkKD4JbtF8</a></td></tr><tr><td>Bundle Subscriptions</td><td><a href="/pages/2VgocrCI93121n9K5KdP">/pages/2VgocrCI93121n9K5KdP</a></td><td><a href="/pages/2VgocrCI93121n9K5KdP">/pages/2VgocrCI93121n9K5KdP</a></td><td><a href="/files/6idcRqyeD3hqLpF74rXF">/files/6idcRqyeD3hqLpF74rXF</a></td></tr><tr><td>Build Your Own Bundle Page Subscriptions</td><td><a href="/pages/dqaX5V6HIwSc4tsUcROW">/pages/dqaX5V6HIwSc4tsUcROW</a></td><td><a href="/pages/dqaX5V6HIwSc4tsUcROW">/pages/dqaX5V6HIwSc4tsUcROW</a></td><td><a href="/files/geQ1QX0FC69FsQqA897o">/files/geQ1QX0FC69FsQqA897o</a></td></tr></tbody></table>

***

<table data-view="cards"><thead><tr><th></th><th data-hidden data-type="content-ref"></th><th data-hidden data-card-cover data-type="files"></th><th data-hidden data-card-target data-type="content-ref"></th></tr></thead><tbody><tr><td>Analytics</td><td><a href="/pages/DYCLRKkycvBhl6ltxZsj">/pages/DYCLRKkycvBhl6ltxZsj</a></td><td><a href="/files/NYo0kV2zRqMtZStkpQVp">/files/NYo0kV2zRqMtZStkpQVp</a></td><td><a href="/pages/DYCLRKkycvBhl6ltxZsj">/pages/DYCLRKkycvBhl6ltxZsj</a></td></tr><tr><td>Settings</td><td><a href="/pages/3yXastQIFGzc5IxvkNLk">/pages/3yXastQIFGzc5IxvkNLk</a></td><td><a href="/files/bvBiEuqE7SIBXseooh19">/files/bvBiEuqE7SIBXseooh19</a></td><td><a href="/pages/3yXastQIFGzc5IxvkNLk">/pages/3yXastQIFGzc5IxvkNLk</a></td></tr><tr><td>Integrations</td><td><a href="/pages/0RCYkP3bmcjJEroKlbSq">/pages/0RCYkP3bmcjJEroKlbSq</a></td><td><a href="/files/0q8sUnT6ep4DS81l7PxN">/files/0q8sUnT6ep4DS81l7PxN</a></td><td><a href="/pages/0RCYkP3bmcjJEroKlbSq">/pages/0RCYkP3bmcjJEroKlbSq</a></td></tr><tr><td>Billing</td><td><a href="/pages/fCJjoGWG5hOFpfQLZTuD">/pages/fCJjoGWG5hOFpfQLZTuD</a></td><td><a href="/files/gPeXwMJQlNvKBHxjNQgs">/files/gPeXwMJQlNvKBHxjNQgs</a></td><td><a href="/pages/fCJjoGWG5hOFpfQLZTuD">/pages/fCJjoGWG5hOFpfQLZTuD</a></td></tr></tbody></table>


# How to Contact Support

Whether you have questions, need assistance, or are looking for guidance, there are two easy ways to reach us. While both options ensure that your inquiries are addressed promptly, we recommend contacting us from inside the app for a more seamless and efficient experience.

### 1. Contacting Us from Inside the App (Recommended)

If you're logged into your store within the app, contacting us is quick and straightforward. Here’s how:

* Look for the chat icon at the bottom-right corner of your dashboard.
* Click on the chat icon to open a conversation with our support team.
* Send us a message! We’re available from **Monday - Friday, 2 AM - 6 PM EST**, to assist you.

Using the in-app chat allows us to identify your store and its configurations right away, ensuring we can provide tailored support faster.

<figure><img src="/files/i6EKvGuKDco4y3IJGSNX" alt=""><figcaption></figcaption></figure>

### 2. Contacting Us via Our Website

You can also reach out to us directly from our website, whether you're browsing the homepage, pricing page, or any other section. Here’s how:

* Visit our [website](https://heyamplify.com/).
* Look for the **chat widget** at the bottom-right corner of the screen.
* Open the widget, and a support chat will appear. Enter your message, and our team will respond promptly.

This method is perfect for general inquiries or if you haven’t logged into your store yet.

<figure><img src="/files/4EySgAdxtdKOqSMhnpu7" alt=""><figcaption></figcaption></figure>

### 3. Contacting Us via Email

If you prefer, you can reach us via email at [**hello@heyamplify.com**](mailto:hello@heyamplify.com). When sending us an email, please include your store's handle or URL. This helps us quickly identify your store and provide you with the most accurate support.

We aim to respond to all emails promptly, so feel free to reach out for any assistance or inquiries.

### Conclusion

No matter which method you choose, our team is ready to help! For the fastest and most personalized support, we recommend reaching out to us from inside the app. However, if you're exploring our website, our chat widget is always available to assist with your questions.

***

<table data-card-size="large" data-column-title-hidden data-view="cards" data-full-width="false"><thead><tr><th></th><th></th><th data-hidden></th><th data-hidden></th><th data-hidden data-card-target data-type="content-ref"></th><th data-hidden data-card-cover data-type="files"></th></tr></thead><tbody><tr><td><mark style="color:purple;"><strong>Get Subscriptions</strong></mark></td><td>Try free </td><td> </td><td><p>1. Customer Portal</p><p>2. Subscription Management</p><p>3. Update Payment Information</p><p>4. Manage Subscriptions</p><p>5. Subscription Settings</p><p>6. Self-Service Portal</p><p>7. Customize Portal Design</p><p>8. Customer Dashboard</p><p>9. Subscription Updates</p><p>10. Edit Subscription Preferences</p></td><td><a href="https://apps.shopify.com/subscriptions-pickystory">https://apps.shopify.com/subscriptions-pickystory</a></td><td></td></tr></tbody></table>


# Product Subscriptions

Create and manage product subscription plans to generate recurring revenue for your store


---

[Next Page](/llms-full.txt/1)